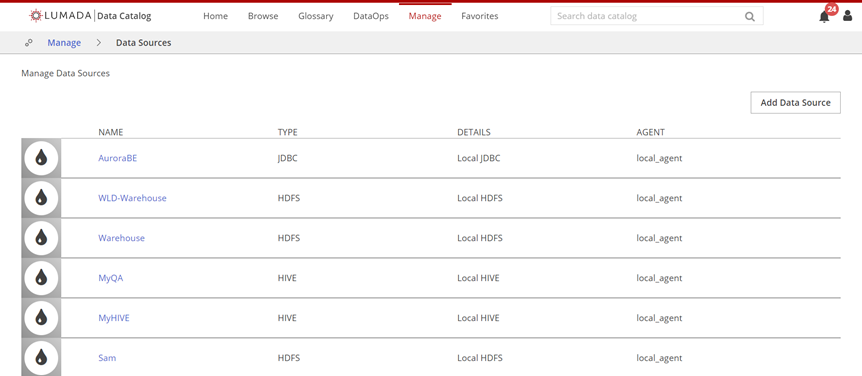
Manage data sources

Lumada Data Catalog can process data from file systems, Hive, and the following relational databases:
- Amazon Aurora
- MSSQL
- MySQL
- Oracle
- PostgreSQL
- Redshift
- SAP-HANA
- Snowflake
- SYBASE
- Teradata
To process data from these systems, Data Catalog stores the connection information to these data sources, including their access URLs and credentials for the service user, in a data source definition. For more information on the Data Catalog service user, see the Installation Guide.
In
addition to traditional data sources, you also can create registered data
sources to represent data assets that may or may not be fingerprinted by Data Catalog, but are required in
Data Catalog for lineage
derivation or discussions, such as a COBOL copybook. Registered data sources are non-processed
data sources that do not offer any discovered data information nor provide any visible data
samples. These are also referred to as offline sources and are indicated with the  icon.
icon.
Registered data sources have a flat structure with no child virtual folders. All resources are listed at the same hierarchical level. To browse the resources of a registered data source, you can add individual data resources to them using a POST request to the /v2/dataresource/generic endpoint. Refer to the POST /v2/dataresource/generic reference for more information.
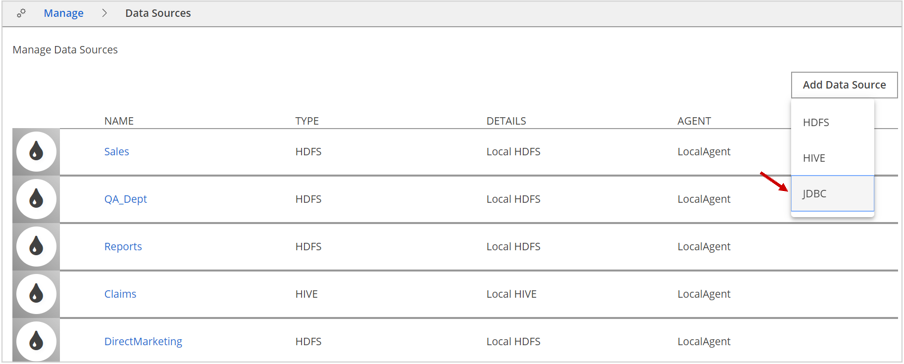
If your role has the Manage Data Source privilege, you can create data source definitions from the Data Catalog home page by clicking Manage, then clicking Data Sources and Add Data Source. On the Manage Data Sources page, you can create connections to the data sources you want to include in your catalog and test a data source connection. You can also complete tasks such as updating the settings for existing data sources, creating virtual folders, and updating existing virtual folders for data sources, and deleting a data source.
AWS S3 data sources
The following list describes access requirements for S3 access from supported file systems:
For S3 access from EMR file systems
- The EMR role must include
s3:GetObjectands3:ListBucketactions for the bucket. By default, the EMR_DefaultRole includes"s3:Get*"and"s3:List*"for all buckets. - The bucket must allow access for the EMR role principal to perform
at least
s3:GetObjectands3:ListBucketactions.
- The EMR role must include
For S3 access from non-EMR file systems
- Data Catalog uses the AWS command line interface to access S3 data. These commands send requests using access keys, which consist of an access key ID and a secret access key.
- You must specify the logical name for the cluster root. This value
is defined by
dfs.nameservicesin the hdfs-site.xml configuration file.
For S3 access from AWS S3 and MapR file systems
You must identify the root of the MapR file system with "maprfs:///". For more details, refer to Installing Lumada Data Catalog on MapR.
For S3 access from Kerberos
You must specify the connection URL, specify the keytab and principal created for the Data Catalog service user.
- The Kerberos user name in the Data Catalog configuration, the cluster proxy settings, and the KDC principal are all case-sensitive.
- Kerberos principal names are case-sensitive, but operating system names can be case-insensitive. A mismatch can cause problems that are difficult to diagnose.
Add an HDFS data source
Perform the following steps to add an HDFS data source:
Procedure
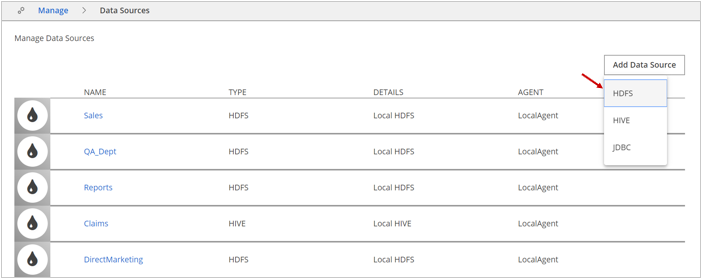
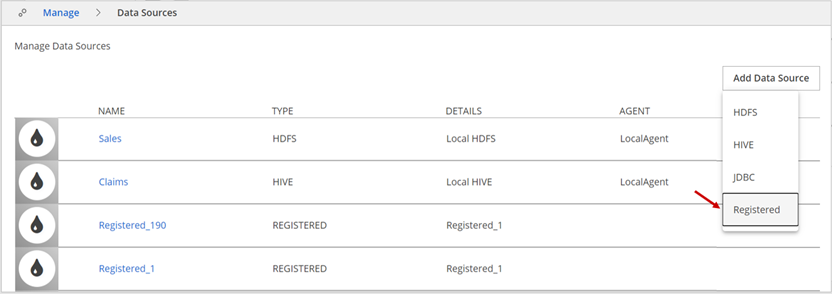
Navigate to Manage, then click Data Sources.
The Manage Data Sources page appears.Click Add Data Source, then click HDFS.
If you are adding an AWS S3 data source, see AWS S3 data sources for more information.
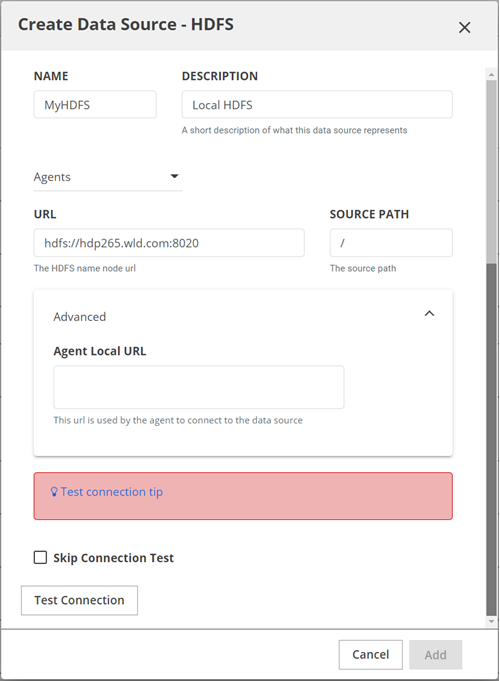
 The Create Data Source – HDFS dialog box opens.
Complete the following fields:
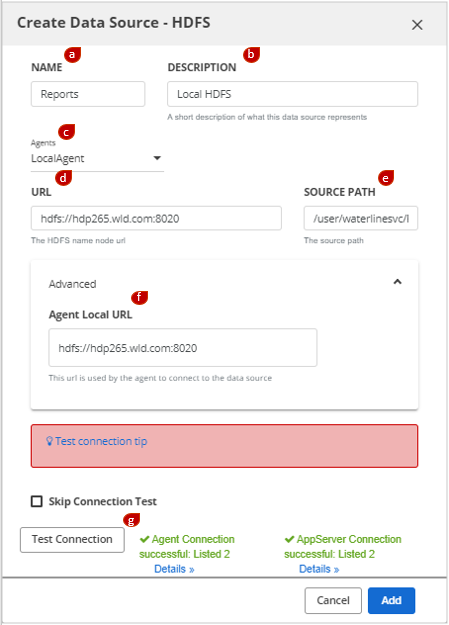
In the NAME field, enter the name of your data source.
This name is used in the Data Catalog interface and command line and should be something your Data Catalog users will recognize.NoteNames must start with a letter, and must contain only letters, digits, hyphens, or underscores. White spaces in names are not supported.(Optional) In the DESCRIPTION field, enter a description of the data source.
In the Agents field, select the Data Catalog Agent that will service this data source.
This Agent is responsible for triggering and managing profiling jobs in Data Catalog for this data source.In the URL field, enter the location of the HDFS root.
If the cluster is configured for high-availability (HA), this URL may be a variable name without a specific port number, for example,HDFS: hdfs://<name node>:8020. The <name node> address can be a variable name for high availability.Other examples include:
s3://<bucket-name>gs://<bucket-name>wasb://<container-name>adl://<data-lake-storage-path>maprfs:///
In the SOURCE PATH field, enter the HDFS directory that this data source includes.
It can be the root of HDFS, or it can be a specific high-level directory. Enter a directory based on your needs for access control. To indicate the root of the file system, use the slash "/".Expand the Advanced pane to display the Agent Local URL field. In the Agent Local URL field, specify the URL that the Data Catalog Agent will use to connect to the data source.
If the Data Catalog Agent is co-located within the same cluster as the Data Catalog Application Server, you may leave this field empty.Click Test Connection.
The database connection settings are verified. If the settings that you entered are correct, a success message appears.
Click Add.
The newly created HDFS data source appears in the data source list.
Next steps
Add a HIVE data source
Perform the following steps to add a HIVE data source:
Procedure
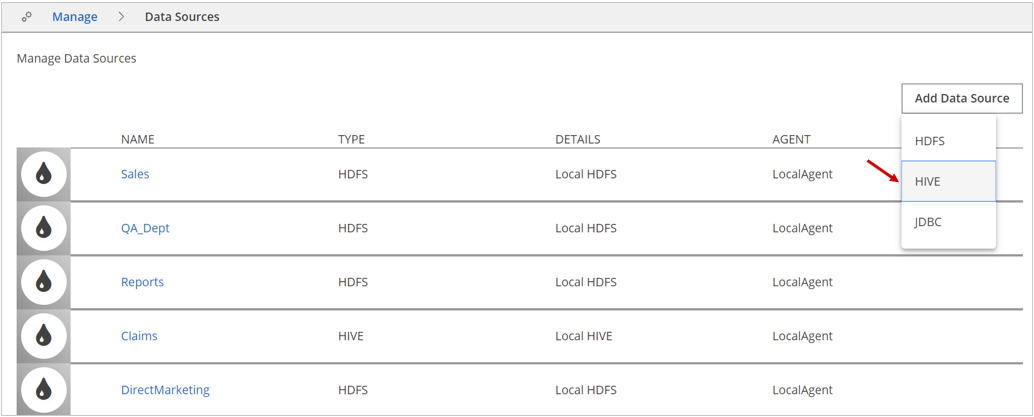
Navigate to Manage, then click Data Sources.
The Manage Data Sources page appears.Click Add Data Source, then click HIVE.
 The Create Data Source – HIVE dialog box opens.
Complete the following fields:
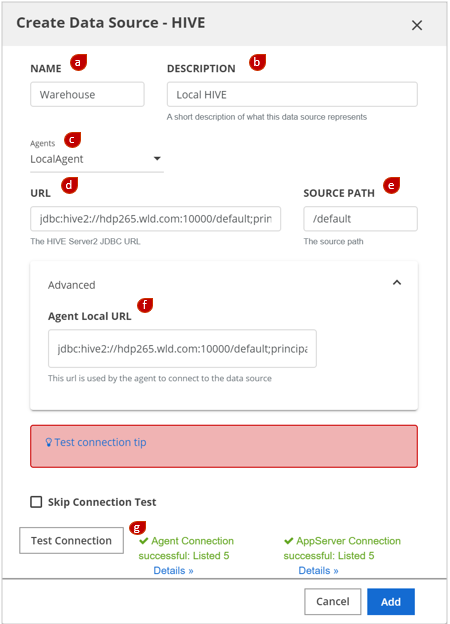
In the NAME field, enter the name of your data source.
This name is used in the Data Catalog interface and command line and should be something your Data Catalog users will recognize.NoteNames must start with a letter, and must contain only letters, digits, hyphens, or underscores. White spaces in names are not supported.(Optional) In the DESCRIPTION field, enter a description of the data source.
In the Agents field, select the Data Catalog Agent that will service this data source.
This Agent is responsible for triggering and managing profiling jobs in Data Catalog for this data source.In the URL field, enter the Hive URL.
The service user for Data Catalog uses this connection string to access HIVE:jdbc:hive2://:10000. This value can be a variable node or a list of nodes for high availability (HA).NoteIf the connection to HIVE is Kerberized, this URL must contain the Kerberos connection details:Hostname and port
Enter the HiveServer2 host. By default, the port is 10000.
Domain
Enter a domain corresponding to the realm configured for the cluster. Use a
domain_realmentry from the krb5.conf file on the HIVE host. This value is used to construct the principal parameter of the URL. Specify the keytab and principal created for the Data Catalog service user.
In the SOURCE PATH field, enter the HIVE directory that this data source includes.
It can be the HIVE root (indicated by a slash "/") or a specific database (indicated by a slash followed by the database name "/default").Expand the Advanced pane to display the Agent Local URL field. In the Agent Local URL field, specify the URL that is used by the Data Catalog Agent to connect to the data source.
If the Data Catalog Agent is co-located within the same cluster as the Data Catalog Application Server, you may leave this field empty.Click Test Connection.
The database connection settings are verified. If the settings that you entered are correct, a success message appears.
Click Add.
The newly created HIVE data source appears in the data source list.
Next steps
Add a JDBC data source
- Amazon Aurora
- MSSQL
- MySQL
- Oracle
- PostgreSQL
- RedShift
- SAP-HANA
- Snowflake
- SYBASE
- Teradata
Perform the following steps to add a JDBC data source:
Procedure
Navigate to Manage, then click Data Sources.
The Manage Data Sources page appears.Click Add Data Source, then select JDBC.
 The Create Data Source – JDBC dialog box opens.
 Complete the following fields:

In the NAME field, enter the name of your data source.
This name is used in the Data Catalog interface and command line and should be something your Data Catalog users will recognize.NoteNames must start with a letter, and must contain only letters, digits, hyphens, or underscores. White spaces in names are not supported.(Optional) In the DESCRIPTION field, enter a description of the data source.
In the Agents field, select the agent that will service this data source.
This agent is responsible for triggering and managing profiling jobs in Data Catalog for this data source.In the DATABASE TYPE field, select the database type.
If the relational database type is not listed in the drop-down list, select the Other option and enter the details, such as in the following examples using SAP-HANA and Sybase:
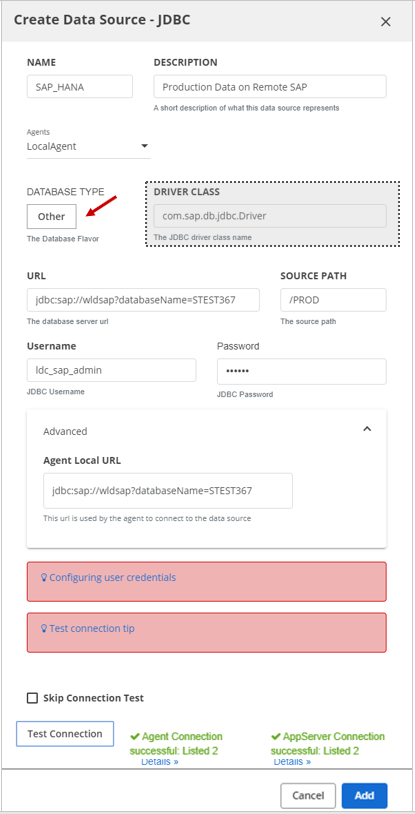
In this example, the user selected Other to add Sybase:
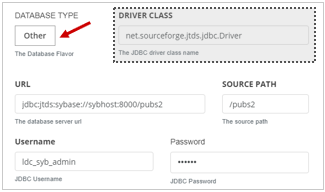 AttentionWhen you use the Other option to enter the database type, you must provide the DRIVER CLASS and import the corresponding JDBC JARs which may require restarting Data Catalog's web application server.
In the DRIVER CLASS field, enter the driver class for the database type.
To connect Data Catalog to a database, you need a driver class of the database. Data Catalog auto-fills the DRIVER CLASS field for the type of database selected from the drop-down list.In the URL field, enter the connection URL of the database.
For example, a MYSQL URL would look like
jdbc:mysql://localhost:<port_no>/<database_name>.In the SOURCE PATH field, enter the directory where this data source is included. It can be the root of JDBC or it can be a specific high-level directory. To include all databases, use "
/".In the Username field, enter the name of the default user in the database.
Note Make sure the specified user can access the data in the JDBC database. Data Catalog can only process the required data if the user has access to the data within the JDBC data source.In the Password field, enter the password for the default user in the database.
Expand the Advanced pane to display the Agent Local URL field. In the Agent Local URL field, specify the URL the agent uses to connect to the data source.
If the agent is co-located within the same cluster as the application server, you may leave this field empty.Click Test Connection.
The database connection settings are verified. If the settings that you entered are correct, a success message appears.NoteIf you encounter errors such as "ClassNotFoundException" or "NoClassDefFoundError", your JDBC driver is not available on the class path. See Installing JDBC drivers for details.
Click Add.
The newly created JDBC data source appears in the data source list.
Next steps
After a JDBC data source connection has been successfully created by a Data Catalog service user, any other user must provide their security credentials to connect to and access this JDBC database.
Add a registered data source
Perform the following steps to add a registered data source:
Procedure
Navigate to Manage, then click Data Sources.
The Manage Data Sources page appears.Click Add Data Source, then select Registered.
 The Create Data Source - Registered dialog box opens.
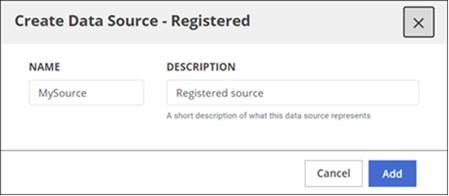
In the NAME field, enter the name of your data source.
This name is used in the Data Catalog interface and command line and should be something your Data Catalog users will recognize.NoteNames must start with a letter, and must contain only letters, digits, hyphens, or underscores. White spaces in names are not supported.(Optional) In the DESCRIPTION field, enter a description of the data source.
Click Add.
The newly created registered data source appears in the data source list.
Test a data source connection
Before you begin
Perform the following steps to test the connection:
Procedure
Click the user icon on the top right of the Data Catalog home page and then click Profile settings.
The User Profile page displays.On the Account tab, click Connect next to the name of the data source you want to test.
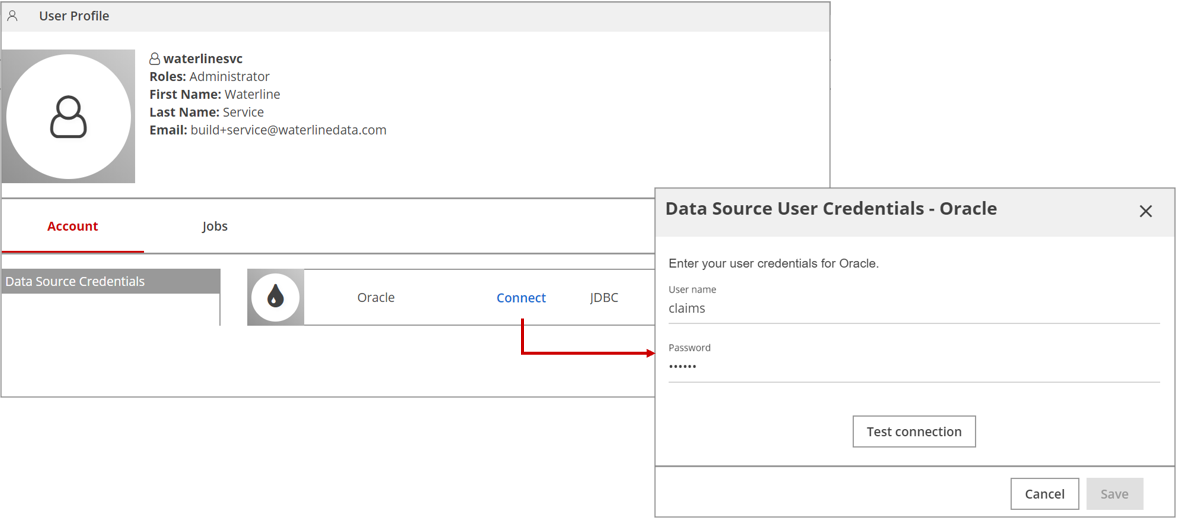 The Data Source User Credentials dialog
box opens.
The Data Source User Credentials dialog
box opens. Enter your credentials and click Test connection.
If the test succeeds, you see two test connection statuses: one for the Agent connection and the other for the App-Server connection.
Edit a data source
Perform the following steps to edit a data source:
Procedure
Navigate to Manage and click Data Sources.
Locate the data source that you want to edit and then click the name of the data source to open the Settings tab for the data source.
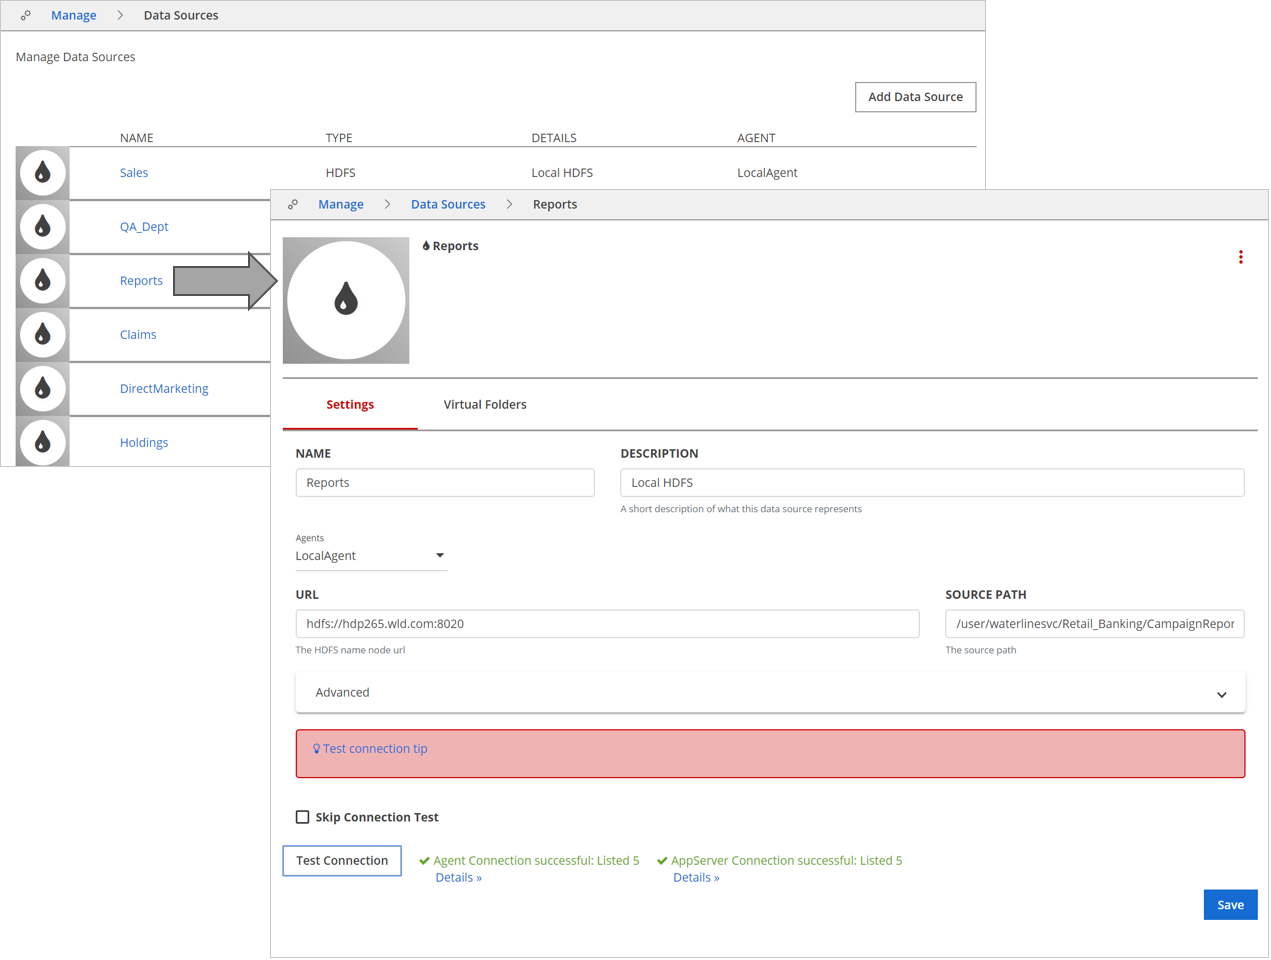
Edit the fields then click Save.
Results
- The source path scope can can only be expanded. Data Catalog does not permit narrowing the scope for an already connected data source.
- Two data sources cannot have overlapping source paths. Data Catalog performs a check for overlapping paths at the time of data source creation and does not proceed if overlapping paths are found.
Delete a data source
Perform the following steps to delete a data source:
Procedure
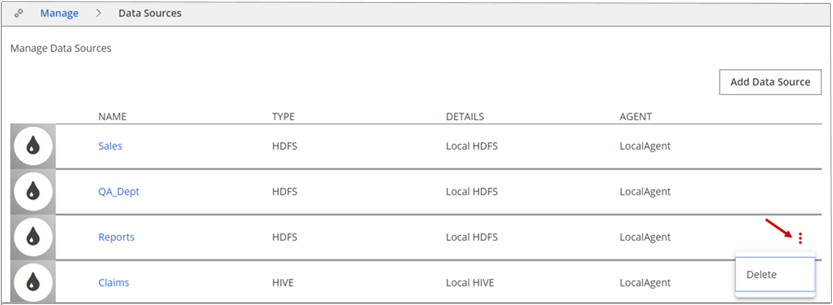
Click Manage and then click Data Sources.
The Manage Data Sources page appears.Do one of the following.
- Locate the data source you want to delete and click the More actions icon at the end of the row. On the drop-down menu, click Delete.
- Click the data source you want to delete. On the data source Settings tab, click the More actions icon, and then click Delete.
 The Delete Data Source dialog box lists the detected dependencies of the data source.
Review the dependencies and click either Delete or Cancel.
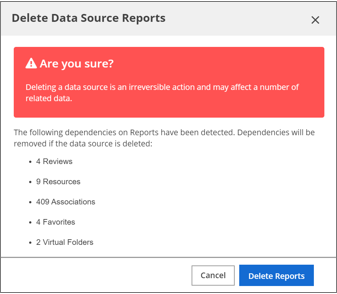
Results
- Virtual folder representations and children.
- Asset associations in job templates.
- Tag associations.
Allow time between deleting a data source and the actual deletion of all dependencies. This time is dependent on the data source size and the number of dependencies.
Connecting to a data source outside the cluster
If the Lumada Data Catalog Application Server is installed in a location outside the cluster, and the Data Catalog agent is located on the cluster, you need to modify the data source settings to add the URL of a data source that is relative to the agent, known as the agent-relative data source URL.
To add the URL, expand the Advanced pane in the Create Data Source dialog box and enter an agent-relative data source URL in the Agent Local URL field. You can also enter the agent-relative data source URL in the Advanced pane of the Settings tab when managing an existing data source.
For efficient network access, the agent might use a local network hostname/IP of the data source, while the application server connection might be routed through a different remote network. This configuration may also be used when the application server cannot connect to the data source directly, but the agent can. In such cases, you can select the Skip Connection Test check box to skip validating network connectivity.