Installing Lumada Data Catalog on MapR

Usethe following steps to install and configure Lumada Data Catalog in your MapR environment.
System requirements
Data Catalog supports the following configuration on MapR:
| Distribution | Components | Versions | Notes |
| MEP | MapR | 6.1.0 | |
| Apache Spark™ | 2.4.0 | ||
| MapR | Solr | 8.4.1 | Installed separately |
| Ecosystem | MapR-FS | 6.1.0.20180926230239.GA | |
| Pack | HIVE | 2.3.3 | |
| Postgres | 11.9 | Installed separately | |
| Atlas | NA |
For memory requirements, see Minimum node requirements.
Sizing estimates
If you plan to install Data Catalog and Solr on the same node, the node should have at least 64 GB RAM. Alternatively, configure Data Catalog and Solr on separate nodes in the same cluster.
Preparation
Before you begin installing Data Catalog, make sure you have read and followed the pre-installation validations for your environment, specifically:
Configure the authentication method for MapR
Procedure
For the Lumada Data Catalog service user, create a ticket with service impersonation propertiest that is valid for an extended duration, such as a year. Refer to the following code sample:
LDC Service User Home$ maprlogin  generateticket  -type servicewithimpersonation \
                                                    -user ldcuser \
                                                    -out ldcuser_ticket \
                                                    -duration 365:0:0
In this example, a ticket file with the name ldcuser_ticket is created, which is valid for 365 days.Write the MapR credentials of the ldcuser for the cluster
maprdemo.waterlinedata.comto the secure_ldcuser_ticket.LDC Service User Home$ ls secure_ldcuser_ticket
.Edit the .bash_profile file with any text editor to configure the MAPR_TICKETFILE_LOCATION environment variable to allow ticket generation, as in the following example:
LDC Service User Home$ vi ~/.bash_profile

# .bash_profile

# Get the aliases and functions
if [ -f ~/.bashrc ]; then
        . ~/.bashrc
fi

# User specific environment and startup programs

PATH=$PATH:$HOME/.local/bin:$HOME/bin
export MAPR_TICKETFILE_LOCATION=/home/ldcuser/secure_ldcuser_ticket

export PATH
Verify that Beeline is part of the classpath by running the Beeline command at the prompt, as follows:
LDC Service User Home
If you get an error that indicates the command is not found, then you must, as a root user, add Beeline to the classpath by creating a symlink or soft link using the following command:
LDC Service User Home$ ln -s /opt/mapr/hive/hive-2.3/bin/beeline /usr/bin/beeline
Edit the .bash_profile file with any text editor to define the path variables for
HIVE_HOMEandSPARK_HOMEas shown in the following example:LDC Service User Home$ vi ~/.bash_profile # .bash_profile # Get the aliases and functions if [ -f ~/.bashrc ]; then . ~/.bashrc fi # User specific environment and startup programs export HIVE_HOME=/opt/mapr/hive/<hive-version> export SPARK_HOME=/opt/mapr/spark/<spark-version> PATH=$PATH:$HOME/.local/bin:$HOME/bin:$HIVE_HOME/bin:$SPARK_HOME/bin export PATH
Download the Data Catalog packages
Download the Data Catalog distribution from the location provided by Data Catalog. If your organization has subscribed to support, you can find the location through the Data Catalog Support portal at Hitachi Vantara Lumada and Pentaho Support Portal.
Obtain access to the following three installers. Note that X indicates the specific version that you want to install.
- ldc-app-server-X.run
- ldc-metadata-server-X.run
- ldc-agent-X.run
To optimize your success, install the components in the following order:
- LDC Application Server
- LDC Metadata Server
- LDC Agent
Installing the Lumada Data Catalog packages
Before installing the Data Catalog packages, make sure you have configured the service user by following the steps in Configure the Data Catalog service user.
Also, verify that you have configured the authentication for MapR as described in Configure the authentication method for MapR.
Install the LDC Application Server
Procedure
Run the ldc-app-server as a root user using the --no-exec argument as in the following command:
$ ./ldc-app-server-6.0.0.run -- --no-exec
The following text displays in the Terminal window:Verifying archive integrity... 100% MD5 checksums are OK. All good. Uncompressing Lumada Data Catalog App Server Installer 100% This program installs Data Catalog Application Server. Press ^C at any time to quit. -------------------------------------------------------------------- LUMADA DATA CATALOG APPLICATION SERVER INSTALLER -------------------------------------------------------------------- 1. Express Install (Requires superuser access) 2. Upgrade 3. Exit Enter your choice [1-3]: 1 Enter the name of the Lumada Data service user [ldcuser]: Enter install location [/opt/ldc] : Enter log location [/var/log/ldc] : Enter the Solr server version [7.5.0]: Is Kerberos enabled? [y/N]: Do you want to link hdfs-site.xml, hive-site.xml, core-site.xml to Data Catalog installation? [y/N] : N -------------------------------------------------------------------- SELECTION SUMMARY -------------------------------------------------------------------- Data Catalog service user : ldcuser Install location : /opt/ldc Log location : /var/log/ldc Kerberos enabled : false Solr server version : 8.4.1 Link site xmls : false Proceed? [Y/n]: [sudo] password for ldcuser: Removed existing directory /opt/ldc/app-server Directory /opt/ldc exists. Created directory /opt/ldc/app-server Directory /var/log/ldc exists. Copying files ... done. Installed app-server to /opt/ldc/app-server Generating certificate ... Certificate fingerprint (SHA-256): 7fbcda6dceaec042cd1f7681a17ac6a99cc70d0cd5e363eb056075c628852893 Starting services ................ done.Enter 1 (Express Install) and choose all the default paths.
When prompted for Kerberos, enter N.
When prompted for linking hdfs-site.xml, hive-site.xml, core-site.xml to Lumada Data Catalog, enter N.
When prompted to Proceed, enter Y.
Edit the /opt/ldc/app-server/bin/app-server file to add -Dmapr.library.flatclass=/opt/mapr/lib to the WEBAPP_OPTS classpath, as in the following code example:
WEBAPP_OPTS="-Dwaterlinedata.webapp.war=${WATERLINEDATA_WEBAPP_WAR} \
    -Dwaterlinedata.webapp.extra.classpath=${EXTRA_CLASSPATH} \
    -Dwaterlinedata.webapp.override.descriptor=${JETTY_BASE}/etc/waterlinedata-override-descriptor.xml \
    -Dmapr.library.flatclass=/opt/mapr/lib \
    -Dwaterlinedata.plugins.dir=${PLUGINS_DIR} \
    -Dwaterlinedata.home=${WATERLINEDATA_INSTALL_DIR} \
    -Dwaterlinedata.shiro.global.timeout=1200000
    -Dwaterlinedata.setup.mode=${SETUP_MODE}"
Modify the script to disable loading of Jackson JARs by adding |jackson.* as indicated below in the
setupClasspathAndOptionsfunction definition.Search for the term
function setupClasspathAndOptions. In this function definition add|jackson.*to the value ofDEPENDENCIES_CP_SANITIZEDas in the following example:function setupClasspathAndOptions() { if [[ -n "${TRUST_STORE_FILE>" ]];then TRUST_STORE_ARGS="-Djavax.net.ssl.trustStore=${TRUST_STORE_FILE>" fi LOGGING_CP="${WATERLINEDATA_INSTALL_DIR}/lib/logging/*" LOGGING_CP_EXPANDED=$(cd ${BIN_DIR} && java -cp "${WATERLINEDATA_INSTALL_DIR}/lib/waterlinedata/waterlinedata-execution-cli-${WLD_VERSION}.jar:${LOGGING_CP}" Globber) LOGGING_CP_SANITIZED=$(echo "${LOGGING_CP_EXPANDED}" | tr ':' ',') EXTRA CLASSPATH= DEPENDENCIES_CP_COLLAPSED=${WATERLINEDATA_INSTALL_DIR}/lib/dependencies/* DEPENDENCIES_CP_EXPANDED=$(java -cp "${WATERLINEDATA_INSTALL_DIR}/lib/waterlinedata/waterlinedata-execution-cli-${WLD_VERSION}.jar:${DEPENDENCIES_CP_COLLAPSED}" Globber) DEPENDENCIES_CP_SANITIZED=$(echo "${DEPENDENCIES_CP_EXPANDED}" | tr ':' '\n' | grep -E -v 'jersey.*1.9|jackson.*|oauth2-oidc-sdk.*|nimbus-jose-jwt.*|log4j.*|deltaspike.*|weld.*|.\*\.jar' | tr '\n' ',' ) 2>&I > /dev/nullCreate a symlink to the /opt/mapr/lib/log4j-1.2.17.jar in the /opt/ldc/app-server/ext directory using the following command:
$ ln -s /opt/mapr/lib/log4j-1.2.17.jar /opt/ldc/app-server/ext
Edit the ldc-jaas file with the following steps:
Append MapR client login information into the
ldc-jaasfile by running the following command:Remove all Kerberos entries from the
ldc-jaasfile.Remove the Kerberos login credentials entry named
Clientfrom the ldc-jaas.conf file.Edit the Client entry to remove
.WDKrb5LoginModuleas in the following example:Client { com.waterlinedata.security.auth.module.WDKrb5LoginModule required useKeyTab = true useTicketCache = false debug = false keyTabName = "waterlinesvc.keytab" principal = "waterlinesvc@WATERLINEDATA.COM”;Change the principal value in the
MAPR_SERVER_KERBEROSdefinition to the name of your cluster. For example, principal="mapr/<your cluster name>";Change the principal value in the
MAPR_WEBSERVER_KERBEROSdefinition to your fully qualified domain name.
Start the LDC Application Server in setup mode. If security is enabled, you must create login credentials before you start the LDC Application Server in setup mode. MapR uses its own authentication system, which is similar to Kerberos.
$ sudo su - ldcuser
$ maprlogin password
$ cat /opt/mapr/conf/mapr.login.conf >> /opt/ldcdata/conf/ldcdata-jaas.confThe Hadoop and Hive JARs included in the Data Catalog package do not work for the MapR environment. You must link the corresponding JARs on MapR to the /opt/ldc/app-server/ext path as follows:
Make a copy of the /opt/ldc/app-server/ext folder:
<APP-SERVER-HOME>$ cd /opt/ldc/app-server && cp -r ext ext.orig
Replace the Hadoop JARs with those from the MapR environment as follows:
CautionExact versions of these files may differ from system to system. Be sure to use the correct version available in your system.<APP-SERVER-HOME>$ rm ext/hadoop/hadoop-auth-2.x.x.jar <APP-SERVER-HOME>$ cp <path on mapr>/hadoop-auth-2.7.0.jar ext/hadoop <APP-SERVER-HOME>$ rm ext/hadoop/hadoop-common-2.x.x.jar <APP-SERVER-HOME>$ cp <path on mapr>/hadoop-common-2.7.0.jar ext/hadoop <APP-SERVER-HOME>$ rm ext/hadoop/maprfs-6.1.0-mapr.jar <APP-SERVER-HOME>$ cp <path on mapr>/maprfs-6.1.0-mapr.jar ext/hadoop
Replace the Hive JARs with those from the MapR environment as follows:
CautionExact versions of these files may differ from system to system. Be sure to use the correct version available in your system.<APP-SERVER-HOME>$ cp /opt/mapr/hive/hive-2.3/lib/hive-common-2.3.3-mapr-1901.jar ext/hive <APP-SERVER-HOME>$ cp /opt/mapr/hive/hive-2.3/lib/hive-exec-2.3.3-mapr-1901.jar ext/hive <APP-SERVER-HOME>$ cp /opt/mapr/hive/hive-2.3/lib/hive-jdbc-2.3.3-mapr-1901.jar ext/hive <APP-SERVER-HOME>$ cp /opt/mapr/hive/hive-2.3/lib/hive-metastore-2.3.3-mapr-1901.jar ext/hive <APP-SERVER-HOME>$ cp /opt/mapr/hive/hive-2.3/lib/hive-service-2.3.3-mapr-1901.jar ext/hive <APP-SERVER-HOME>$ cp /opt/mapr/hive/hive-2.3/lib/libthrift-0.9.3.jar ext/hive
Copy or link the following Hive and Hadoop files to the Data Catalog install directory /opt/ldc/app-server/conf.
<APP-SERVER-HOME>$ ln -s /opt/mapr/hive/hive-2.3/conf.new/hive-site.xml conf/
<APP-SERVER-HOME>$ ln -s /opt/mapr/hadoop/hadoop-2.7.0/etc/hadoop/hdfs-site.xml conf/
<APP-SERVER-HOME>$ ln -s /opt/mapr/hadoop/hadoop-2.7.0/etc/hadoop/core-site.xml conf/
Copy the packaged hive-serde JAR from /opt/ldc/app-server/ext to the MapR auxlib directory as follows:
<APP-SERVER-HOME>$ cp ext/hive-serde-1.0.1.jar
        /opt/mapr/hive/hive-2.3/auxlib/
Make sure that the
SPARK_HOMEandHIVE_HOMEvalues are defined correctly in the~/.bash_profilescript of ldsuser and root user.Make sure that the Data Catalog user has the
spark-submitENV variable in order to run Data Catalog jobs.Make sure that the root user has the
BeelineENV variable in order to run installer.Add ldcuser user to the HiveServer2 node (if not already available).
The Data Catalog service user should be available on all the MapR nodes.
Restart the Web application in setup mode to load the environment-specific JARs, using the following command:
$ /opt/ldc/app-server/bin/app-server start –setupComplete the setup as follows:
Click Let's get started on the Setup screen. The setup wizard opens.
Review the license agreement and select the check box to acknowledge that you have read and agee to the terms. Click I agree to accept the licensing agreement.
Continue in the setup wizard, entering the required information at the prompts.
On the last step of the setup wizard, copy the Metadata Server installation command from the Metadata REST server details page for later reference, but do not execute it yet. Then click Next step.
You need this information when installing the Metadata Server. The LDC Application Server installation automatically creates a token for the LDC Metadata Server, which is used for initializing and registering the Metadata Server with the Application Server.
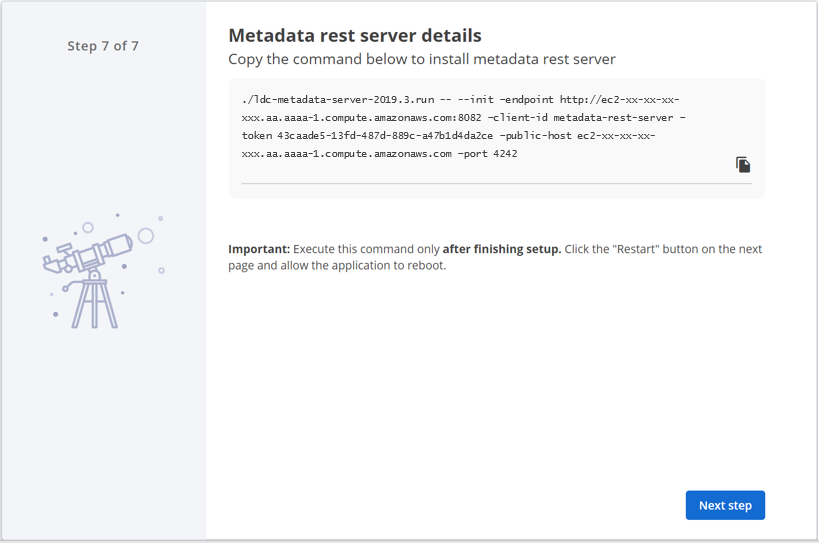 NoteThe same Metadata Server token, shown above, can also be obtained from the user interface after restarting the Application Server, and then by selecting Install Metadata Rest Server, under , and clicking Install Metadata Rest Server.The Restart page appears.
Click Restart to apply the changes.
The Welcome page appears.
Next steps
Install the LDC Metadata Server
Perform the following steps to install the LDC Metadata Server:
Procedure
Restart the Application Server.
Execute the following command on the node where you want to install the Metadata Server:
./ldc-metadata-server-6.0.0.run -- --init --endpoint ayro:8082 \
--client-id metadata-rest-server \
--token 4236cea0-93ad-416d-9b38-919392ac6059 \
--public-host ayro \
--port 4242
Refer to the following list for a description of each argument:
--init
Initialize: synchronize the repository configuration from the LDC Application Server.
--endpoint
The URL of the LDC Application Server you want to connect to.
--token
Authentication token.
--public-host
Public host of the LDC Metadata Server to be reported to the LDC Agent when it subsequently registers. "Public" does not necessarily mean the internet facing public hostname/IP. It only means the hostname/IP that is routable from all the LDC Agent. If all the LDC Agents are part of a private subnet, then enter the private hostname/IP of the LDC Metadata Server host.
--port
Port on which to run.
NoteOn some MapR environments, port 4242 may be used for Data Catalog. In this case, you must provide a different port (for example, 4244) in the metadata server installation command.The LDC Metadata Server installer is verified and extracted.
Next steps
Install LDC Agent
Procedure
In Lumada Data Catalog, navigate to .
The Agents page opens.Click Create Agent.
The Create Agent dialog box opens.In the Name field enter a name and the Description field enter a description for the Agent, then click Add.
The Register Agent dialog box opens.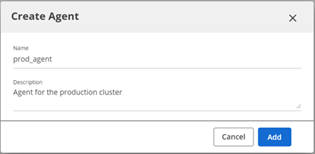
Run the copied command to install the LDC Agent as follows:
./ldc-agent-6.0.0.run -- --register --endpoint ayro:8082 --agent-id radf0e60f224ad436e --agent-token c6cd59db-6225-4698-9dd5-ac12f5d5e434
NoteAgent installation requires the Hive version in the distribution as an input, which dictates the install-time Hive specific configuration of the LDC Agent.
Building your Data Catalog
Now that Data Catalog is installed and running, the next step is to connect to the data you want to include in the catalog. For information on how to create a data source, see Managing Data Sources.
maprfs:///