Managing tag domains

Lumada Data Catalog provides a single location for creating, organizing, curating, and identifying the business labels to help you navigate your vast data lake so you can get the right data efficiently. You also can use tag domains as a tool with role-based access control to secure and separate valuable data and metadata and prevent such data from reaching unintended audiences.
Using the Glossary menu, you can open the glossary feature to manage or browse the tag glossary for your data lake.

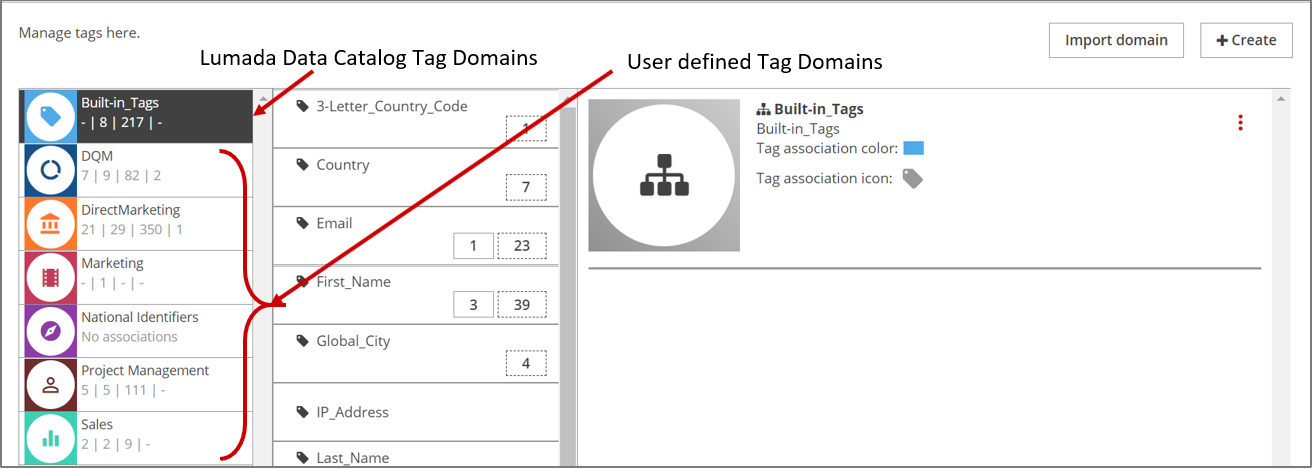
In Lumada Data Catalog, tags are organized into domains. When you select , you can view and create all tag domains for your organization in the Manage Glossary page.
The Built-in Tags domain is created by Lumada Data Catalog.
The Built-in Tags domain contains tags primarily intended as field tags to identify commonly recognized data set attributes like first names, United States phone numbers, credit card numbers, or SSNs.
Data Catalog users with the Administrator role can create new domains, while users with the Steward role can add tags to the catalog within the domains they have privileges for. Users with the Analyst role can make associations for existing tags within the domains assigned to them.
Use the following tables to view these privileges by role:
| Privilege | Permissions | Notes |
| Associate Roles with Tag Domains | Assign tag domains to roles. |
Requires the Manage Roles privilege. You can only assign the tag domains that are visible to the current Administrator role. |
| Privilege | Permissions | Notes |
| Manage Tag Domain | Create, read, update, delete tag domains | |
| Export Tag Domain | Export tag domains |
Requires the Manage Tag Domain privilege. |
| Import Tag Domain | Import tag domains |
Requires the Manage Tag Domain privilege. |
| Analyst | ||
| Privilege | Permissions | Notes |
| Associate Tags | Curate tags, accept, and reject tag associations |
Requires the View Tag Domain privilege to see the tags from assigned tag domains. You can only curate tags from assigned tag domains. |
| Manage Tags | Create, read, update, and delete tags |
Requires the View Tag Domain privilege. |
| Guest | ||
| View Tags | Makes tag APIs available for users |
Requires the View Tag Domain privilege to see the tags from assigned tag domains. You can only view tags from assigned tag domains. |
| View Tag Domains | View tag domains | |
Create a new tag domain
A tag domain is required for users to create tags. Even if you are not sure what your tag domains will be when you first install Data Catalog, you will want to create at least one temporary tag domain.
Follow the steps below to create a tag domain.
Procedure
Navigate to , and then click +Create.
Select A new tag domain.
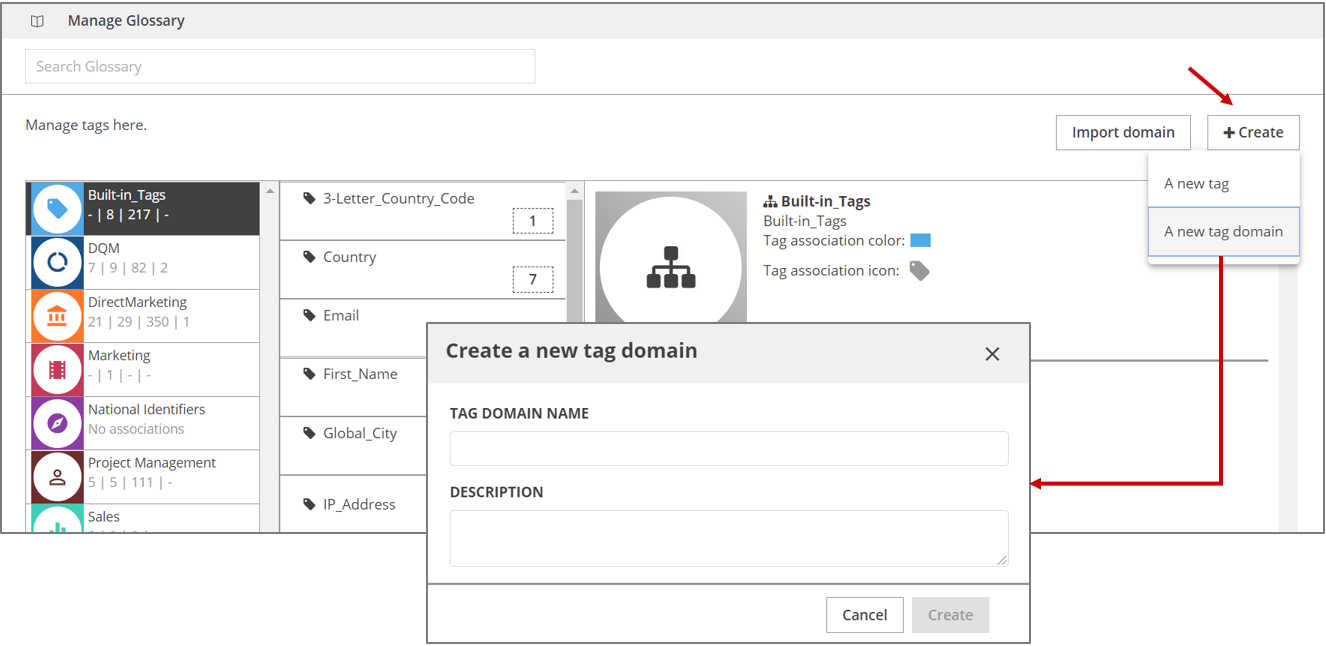 The Create a new tag domain dialog box
opens.
The Create a new tag domain dialog box
opens.In the TAG DOMAIN NAME field, enter a name for the tag domain.
NoteThe tag domain name can contain any ASCII character except the dot ('.'). The dot ('.') separator is used to establish tag hierarchy in Data Catalog.In the DESCRIPTION field, enter a description for the tag domain.
Click Create.
The tag domain is created and displays in the list of tag domains on the Manage Glossary page.
Next steps
Assign a tag domain color and icon
For example, if both the Finance domain and the Claims domain have a tag named "category," then these two tags each have an independent identity: the "Finance.category" and the "Claims.category". Therefore, if both of these tags are associated on one field, then the tag domain color and icon code makes each tag visually distinct from the other.
Follow the steps below to assign a color and icon to a tag domain:
Procedure
Navigate to .
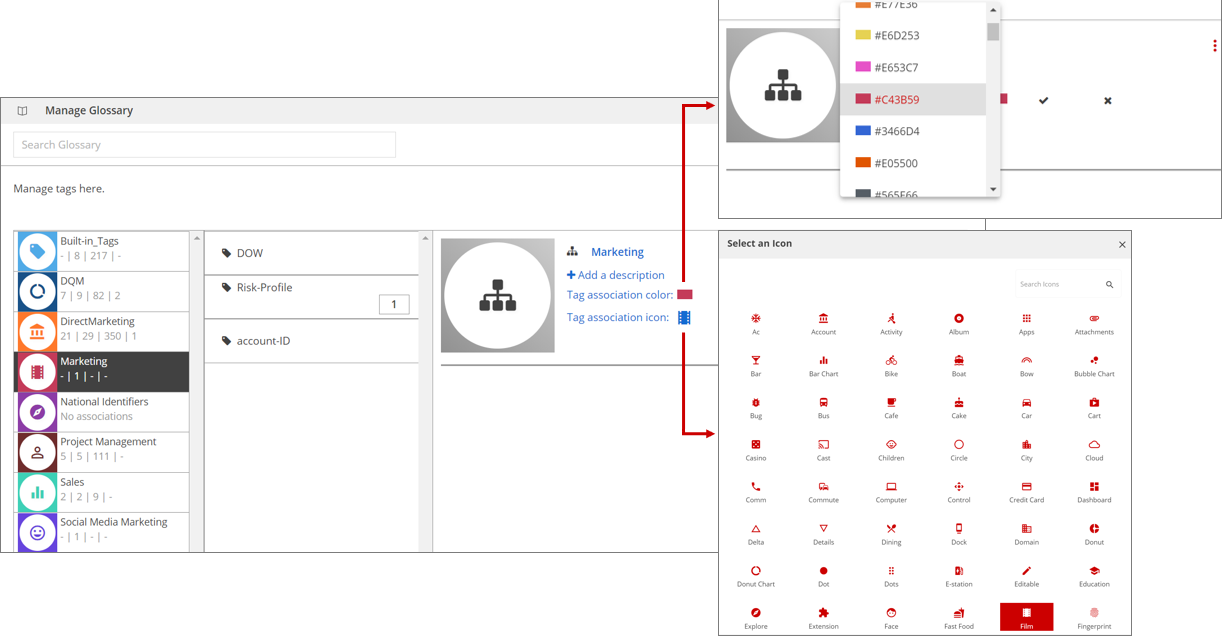
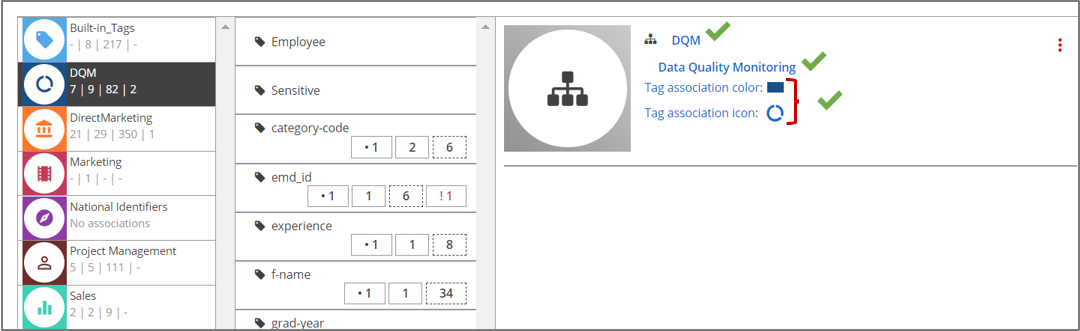
From the list of tag domains in the left panel, select the tag domain for which you want to assign the tag domain color and icon.
In the right panel, click Tag association color and select a color from the color palette, and then click the check mark icon to confirm your selection. Optionally, click the X icon to cancel your selection.
All the tags in this domain will now be identified with this color.Click Tag association icon and select an icon from the list. By default, the Tag icon is selected. You can scroll through the list or use the search box to locate an icon by keyword. Once selected, click the check mark icon to confirm your selection. Optionally, click the X icon to cancel your selection.
All the tags in this domain will now be identified with this icon.
Delete a tag
This task assumes you are on the Manage Glossary page.
Procedure
Select the tag to be deleted. To select multiple tags, press Ctrlclick.
From the details panel, click More actions and then select Delete from the menu that appears. If you selected multiple tags to delete, click More actions and then select Delete all selected from the menu that appears.
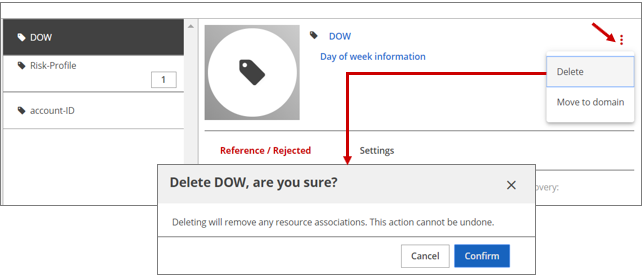 A dialog box displays, asking you to confirm the deletion.
Click Confirm.
Results
Create a new tag
Follow the steps below to create a new tag.
Procedure
Navigate to and click + Create.
Select A new tag.
The Create a new tag dialog box appears.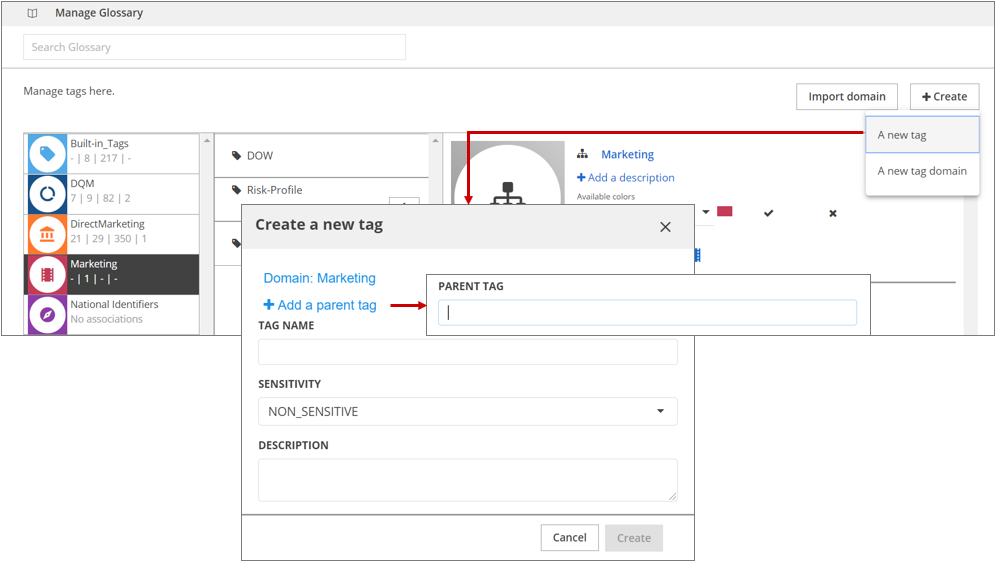
In the Tag Domain field, enter the tag domain under which this new tag will be grouped.
If you selected a tag domain from the list before creating a new tag, then the new tag's domain is automatically pre-selected to the highlighted domain.(Optional) Click +Add parent tag and add the parent tag details if the new tag is to be a child of an existing parent tag.
In the Name field, enter a name that uniquely identifies the new tag in Data Catalog.
NoteThe tag name can contain any ASCII character except the dot ('.'). The dot ('.') separator is used to establish tag hierarchy in Data Catalog.Tag lineage and parentage can also be established using dot notation when naming a tag. If the parent tag in the dot notation does not exist, this parent tag will also be created. For example, if you create a tag name as TagA.TagB.TagC, all three tags (TagA, TagB, TagC) will be created with parentage established as "TagA is the parent of TagB which is the parent of Tag C."
In the Sensitivity field, set a sensitivity level on a tag to identify the sensitivity level of the type data that will be labeled with this tag.
Stewards can choose from four levels of sensitivity:High Typically used for the most sensitive data like PAN, SSN, Account numbers, and FirstName-LastName combination. Medium Generally reserved for data with medium sensitivity like First_Name only, Last_Name only, address, and policy number. Low Data that is not necessarily personally identifiable or that does not generally pose a security risk. Non-Sensitive The default sensitivity setting for a tag. If not specifically changed, the new tag is marked as non-sensitive. Generic non-sensitive data falls into this category. NoteWhen such a tag is associated or suggested on a resource as a resource tag or a field tag, it will indirectly dictate the sensitivity of the resource. The resource sensitivity is automatically set to the highest sensitivity tag associated or suggested on that resource.(Optional) In the Description field, enter a short description detailing the tag's usage and the type of data it will label.
Click Create.
Results
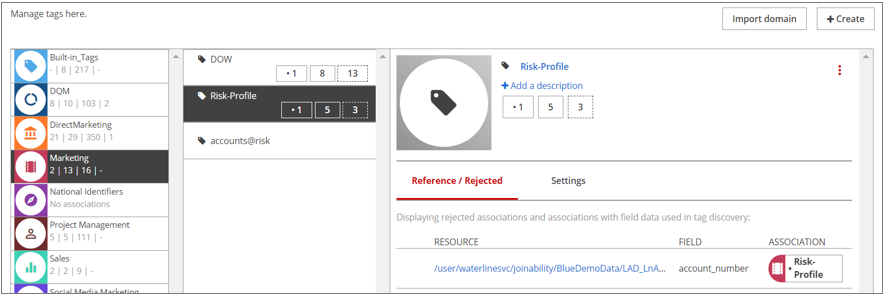
Create a reference tag
Any tag can be a reference tag.
- When reference tags are defined for business entity members, after successful tag discovery only the associations for the business entity member (referred) tag are suggested for fields. The original reference tag suggestions are removed for these fields.
- When reference tags are defined for tags that do not belong to a business entity), both tag associations (one for the referring tag and one for the original reference tag) are shown.
Perform the following steps to create a reference tag:
Procedure
Navigate to .
Select the tag you want to point to a reference tag.
NoteThe selected tag is considered the referring tag.Click the Settings tab. In the REFERENCE TAG field, start typing the name of the tag to create as a reference tag and select the best match from the list that displays.
Reference tag suggestions that appear in the field depend on the tag domains accessible to your user role.
Click Save.
Edit a tag domain
Follow the steps below to edit a tag domain.
Procedure
Navigate to and click the name of the tag domain you want to edit.
In the details panel, click the hyperlinks for the name, description, tag association color, and tag association icon to update each feature.
For each feature, click the check mark icon to accept the change or the X icon to reject the change.
Delete a tag domain
Follow the steps below to delete a tag domain.
Procedure
Navigate to and click the name of the tag domain you want to delete.
From the details panel, click More actions and then select Delete from the menu that appears.
(Optional) If this tag domain has any tags associated with it, then you are prompted to delete or move these tags before deleting the tag domain. Click OK and proceed to delete or remove any existing tag dependencies.

In the confirmation box that appears, click Confirm to delete the selected tag domain.
Results
Move bulk tags within tag domains
Follow the steps below to move tags from one domain to another.
Procedure
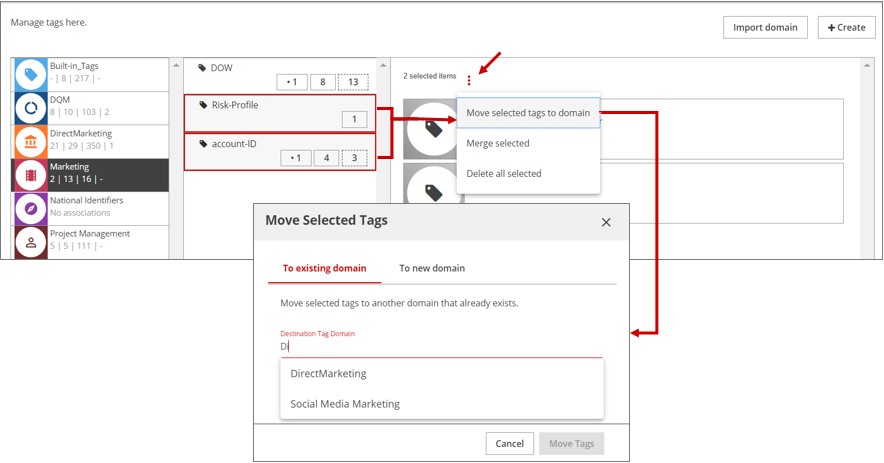
Navigate to and select the tag in the domain that you want to move.
To select multiple tags, use the Ctrlclick on tags that you want to move to another domain.Click the More actions icon and select Move selected tags to domain from the menu that appears.
In the Move Selected Tags dialog box, enter an existing domain name in the Destination Tag Domain field. Optionally, select the To new domain tab to enter the relevant details.
Click Move Tags.
Results
Merge tags
Follow the steps below to merge two tags.
Procedure
Navigate to .
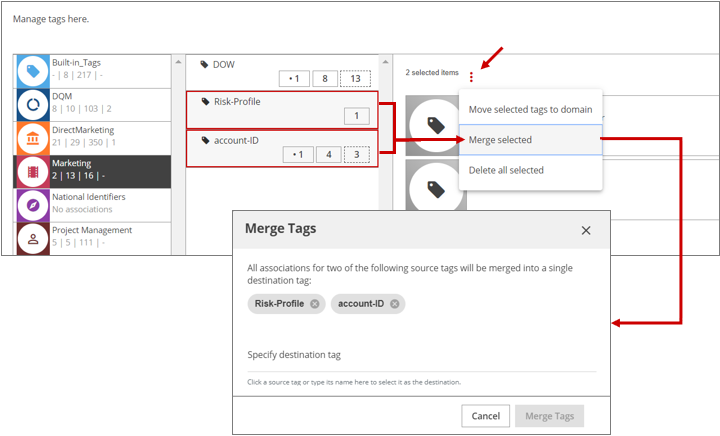
Select the two tags in the domain that are to be merged.
To select multiple tags, use Ctrlclick.NoteOnly child tags within same domain can be merged.Click the More actions icon and then select Merge selected from the menu that appears.
In the Merge Tags dialog box, specify the destination tag from the existing selected two options.
Results
| If... | Then... | |
| Both tags were accepted for the same field/resource, | The resultant accepted count for target tag is considered as 1. | |
| Both tags were accepted for different field/resource, | The resultant accepted count for target tag is summation of the two counts. | |
| Both tags were suggested for the same field, | The resultant suggested count for target tag is considered as 1. | |
| Both tags were suggested for different fields, | The resultant suggested count for target tag is summation of the two counts. | |
| Both tags were rejected for the same field, | The resultant rejected count for target tag is considered as 1. | |
| Both tags were rejected for different fields, | The resultant rejected count for target tag is summation of the two counts. | |
| Both tags have different sensitivity, | The sensitivity of the target tag prevails. | |
| A value tag is merged into a regex tag, | The seed value tag will
be ignored for the final target regex tag.
Any non-incremental tag propagation re-evaluates the regex tag and re-applies tag suggestions/associations. | |

Importing and exporting tag domains
You can import a previously exported tag domain from Data Catalog.
Export a tag domain
Procedure
Navigate to and select the tag domain to be exported.
In the Tag Domain details pane, click the More actions icon and then select Export Tag Domain from the menu that appears.
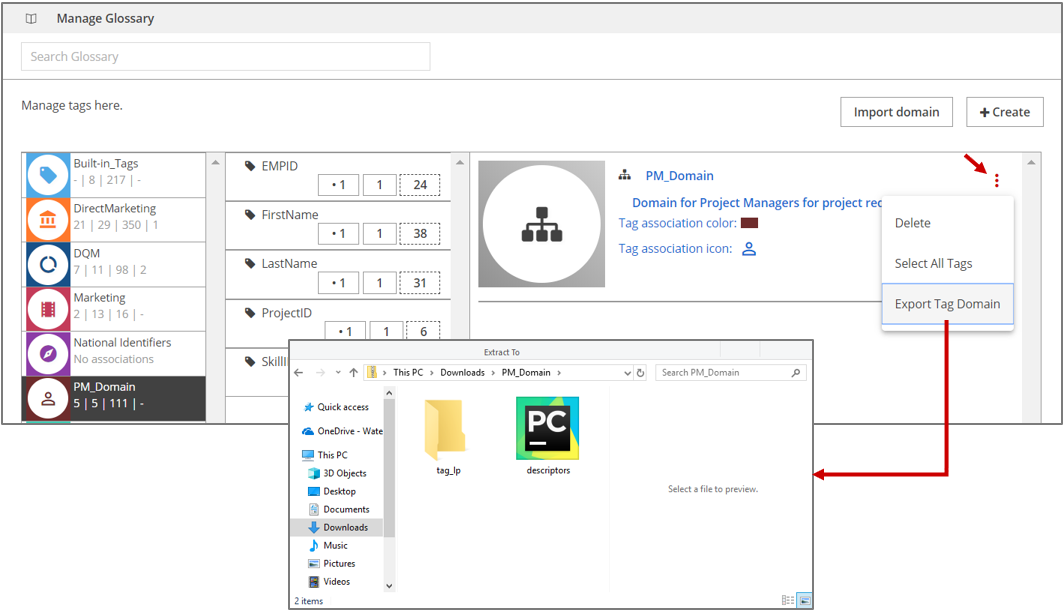 Based on your browser's download settings, a system dialog box may open
prompting for confirmation and download location. Complete the necessary actions
to continue.
Based on your browser's download settings, a system dialog box may open
prompting for confirmation and download location. Complete the necessary actions
to continue.
Results
Import a tag domain
Follow the steps below to import a tag domain. You must be an admin user to import tag domains.
Procedure
Navigate to .
Click Import domain.
A system window opens prompting you to enter a previously exported domain location.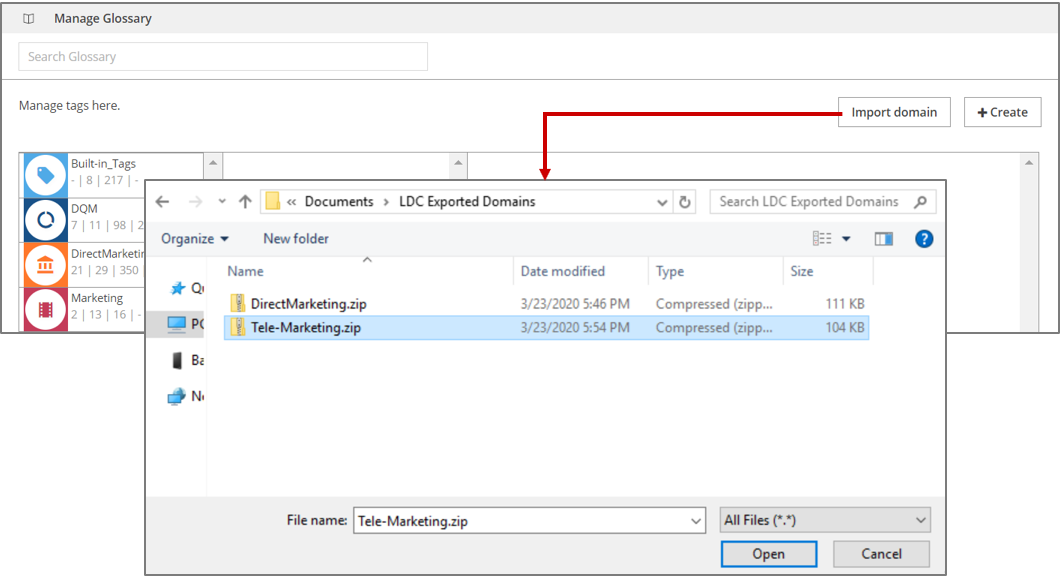
Locate the domain compressed file and click Open.
Results