Setting up DI Operations Mart with an archive installation
Follow these instructions for setting up the Data Integration Operations Mart if you installed Pentaho with the Archive installation method.
Before you begin
Installation of the Data Integration Operations Mart depends on the following conditions and prerequisites.
The Data Integration Operations Mart installation instructions assume that you have installed the Pentaho Server with the archive installation method. If you need to review the installation instructions, see Archive installation.
Before proceeding with the Data Integration Operations Mart installation steps, ensure that your Pentaho Server and Pentaho Repository are configured with one of the following database types:
- PostgreSQL
- MySQL
- Oracle
- MS SQL Server
To install the Data Integration Operations Mart, you must have the following two scripts:
pentaho_logging_databasename.sqlpentaho_mart_databasename.sql
postgresqlmysql15oracle10gororacle12csqlserver
Process overview
To install the Data Integration Operations Mart, perform the following steps:
- Step 1: Get the Data Integration Operations Mart files
- Step 2: Run the setup scripts
- Step 3: Set the global Kettle logging variables
- Step 4: Add the JNDI connections for logging
- Step 5: Add a JDBC connection for the Pentaho Server
- Step 6: Add the Data Integration Operations Mart ETL solutions to the Pentaho Repository default content folder
- Step 7: Initialize the Data Integration Operations Mart
- Step 8: Verify the Data Integration Operations Mart is working
Step 1: Get the Data Integration Operations Mart files
- If you performed an archive installation with a PostgreSQL repository, skip to Step 2: Run the setup scripts.
- If you performed an archive installation with a MySQL, MS SQL Server, or Oracle
repository, and you do not have the
pentaho-operations-mart-9.5.0-dist.zipfile, then you need to download it from the Support Portal.
Procedure
On the Support Portal page, sign in using the Pentaho support user name and password provided in your Pentaho Welcome Packet.
Click Downloads, then click Pentaho 9.5 GA Release in the current version list.
On the bottom of the Pentaho 9.5 GA Release page, browse the folders in the Box widget to find the files you need, in the Operations Mart folder:
- pentaho-operations-mart-9.5.0-dist.zip
Unzip the Pentaho Operations Mart file.
Inside are the packaged Operations Mart installations files.Unpack the installation file by running the installer file for your environment.
In the IZPack window, read the license agreement, select I accept the terms of this license agreement, and then click Next.
In the Select the installation path text box, browse to or enter the directory location where you want to unpack the files, then click Next.
If you chose an existing directory, a warning message that the directory already exists appears. Click Yesto continue.
Any existing files in the directory are retained.When the installation progress is complete, click Quit.
Navigate to the directory where you unpacked the pentaho-operations-mart-9.5.0-dist.zip file.
Results
- pentaho-operations-mart-operations-di-9.5.0.zip
- pentaho-operations-mart-operations-bi-9.5.0.zip
| Database Type | Filenames |
| Oracle | pentaho-operations-mart-etl-oracle10g-<version>.zip
|
| MySQL5 | pentaho-operations-mart-etl-mysql5-<version>.zip
|
| MS SQL Server | pentaho-operations-mart-etl-mssql-<version>.zip
|
Step 2: Run the setup scripts
pentaho-server-ee-9.5.0-dist.zip file, which contains both the required Ops
Mart setup scripts. They are located in the
<install-directory>/pentaho-server/data/databasename directory where databasename is your Pentaho Server Repository database type:postgresqlmysql5oracle10gororacle12csqlserver
Depending on your database repository type, run each of the scripts listed below in the order shown. These scripts create the tables that log the activity for transformations and jobs.
- pentaho_logging_databasename.sql
- pentaho_mart_databasename.sql
Step 3: Set the global Kettle logging variables
When you run PDI for the first time, the kettle.properties file is created and stored in the $USER_HOME/.kettle.properties directory.
Procedure
In the PDI client, select .
Add or edit the values for each of the logging variables shown in the following log tables:
NoteIf you customized the values for these logging variables in the following scripts, add the customized values for your site rather than the default values shown in the table.pentaho_logging_databasename.sqlpentaho_mart_databasename.sql
NoteFor Oracle and Microsoft SQL Server, leave Value blank with Variables that contain 'SCHEMA' in the name.Kettle channel log Variable Value KETTLE_CHANNEL_LOG_DB live_logging_info KETTLE_CHANNEL_LOG_TABLE channel_logs KETTLE_CHANNEL_LOG_SCHEMA pentaho_dilogs Kettle job entry log Variable Value KETTLE_JOBENTRY_LOG_DB live_logging_info KETTLE_JOBENTRY_LOG_TABLE jobentry_logs KETTLE_JOBENTRY_LOG_SCHEMA pentaho_dilogs Kettle job log Variable Value KETTLE_JOB_LOG_DB live_logging_info KETTLE_JOB_LOG_TABLE job_logs KETTLE_JOB_LOG_SCHEMA pentaho_dilogs Kettle metrics log Variable Value KETTLE_METRICS_LOG_DB live_logging_info KETTLE_METRICS_LOG_TABLE metrics_logs KETTLE_METRICS_LOG_SCHEMA pentaho_dilogs Kettle step log Variable Value KETTLE_STEP_LOG_DB live_logging_info KETTLE_STEP_LOG_TABLE step_logs KETTLE_STEP_LOG_SCHEMA pentaho_dilogs Kettle trans log Variable Value KETTLE_TRANS_LOG_DB live_logging_info KETTLE_TRANS_LOG_TABLE trans_logs KETTLE_TRANS_LOG_SCHEMA pentaho_dilogs Kettle trans performance log Variable Value KETTLE_TRANS_PERFORMANCE_LOG_DB live_logging_info KETTLE_TRANS_PERFORMANCE_LOG_TABLE transperf_logs KETTLE_TRANS_PERFORMANCE_LOG_SCHEMA pentaho_dilogs
Step 4: Add the JNDI connections for logging
Procedure
Navigate to the PDI client <install directory>/data-integration/simple-jndi directory.
Open the jdbc.properties file with a text editor.
Depending on your repository database type, update the values accordingly (URL, users, password) as shown in the following samples.
PostgreSQL:
 PDI_Operations_Mart/type=javax.sql.DataSource
PDI_Operations_Mart/driver=org.postgresql.Driver
PDI_Operations_Mart/url=jdbc:postgresql://localhost:5432/hibernate?searchpath=pentaho_operations_mart
PDI_Operations_Mart/user=hibuser
PDI_Operations_Mart/password=password
live_logging_info/type=javax.sql.DataSource
live_logging_info/driver=org.postgresql.Driver
live_logging_info/url=jdbc:postgresql://localhost:5432/hibernate?searchpath=pentaho_dilogs
live_logging_info/user=hibuser
live_logging_info/password=password
MySQL:
PDI_Operations_Mart/type=javax.sql.DataSource
PDI_Operations_Mart/driver=com.mysql.jdbc.Driver
PDI_Operations_Mart/url=jdbc:mysql://localhost:3306/pentaho_operations_mart
PDI_Operations_Mart/user=hibuser
PDI_Operations_Mart/password=password
live_logging_info/type=javax.sql.DataSource
live_logging_info/driver=com.mysql.jdbc.Driver
live_logging_info/url=jdbc:mysql://localhost:3306/pentaho_dilogs
live_logging_info/user=hibuser
live_logging_info/password=password
Oracle:
PDI_Operations_Mart/type=javax.sql.DataSource
PDI_Operations_Mart/driver=oracle.jdbc.OracleDriver
PDI_Operations_Mart/url=jdbc:oracle:thin:@localhost:1521/XE
PDI_Operations_Mart/user=pentaho_operations_mart
PDI_Operations_Mart/password=password
live_logging_info/type=javax.sql.DataSource
live_logging_info/driver=oracle.jdbc.OracleDriver
live_logging_info/url=jdbc:oracle:thin:@localhost:1521/XE
live_logging_info/user=pentaho_dilogs
live_logging_info/password=password
Microsoft SQL Server:
PDI_Operations_Mart/type=javax.sql.DataSource
PDI_Operations_Mart/driver=com.microsoft.sqlserver.jdbc.SQLServerDriver
PDI_Operations_Mart/url=jdbc:sqlserver://10.0.2.15:1433;DatabaseName=pentaho_operations_mart
PDI_Operations_Mart/user=pentaho_operations_mart
PDI_Operations_Mart/password=password
live_logging_info/type=javax.sql.DataSource
live_logging_info/driver=com.microsoft.sqlserver.jdbc.SQLServerDriver
live_logging_info/url=jdbc:sqlserver://10.0.2.15:1433;DatabaseName=pentaho_dilogs
live_logging_info/user=dilogs_user
live_logging_info/password=password
Step 5: Add a JDBC connection for the Pentaho Server
Procedure
Navigate to the <install directory>/server/pentaho-server/tomcat/webapps/Pentaho/META-INF/ folder.
Open the context.xml file with a text editor.
Depending on your database type, edit the file to reflect the values, as shown in the following examples.
(Optional) If you want to use encrypted passwords, locate all occurrences of the
factorysetting and replace them with the following value:factory="org.pentaho.di.core.database.util.DecryptingDataSourceFactoryPostgreSQL:
 <Resource name="jdbc/PDI_Operations_Mart" auth="Container" type="javax.sql.DataSource"
            factory="org.apache.tomcat.jdbc.pool.DataSourceFactory" maxActive="20" minIdle="0" maxIdle="5" initialSize="0"
            maxWait="10000" username="hibuser" password="password"
            driverClassName="org.postgresql.Driver"
            url="jdbc:postgresql://localhost:5432/hibernate"
            validationQuery="select 1"/>

 <Resource name="jdbc/pentaho_operations_mart" auth="Container" type="javax.sql.DataSource"
            factory="org.apache.tomcat.jdbc.pool.DataSourceFactory" maxActive="20" minIdle="0" maxIdle="5" initialSize="0"
            maxWait="10000" username="hibuser" password="password"
            driverClassName="org.postgresql.Driver"
            url="jdbc:postgresql://localhost:5432/hibernate"
            validationQuery="select 1"/>

 <Resource name="jdbc/live_logging_info" auth="Container" type="javax.sql.DataSource"
            factory="org.apache.tomcat.jdbc.pool.DataSourceFactory" maxActive="20" minIdle="0" maxIdle="5" initialSize="0"
            maxWait="10000" username="hibuser" password="password"
            driverClassName="org.postgresql.Driver"
            url="jdbc:postgresql://localhost:5432/hibernate?searchpath=pentaho_dilogs"
            validationQuery="select 1"/>
MySQL:
  <Resource name="jdbc/PDI_Operations_Mart" auth="Container" type="javax.sql.DataSource"
            factory="org.apache.tomcat.jdbc.pool.DataSourceFactory" maxActive="20" maxIdle="5"
            maxWait="10000" username="hibuser" password="password"
            driverClassName="com.mysql.jdbc.Driver" url="jdbc:mysql://localhost:3306/pentaho_operations_mart"
            jdbcInterceptors="ConnectionState" defaultAutoCommit="true" validationQuery="select 1"/>

  <Resource name="jdbc/pentaho_operations_mart" auth="Container" type="javax.sql.DataSource"
            factory="org.apache.tomcat.jdbc.pool.DataSourceFactory" maxActive="20" maxIdle="5"
            maxWait="10000" username="hibuser" password="password"
            driverClassName="com.mysql.jdbc.Driver" url="jdbc:mysql://localhost:3306/pentaho_operations_mart"
            jdbcInterceptors="ConnectionState" defaultAutoCommit="true" validationQuery="select 1"/>

  <Resource name="jdbc/live_logging_info" auth="Container" type="javax.sql.DataSource"
            factory="org.apache.tomcat.jdbc.pool.DataSourceFactory" maxActive="20" maxIdle="5"
            maxWait="10000" username="hibuser" password="password"
            driverClassName="com.mysql.jdbc.Driver" url="jdbc:mysql://localhost:3306/pentaho_dilogs"
            jdbcInterceptors="ConnectionState" defaultAutoCommit="true" validationQuery="select 1"/>
Oracle:
<Resource
    validationQuery="select 1 from dual"
    url="jdbc:oracle:thin:@localhost:1521/orcl"
    driverClassName="oracle.jdbc.OracleDriver"
    password="password"
    username="pentaho_operations_mart"
    initialSize="0"
    maxActive="20"
    maxIdle="10"
    maxWait="10000"
    factory="org.apache.tomcat.jdbc.pool.DataSourceFactory"
    type="javax.sql.DataSource"
    auth="Container"
    connectionProperties="oracle.jdbc.J2EE13Compliant=true"
    name="jdbc/pentaho_operations_mart"/>

<Resource
    validationQuery="select 1 from dual"
    url="jdbc:oracle:thin:@localhost:1521/orcl"
    driverClassName="oracle.jdbc.OracleDriver"
    password="password"
    username="pentaho_operations_mart"
    initialSize="0"
    maxActive="20"
    maxIdle="10"
    maxWait="10000"
    factory="org.apache.tomcat.jdbc.pool.DataSourceFactory"
    type="javax.sql.DataSource"
    auth="Container"
    connectionProperties="oracle.jdbc.J2EE13Compliant=true"
    name="jdbc/PDI_Operations_Mart"/>

<Resource validationQuery="select 1 from dual" url="jdbc:oracle:thin:@localhost:1521/XE"
     driverClassName="oracle.jdbc.OracleDriver" password="password"
     username="pentaho_dilogs" maxWaitMillis="10000" maxIdle="5" maxTotal="20"
     jdbcInterceptors="ConnectionState" defaultAutoCommit="true"
     factory="org.apache.tomcat.jdbc.pool.DataSourceFactory" type="javax.sql.DataSource"
     auth="Container" name="jdbc/live_logging_info"/>
Microsoft SQL Server:
<Resource name="jdbc/PDI_Operations_Mart" auth="Container" type="javax.sql.DataSource"
      factory="org.apache.tomcat.jdbc.pool.DataSourceFactory" maxTotal="20" maxIdle="5"
      maxWaitMillis="10000" username="pentaho_operations_mart" password="password"
      jdbcInterceptors="ConnectionState" defaultAutoCommit="true"
      driverClassName="com.microsoft.sqlserver.jdbc.SQLServerDriver"
      url="jdbc:sqlserver://localhost:1433;DatabaseName=pentaho_operations_mart"
      validationQuery="select 1"/>

<Resource name="jdbc/pentaho_operations_mart" auth="Container" type="javax.sql.DataSource"
       factory="org.apache.tomcat.jdbc.pool.DataSourceFactory" maxTotal="20" maxIdle="5"
       maxWaitMillis="10000" username="pentaho_operations_mart" password="password"
       jdbcInterceptors="ConnectionState" defaultAutoCommit="true"
       driverClassName="com.microsoft.sqlserver.jdbc.SQLServerDriver"
       url="jdbc:sqlserver://localhost:1433;DatabaseName=pentaho_operations_mart"
       validationQuery="select 1"/>

<Resource name="jdbc/live_logging_info" auth="Container" type="javax.sql.DataSource"
        factory="org.apache.tomcat.jdbc.pool.DataSourceFactory" maxTotal="20" maxIdle="5"
        maxWaitMillis="10000" username="dilogs_user" password="password"
        jdbcInterceptors="ConnectionState" defaultAutoCommit="true"
        driverClassName="com.microsoft.sqlserver.jdbc.SQLServerDriver"
        url="jdbc:sqlserver://localhost:1433;DatabaseName=pentaho_dilogs"
        validationQuery="select 1"/>
Step 6: Add the Data Integration Operations Mart ETL solutions to the Pentaho Repository default content folder
Before you begin
Procedure
Stop the Pentaho Server.
Depending on your repository database type, locate the ZIP files containing the ETL solution and sample reports.
You downloaded and unpacked these files in Step 1: Get the Data Integration Operations Mart files.pentaho-operations-mart-operations-di-9.5.0.zippentaho-operations-mart-operations-bi-9.5.0.zip
Directory Filenames /oracle (10g or 12c) - pentaho-operations-mart-etl-oracle10g-9.5.0.zip
- pentaho-operations-mart-clean-oracle10g-9.5.0.zip
/mysql5 - pentaho-operations-mart-etl-mysql5-9.5.0.zip
- pentaho-operations-mart-clean-mysql5-9.5.0.zip
/sqlserver - pentaho-operations-mart-etl-mssql-9.5.0.zip
- pentaho-operations-mart-clean-mssql-9.5.0.zip
Copy all four ZIP files (di, bi, mart-etl, mart-clean) for your database to this directory:
$PENTAHO_HOME/pentaho-server/pentaho-solution/default-content- DI Operations Mart sample reports: pentaho-operations-mart-operations-di-9.5.0-dist.zip
- BA Operations Mart sample reports: pentaho-operations-mart-operations-bi-9.5.0-dist.zip
Start the Pentaho Server.
When you restart the Pentaho Server, the startup process unpacks the content in the ZIP files to generate the Pentaho User Console (PUC) reports, sample transformations, and sample jobs needed to use the Data Integration Operations Mart.NoteAfter these files are processed by the Pentaho Server, they are renamed with a timestamp so that each subsequent time you start the Pentaho Server, it does not unzip them again. You must keep these files in this directory, even though the date/timestamp is the installation date.
Step 7: Initialize the Data Integration Operations Mart
Procedure
Launch the PDI client (Spoon).
Connect to the Pentaho Repository through the Pentaho Server.
At the main menu, select .
Select .
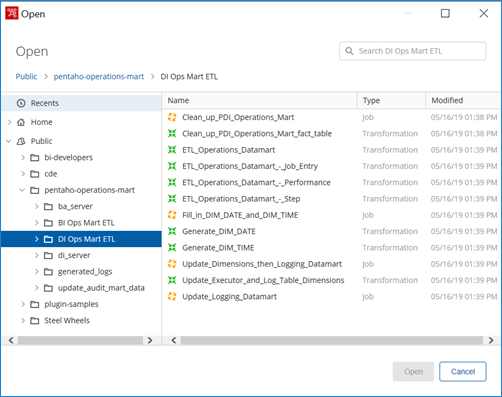
To initiate the transformation and job logging processes, open each transformation and job.
In each transformation or job, open the associated Job Properties or Transformation Properties window and click the Logging tab.
- For logging to occur, you must at a minimum add a value to each individual Log Connection field shown in the tables below for jobs and transformations. A best practice tip for these fields is to use the global variables, as shown in the tables. You can also use the values you customized for your site and defined in the kettle.properties file during Step 3: Set the global Kettle logging variables.
- If you leave all three fields shown in each table as empty values, then no logging occurs.
- Logging also occurs if you add a value to all three fields, as shown in each table.
For job logging, add values to the Log connection, Log table schema, and Log table name fields as shown in the tables below for the Job log table, Job entry log table, and Logging channel log table in the Log tab. You can also use any values you have customized for your site.
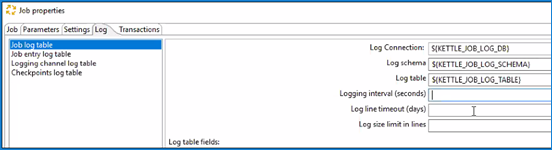
Job log table Field Value Log connection ${KETTLE_JOB_LOG_DB} Log table schema ${KETTLE_JOB_LOG_SCHEMA} Log table name ${KETTLE_JOB_LOG_TABLE} Job entry log table Field Value Log connection ${KETTLE_JOBENTRY_LOG_DB} Log table schema ${KETTLE_JOBENTRY_LOG_SCHEMA} Log table name ${KETTLE_JOBENTRY_LOG_TABLE} Logging channel log table Field Value Log connection ${KETTLE_CHANNEL_LOG_DB} Log table schema ${KETTLE_CHANNEL_LOG_SCHEMA} Log table name ${KETTLE_CHANNEL_LOG_TABLE} For transformation logging, add values to the Log connection, Log table schema, and Log table name fields as shown in the following tables for the Transformation, Step, Performance, Logging channels, and Metrics in the Logging tab. You can also use a value you have customized for your site.
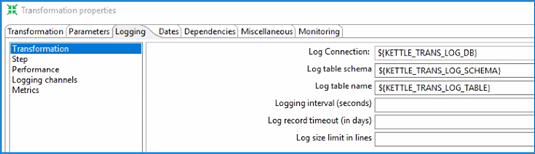
Transformation Field Value Log connection ${KETTLE_TRANS_LOG_DB} Log table schema ${KETTLE_TRANS_LOG_SCHEMA} Log table name ${KETTLE_TRANS_LOG_TABLE} Step Field Value Log connection ${KETTLE_STEP_LOG_DB} Log table schema ${KETTLE_STEP_LOG_SCHEMA} Log table name ${KETTLE_STEP_LOG_TABLE} Performance Field Value Log connection ${KETTLE_TRANS_PERFORMANCE_LOG_DB} Log table schema ${KETTLE_TRANS_PERFORMANCE_LOG_SCHEMA} Log table name ${KETTLE_TRANS_PERFORMANCE_LOG_TABLE} Logging channels Field Value Log connection ${KETTLE_CHANNEL _LOG_DB} Log table schema ${KETTLE_CHANNEL_LOG_SCHEMA} Log table name ${KETTLE_CHANNEL_LOG_TABLE} Metrics Field Value Log connection ${KETTLE_METRICS_LOG_DB} Log table schema ${KETTLE_METRICS_LOG_SCHEMA} Log table name ${KETTLE_METRICS_LOG_TABLE}
In the main menu, select .
Select job file and run it.
Run a few of the sample KTRs, to generate logging activities for Step 8: Verify the Data Integration Operations Mart is working. You can also use or create your own sample KTRs.
At the main menu, select .
Select job file and run it.
All the transformations and jobs are placed in the Pentaho Repository, then the data mart is populated. You can then set your transformations and jobs to run on a schedule, based on how often you want this data refreshed.
Step 8: Verify the Data Integration Operations Mart is working
From the Pentaho User Console, select and open it.
Verify that the jobs and transformations in Step 7: Initialize the Data Integration Operations Mart were run.