Work with transformations
In the PDI client (Spoon), you can develop transformations, which are data workflows representing your ETL activities. The steps used in your transformations define the individual ETL activities. The transformations containing your steps are stored in KTR files. You can access these KTR files through the PDI client.
Open a transformation
The method you use to open an existing transformation depends on if you are using PDI locally on your machine or if you are connected to a repository. If you are connected to a repository, then you are remotely accessing your file on the Pentaho Server. Optionally, you can open a transformation on a Virtual File System (VFS).
If you recently had a file open, you can also use .
On your local machine
Procedure
-
In the PDI client, perform one of the following actions:
- Select .
- Click the Open file icon in the toolbar.
- Click the OPEN Files tile from the Welcome screen.
- Hold down the CTRLO keys.
-
Select the file from the Open window, then click Open.
NoteBy default, the folder from where the last file was accessed is opened.
Results
In the Pentaho Repository
Procedure
-
Verify that you are connected to a repository, which establishes remote access to the Pentaho Server.
-
In the PDI client, perform one of the following actions to access the Open repository browser window:
- Select .
- Click the Open file icon in the toolbar.
- Click the OPEN Files tile from the Welcome screen.
- Hold down the CTRLO keys.
NoteBy default, the folder from where the last file was accessed is opened. -
To use a recently opened file, use the Recents option to navigate to your transformation.
-
Use either the search box to find your transformation, or use the left panel to navigate to a repository folder containing your transformation.
NoteIf the PDI is already connected to the Pentaho Repository, then only the Recents and Pentaho Repository options appear in the left pane. If the PDI is not connected to a Pentaho Repository, then the following options appear in the left pane:- Recents
- Local
- VFS Connections
- Hadoop Clusters
-
If you are not connected to Pentaho Repository, then perform one of the following actions to access the transformation:
- Double-click on your transformation.
- Select it and press the Enter key.
- Select it and click Open.
-
If you are connected to the Pentaho Repository, click Open to access the transformation.
Results
On Virtual File Systems
From the menu bar in the PDI client, select to open a PDI transformation on a Virtual File System (VFS). See Connecting to Virtual File Systems for details.
Rename a folder
You can rename a folder from the Open. You can rename a folder or file only if you are not connected to the Pentaho Repository.
Procedure
-
Select a folder or file in the Open window.
-
Right-click on it.
-
Select the Rename option from the context menu to rename it.
Save a transformation
The method you use to save a transformation depends on if you are using PDI locally on your machine or if you are connected to a repository. If you are connected to a repository, you are remotely saving your file on the Pentaho Server. Optionally, you can save a transformation on a Virtual File System (VFS) if you are not connected to the Pentaho Repository.
On your local machine
Procedure
-
In the PDI client, perform one of the following actions:
- Select or .
- Click the Save current file icon in the toolbar.
- Hold down the CTRLS keys.
-
Specify the transformation's name in the window and select the location.
By default, the folder from where the last file was accessed is opened.
NoteThe file types allowed are .ktr or.kjb. -
Click Save.
The transformation is saved.
Results
In the Pentaho Repository
Procedure
-
Verify that you are connected to a repository, which establishes remote access to the Pentaho Server.
-
In the PDI client, perform one of the following actions:
- Select or .
- Click the Save current file icon in the toolbar.
- Hold down the CTRLS keys.
NoteThe file types allowed are .ktr or.kjb. -
Navigate to the repository folder where you want to save your transformation.
-
Specify the transformation's name in the File name field.
-
Click Save.
Results
On Virtual File Systems
From the menu bar in the PDI client, select to save a PDI transformation on a Virtual File System (VFS). See Connecting to Virtual File Systems for details.
Run your transformation
After creating a transformation as a network of steps (a data workflow) that performs your ETL tasks, you should run it in the PDI client to test how it performs in various scenarios. With the Run Options window, you can apply and adjust different run configurations, options, parameters, and variables.
When you are ready to run your transformation, you can perform any of the following actions to access the Run Options window:
- Click the Run icon on the toolbar.
- Select Run from the Action menu.
- Press F9.
The Run Options window appears.
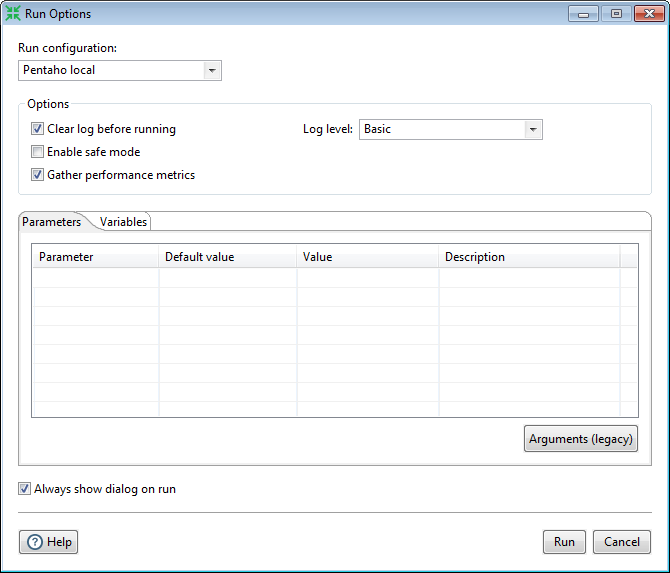
In the Run Options window, you can specify a Run configuration. To set up run configurations, see Run configurations .
The Run Options window also lets you specify logging and other options, or experiment by passing temporary values for defined parameters and variables during each iterative run.
Always show dialog on run is set by default. You can deselect this option if you want to use the same run options every time you execute your transformation. After you have selected to not Always show dialog on run, you can access it again through the dropdown menu next to the Run icon in the toolbar, through the Action main menu, or by pressing F8.
After running your transformation, you can use the Execution panel to analyze the results.
Run configurations
Some ETL activities are lightweight, such as loading in a small text file to write out to a database or filtering a few rows to trim down your results. For these activities, you can run your transformation locally using the default Pentaho engine. Some ETL activities are more demanding, containing many steps calling other steps or a network of transformation modules. For these activities, you can set up a separate Pentaho Server dedicated for running transformations using the Pentaho engine. Other ETL activities involve large amounts of data on network clusters requiring greater scalability and reduced execution times. For these activities, you can run your transformation using the Spark Submit job entry.
You can create or edit run configurations through the Run configurations folder in the View tab as shown below:
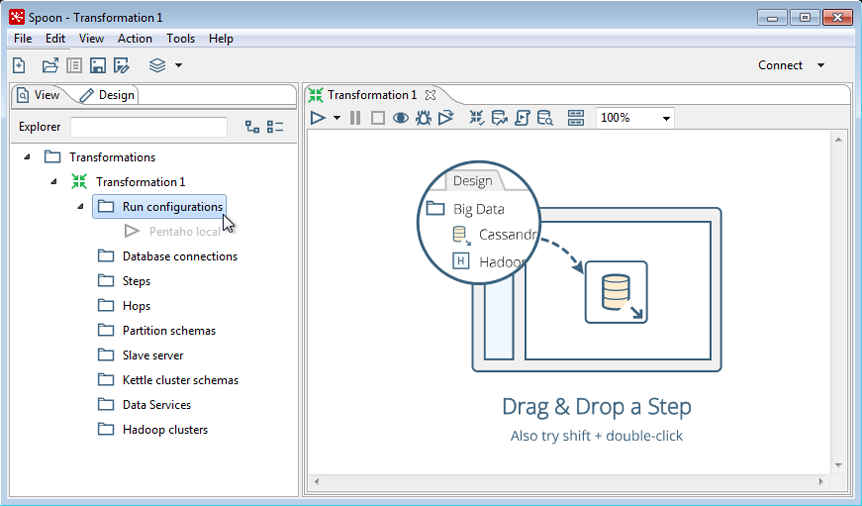
To create a new run configuration, right-click on the Run configurations folder and select New. To edit or delete a run configuration, right-click on an existing configuration.
Selecting New or Edit opens the Run configuration dialog box that contains the following fields:
| Field | Description |
| Name | Specify the name of the run configuration. |
| Description | Optionally, specify details of your configuration. |
Select an Engine
You can select the Pentaho Engine to run transformations in the default Pentaho (Kettle) environment.
You can also use the Spark Submit job entry to run big data transformations on your Hadoop cluster to coordinate large amounts of data over multiple nodes. See Spark Submit for details.
Pentaho Engine
The Pentaho engine does not execute sub-transformations or sub-jobs when you select the Pentaho server or Slave server option. If you want to run a sub-transformation on the same server where your parent job runs, select Local for the Run Configuration type.
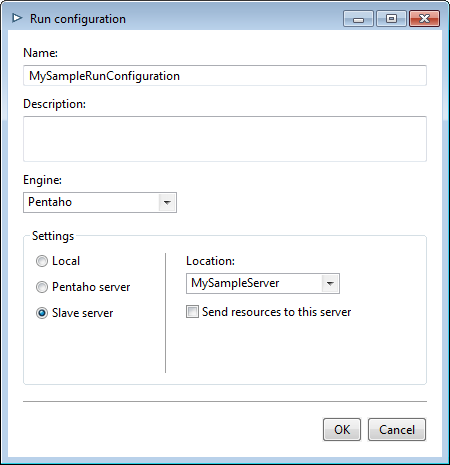
The Settings section of the Run configuration dialog box contains the following options when Pentaho is selected as the Engine for running a transformation:
| Option | Description |
| Local | Select this option to use the Pentaho engine to run a transformation on your local machine. |
| Pentaho server | Select this option to run your transformation on the Pentaho Server. This option only appears if you are connected to a Pentaho Repository. |
| Slave server | Select this option to send your transformation to a slave (remote) server or Carte cluster. |
| Location |
If you select Slave server, specify its location. If you have set up a Carte cluster, you can specify Clustered. See Use Carte Clusters for more details. |
| Send resources to the server | If you specified a remote server for your remote Location, select to send your transformation to the specified server before running it. Select this option to run the transformation locally on the server. Any related resources, such as other referenced files, are also included in the information sent to the server. |
| Log remote execution locally | If you specified Clustered for your remote Location, select to show the logs from the cluster nodes. |
| Show transformations | If you specified Clustered for your remote Location, select to show the other transformations that are generated when you run on a cluster. |
Options
Errors, warnings, and other information generated as the transformation runs are stored in logs. You can specify how much information is in a log and whether the log is cleared each time through the Options section of this window. You can also enable safe mode and specify whether PDI should gather performance metrics. Logging and performance monitoring describes the logging methods available in PDI.
| Option | Description |
| Clear log before running | Indicates whether to clear all your logs before you run your transformation. If your log is large, you might need to clear it before the next execution to conserve space. |
| Log level | Specifies how much logging is performed and the amount of information captured:
|
| Enable safe mode | Checks every row passed through your transformation and ensure all layouts are identical. If a row does not have the same layout as the first row, an error is generated and reported. |
| Gather performance metrics | Monitors the performance of your transformation execution through these metrics. Use performance graphs shows how to visually analyze these metrics. |
Parameters and Variables
You can temporarily modify parameters and variables for each execution of your transformation to experimentally determine their best values. The values you enter into these tables are only used when you run the transformation from the Run Options window. The values you originally defined for these parameters and variables are not permanently changed by the values you specify in these tables.
| Value Type | Description |
| Parameters | Set parameter values pertaining to your transformation during runtime. A parameter is a local variable. The parameters you define while creating your transformation are shown in the table under the Parameters tab.
|
| Variables | Set values for user-defined and environment variables pertaining to your transformation during runtime. |
Configure transformation properties
Transformation properties are a collection of properties that describe the transformation and configure its behavior. You can use transformation properties to customize the processing of your data to achieve the desired output.
To view the transformation properties, click CTRLT or right-click on the canvas and select Properties from the menu that appears.. The following sections provide a detailed description of the available settings:
- Transformation tab
- Parameters tab
- Logging tab
- Dates tab
- Dependencies tab
- Miscellaneous tab
- Monitoring tab
After you have adjusted your settings, click SQL to generate the SQL code necessary for creating the logging table. The Data Definition Language (DDL) displays in the Simple SQL Editor allowing you to execute this or any other SQL statements against the logging connection. For information on how to use the SQL Editor, see Use the SQL Editor.
Transformation tab
Use the Transformation tab to specify general properties about the transformation.
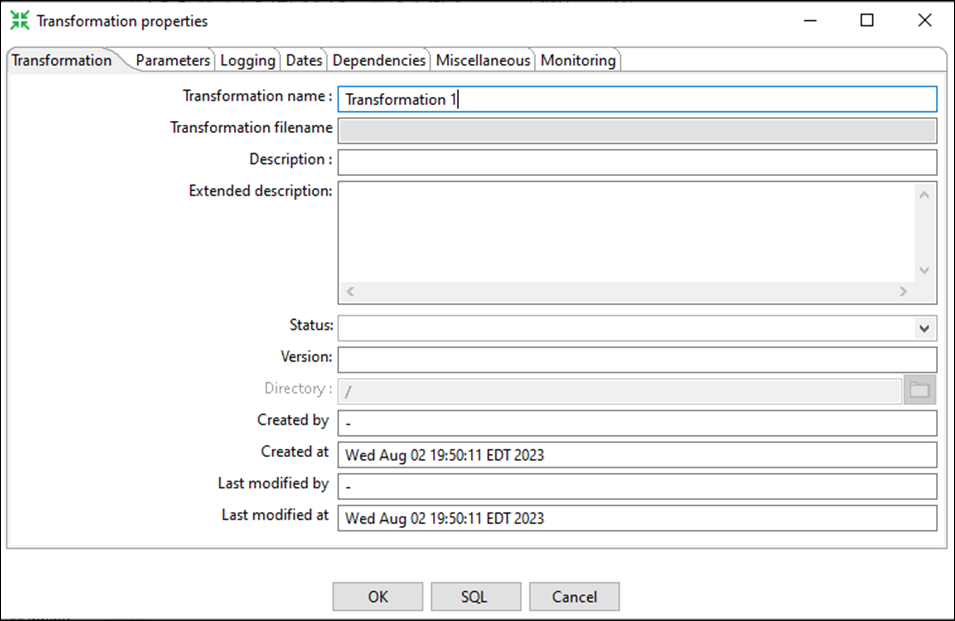
This tab includes the following options:
| Property | Description |
| Transformation name | The name of the transformation. This field is required to save the settings to a repository. |
| Transformation filename | The file name (*.ktr) of the transformation. |
| Description | Short description of the transformation which displays in the repository explorer. |
| Extended description | Long extended description of the transformation. |
| Status | Draft or production status |
| Version | Version description |
| Directory | The directory in the repository where the transformation is stored. |
| Created by | Name of the original creator of the transformation. |
| Created at | Date and time when the transformation was created. |
| Last modified by | The username of the last user that modified the transformation. |
| Last modified at | Date and time when the transformation was last modified. |
Parameters tab
Use the Parameters tab to add parameters to customize your transformation.
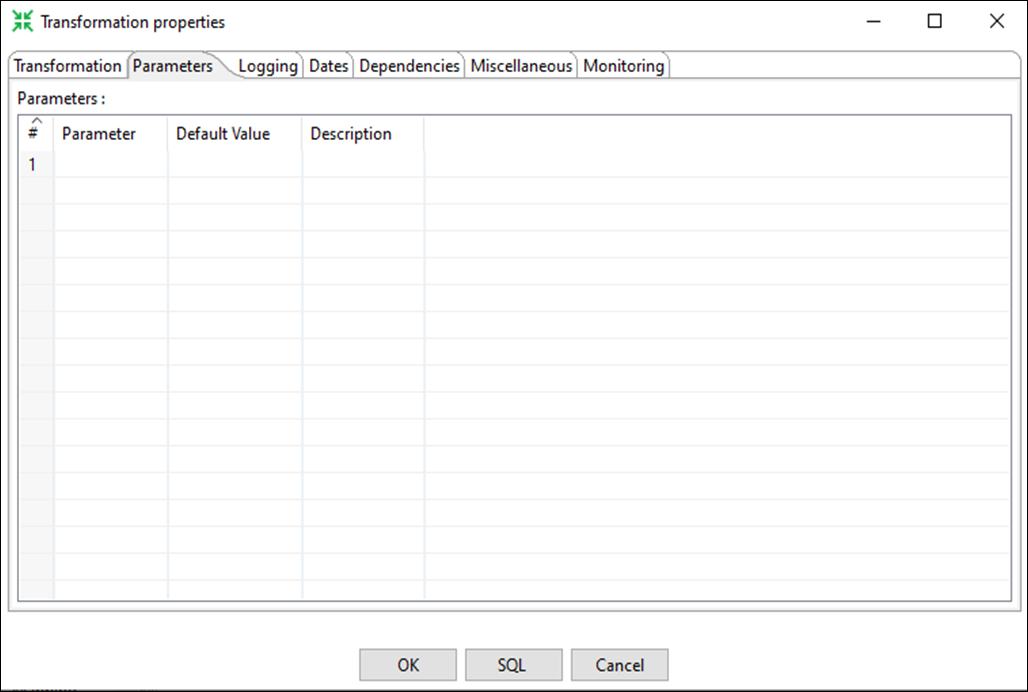
This tab includes the following options:
| Property | Description |
| Parameter | Acts as a local variable that can be shared across all steps in an individual transformation. |
| Default Value | Value that is used if the parameter is not set somewhere else in the transformation. |
| Description | Description of the user-defined parameter. |
Logging tab
Use the Logging tab to configure how and where logging information is captured. For more information about how to configure transformation logging, see Set up transformation logging.
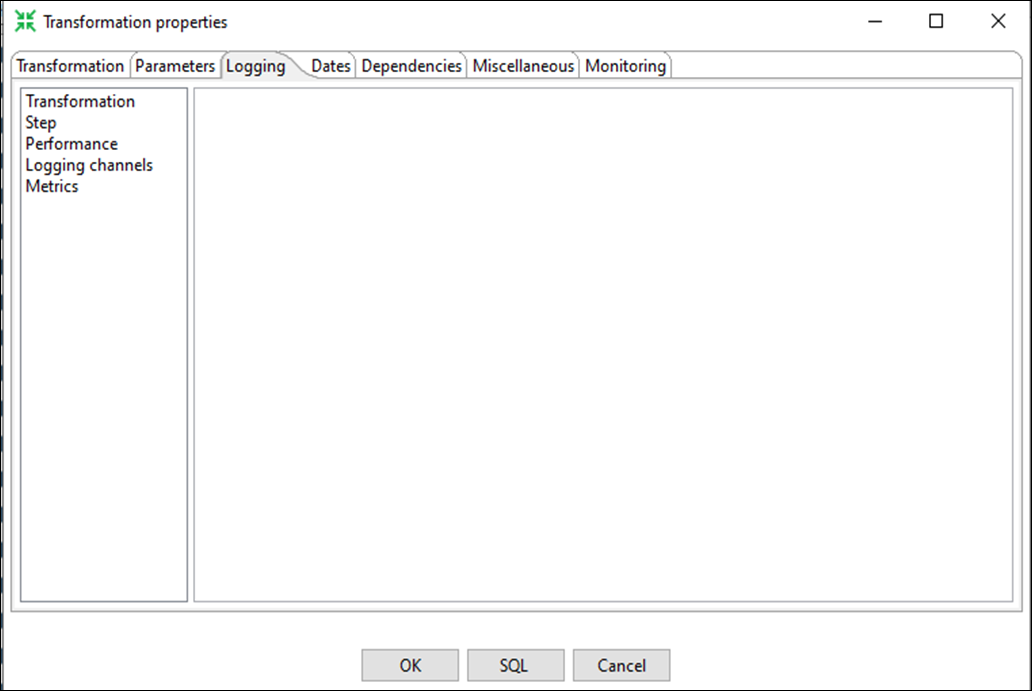
In the left navigation pane, select which type of logging you want to use. This tab includes the following options:
| Property | Description |
| Log Connection | Specify the database connection you are using for logging. You can configure a new connection by clicking New. |
| Log table schema | Specify the schema name, if supported by your database. |
| Log table name | Specifies the name of the log table.
NoteIf you are also using job logging, use a different table name for Transformation logging.
|
| Logging interval (seconds) | Specify the interval in which logs are written to the table. This property only applies to Transformation and Performance logging types. |
| Log record timeout (in days) |
Specify the number of days to keep log entries in the table before they are deleted. This property only applies to Transformation and Performance logging types. If you find that data in the log table is not deleted as expected, see Log table data is not deleted in Troubleshooting for best practice information. |
| Log size limit (in lines) |
Enter the limit for the number of lines that are stored in the LOG_FIELD. PDI stores logging for the transformation in a long text field (CLOB). This property only applies to the Transformation logging type. |
| Fields to log | Select the fields you want to log in the Fields to log pane. |
Dates tab
Use the Dates tab to configure date ranges and limits for this connection.
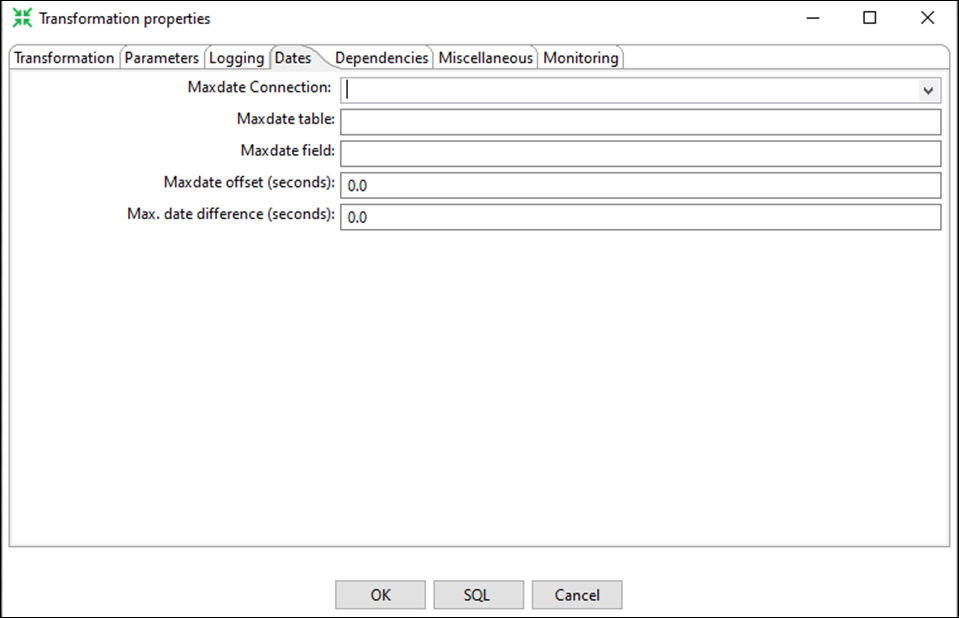
This tab includes the following options:
| Property | Description |
| Maxdate connection | Get the upper limit for a date range on this connection. |
| Maxdate table | Get the upper limit for a date range in this table. |
| Maxdate field | Get the upper limit for a date range in this field. |
| Maxdate offset (seconds) | Increases the upper date limit with this amount. Use this for example, if you find that the field DATE_LAST_UPD has a maximum value of 2004-05-29 23:00:00, but you know that the values for the last minute are not complete. In this case, simply set the offset to -60. |
| Maximum date difference (seconds) | Sets the maximum date difference in the obtained date range. This will allow you to limit job sizes. |
Dependencies tab
Use the Dependencies tab to specify all of the dependencies for the transformation.
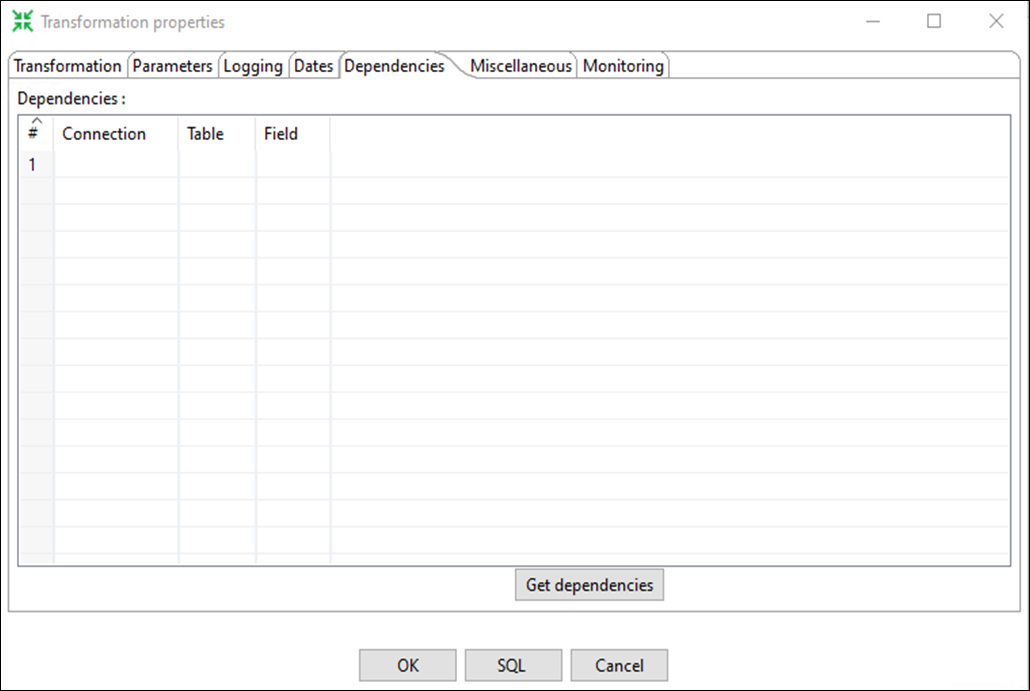
The Dependencies tab allows you to enter all of the dependencies for the transformation. For example, if a dimension depends on three lookup tables, make sure that the lookup tables have not changed. If the values in these lookup tables have changed, extend the date range to force a full refresh of the dimension.
Dependencies allow you to determine if a table has changed when you have a "data last changed" column in the table. Click Get dependencies to detect dependencies automatically.
| Property | Description |
| Connection | A dropdown to select a database connection that has already been created for that transformation. |
| Table | A specific table from the selected database connection. |
| Field | A specific field within the selected table. |
Miscellaneous tab
Use the Miscellaneous tab to configure buffer and feedback size and performing various administrative tasks.
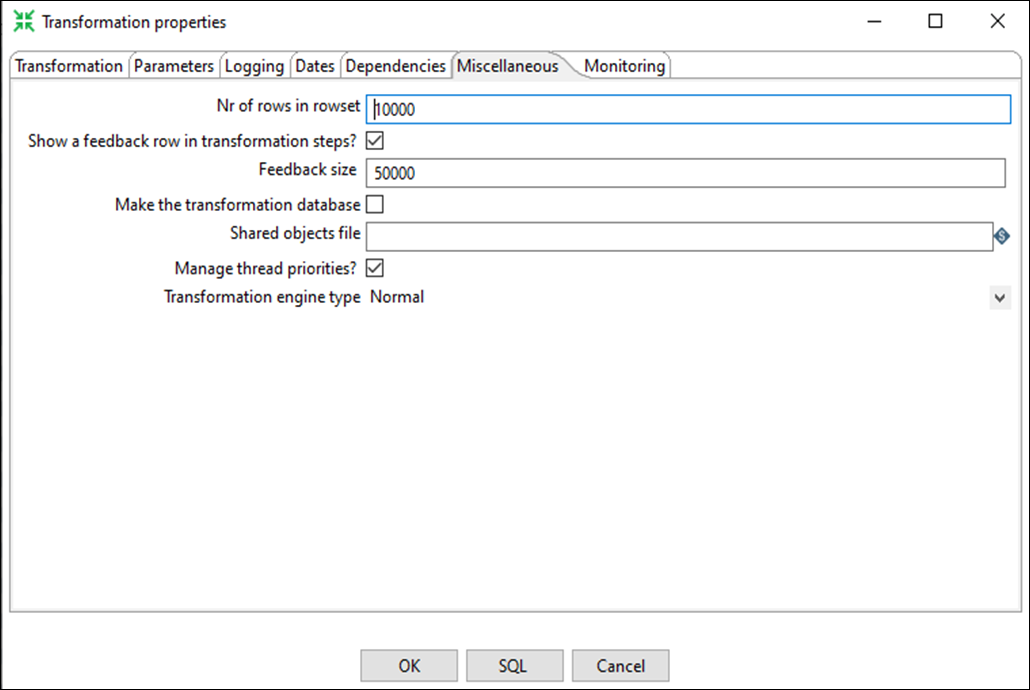
This tab includes the following options:
| Property | Description |
| Number of rows in rowset | Allows you to change the size of the buffers between the connected steps in a transformation. Do not change this parameter unless you are running low on memory, for example. |
| Show a feedback row in transformation steps? | Controls whether or not to add a feedback entry into the log file while the transformation is being executed. By default, this feature is enabled and configured to display a feedback record every 5000 rows. |
| The feedback size | Sets the number of rows to process before entering a feedback entry into the log. Set this higher when processing large amounts of data to reduce the amount of information in the log file. |
| Make the transformation database transactional |
This allows you to open one unique connection per defined and used database connection in the transformation. Enabling this option is required to allow a failed transformation to be completely rolled back. Enabling this option is also necessary when trying to alter connection settings before a query using an "Execute SQL script" step. (See also the Advanced section in the Database Connection dialog box "Enter the SQL statements (separated ...) to execute right after connecting") Further information can be found in Database transactions in jobs and transformations. NoteA transformation wide commit for all steps is done when the last step finishes. When the transformation fails, a rollback is done. It is not necessary to set any commit sizes since they are ignored.
|
| Shared objects file | Specifies the location of the XML file used to store shared objects like database connections, clustering schemas, and more. |
| Manage thread priorities? | Allows you to enable or disable the internal logic for changing the Java thread priorities based on the number of input and output rows in the "rowset" buffers. This can be useful in some situations where the cost of using the logic exceeds the benefit of the thread prioritization. |
Monitoring tab
Use the Monitoring tab for enabling and disabling step performance monitoring and setting related performance parameters.
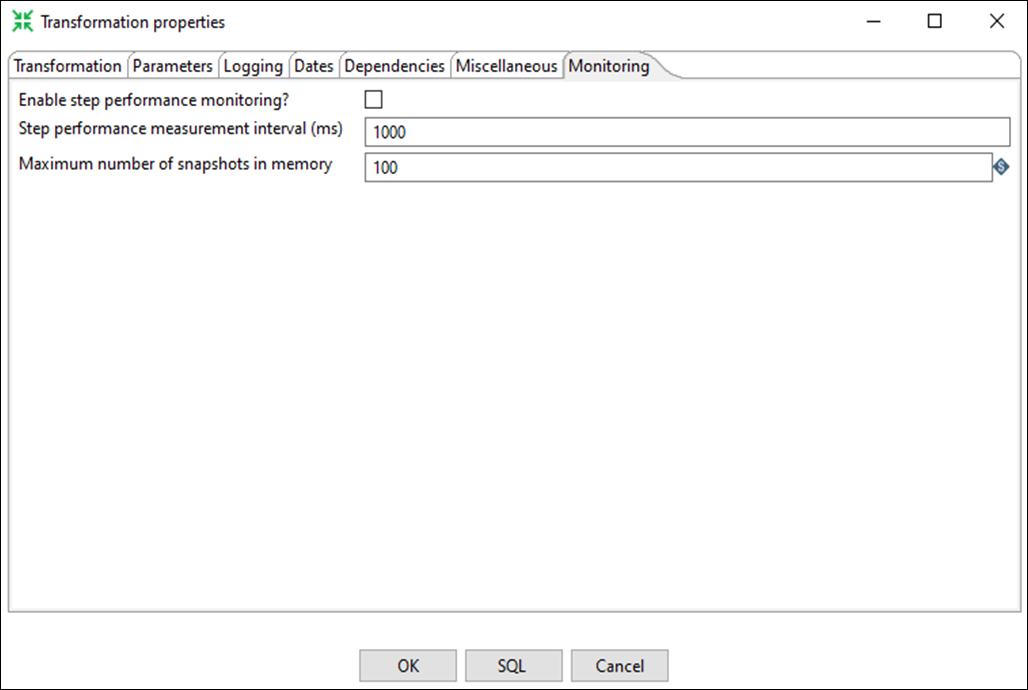
This tab includes the following options:
| Property | Description |
| Enable step performance monitoring? | This activates performance monitoring for transformation steps. It shows how many rows of data are being written, read, inputted, or outputted for each step. These metrics can be viewed on the Performance Graph tab that’s part of the Execution Results panel below the canvas. |
| Step performance measurement interval (ms) | This is the interval in milliseconds used to take a snapshot. Example: 10 ms |
| Maximum number of snapshots in memory | Sets the maximum number of measurement snapshots that can be held in memory during runtime. |
Use the transformation menu
Right-click any step in the transformation canvas to view the Transformation menu.
Stop your transformation
There are two different methods you can use to stop transformations running in the PDI client. The method you use depends on the processing requirements of your ETL task. Most transformations can be stopped immediately without concern. However, since some transformations are ingesting records using messaging or streaming data, such incoming data may need to be stopped safely so that the potential for data loss is avoided.
To stop a transformation running in the PDI client:
- Use Stop if your ETL task should stop processing all data immediately.
- Use Stop input processing if your ETL task needs to finish any records already initiated or retrieved before stopping.