Installing the Platform or PDI Server on Azure
These instructions provide the steps necessary to deploy Docker images of the Platform or PDI Server on Azure.
Prerequisites for installing the Platform or PDI Server on Azure
Observe the following prerequisites before installing the Platform or PDI Server:
- A stable version of Docker must be installed on your workstation.
- You must have an Azure account and subscription to complete this installation.
- The following software versions are required:
| Application | Supported version |
| Docker | v20.10.21 or a later stable version |
| Azure CLI | v2.x |
| Python | v3.x |
Process overview for installing the Platform or PDI Server on Azure
Use the following instructions to deploy the Platform or PDI Server on the Azure cloud platform:
- Download and unpack Pentaho for Azure.
- Create an Azure ACR.
- Push the Pentaho Docker image to ACR.
- Create Azure database and storage account.
- Choose one of the following deployment methods for Azure hyperscaler:
- Use Azure Container Instances (ACI)
- Use Azure Kubernetes Services (AKS)
You can also perform the following operation:
- Update a license when stored in a storage account
Download and extract Pentaho for Azure
Procedure
Navigate to the Support Portal and download the Azure version of the Docker image with the corresponding license file for the applications you want to install on your workstation.
Extract the image to view the directories and the readme file.
The image package file (<package-name>.tar.gz) contains the following:Name Content description image Directory containing all the Pentaho source images. templates Directory containing templates for various operations. yaml Directory containing YAML configuration files and various utility files. README.md File containing a link to detailed information about what we are providing for this release. In the image directory, unpack the tar.gz file that contains the Pentaho Docker image layers.
Create an Azure ACR
Before pushing the Pentaho image to Azure, you need to create an Azure Container Registry (ACR).
Procedure
Create an ACR repository to load Pentaho.
For information on how to create an Azure ACR, see Create an ACR repository.Record the name of the ACR repository that you have created in the Worksheet for Azure hyperscaler.
Push the Pentaho Docker image to ACR
Select and tag the Pentaho Docker image and then push it to the ACR registry.
Procedure
Navigate to the image directory containing the Pentaho tar.gz files.
Select and load the tar.gz file into the local registry by running the following command:
docker load -i <pentaho-image>.tar.gzRecord the name of the source image that was loaded into the registry by using the following command:
docker imagesTag the source image so it can be pushed to the cloud platform by using the following command:
docker tag <source-image>:<tag> <target-repository>:<tag>Push the image file into the ACR registry by using the following Docker command:
docker push <target-repository>:<tag>NoteFor general Azure instructions on how to push an image to Azure, see Pushing a Docker image.The Azure Management Console displays the uploaded image URI.Record the newly created ACR repository URI in the Worksheet for Azure hyperscaler.
Create Azure database and storage account
To install the Platform or PDI Server on Azure, you must create your database and storage account.
Procedure
Create an Azure PostgreSQL database for the Platform or PDI Server to use.
NoteSee the Azure instructions at Quickstart: Create server - Azure portal - Azure Database for PostgreSQL - Flexible Server | Microsoft Learn and apply the settings in the table below:Setting Description Subscription Choose your Azure subscription Resource Group Give the name of your resource group where you want all your services to be Server Name Select a unique server name Region Select your region PostgreSQL version Set engine version to PostgreSQL 13 Workload type, Compute+Storage, Availability
Use the options as per your requirement load. Authentication Select PostgreSQL authentication only
Give the Admin username as postgres and set the Master password
Networking Choose private or public option based on your requirements:
Private
Platform or PDI Server should be on the same virtual network as Postgres server
Public
Add IP addresses for firewall rule, or allow any Azure service to access the Postgres server
Security Use the default options Tags Leave it as default Review and create the database.
From the Azure Portal in the Azure Database for PostgreSQL servers resource, click on the created resource and go to the Overview. Record the Server Name and Port number in the Worksheet for Azure hyperscaler.
Connect to the database using Azure Cloud Shell or Azure CLI and run the five sql-scripts present in the sql-scripts folder in order, or run only the postgres-db-scripts shell script.
NoteThe password will be prompted, the default is password.Create a storage account only if one or more of the following cases apply. Otherwise, skip this step and proceed to create the AKS cluster or ACI instance:
- Store the Platform or PDI Server license.
- Add third party JAR files like JDBC drivers or custom JAR files for Platform or PDI Server to use.
- Customize the default Platform or PDI Server configuration.
- Replace the server files.
- Upload or update the metastore.
- Add files to the Platform or PDI Server’s .kettle directory.
NoteTo create a storage account, see Creating a storage account. To upload a file to the storage account’s file share, see Creating and using Azure file shares.Record the newly created storage account name and the corresponding file share name in the Worksheet for Azure hyperscaler.
After the storage account is created, upload the relevant files to the file share into an appropriate directory location (the storage account’s file share) using the Azure Portal. The relevant Platform or PDI Server directories are explained below:
Directory Actions /root All the files in the storage account are copied to the Platform or PDI Server .kettle directory.
If you need to copy a file to the Pentaho Server .kettle directory, do the following:
User action: Drop the file in the root directory of the file share.
licenses The licenses directory contains the Pentaho licenses files. However, the Server Secret Generation Tool documented in Use Azure Kubernetes Service (AKS) automatically retrieves the needed license file from the proper location, as long as you download the license file with the image distribution as described in Download and extract Pentaho for Azure.
Without the license file, the server will ask for the license file the first time you connect to the Platform or PDI Server. You can provide the file, but it will not be persisted, and the server will ask for it every time you reboot.
This file can be found in the local.pentaho directory.
custom-lib If your Platform or PDI Server needs custom JAR libraries, add the custom-lib directory to your storage account and place the libraries there.
Any files within this directory will be copied to the Platform or PDI Server’s lib directory.
Jdbc-drivers If your Platform or PDI Server needs JDBC drivers, do the following:
- Add the jdbc-drivers directory to your storage account.
- Place the drivers in this directory.
Any files within this directory will be copied to the Platform or PDI Server’s lib directory.
plugins If your Platform or PDI Server installation needs additional plugins installed, add the plugins directory to your file share.
Any files within this directory are copied to the Platform or PDI Server’s plugins directory. For this reason, the plugins should be organized in their own directories as expected by the Platform or PDI Server.
drivers If your Platform or PDI Server needs big data drivers installed, do the following:
- Add the drivers directory to your Fileshare.
- Place the big data drivers in this directory.
Any files placed within this directory will be copied to the Platform or PDI Server’s drivers directory.
metastore Pentaho can execute jobs and transformations. Some of these require additional information that is usually stored in the Platform or PDI Server metastore.
If you need to provide your Platform or PDI Server metastore to Platform or PDI Server, copy your local
metastoredirectory to the root of the file share of your storage account. From there, themetastoredirectory is copied to the proper location within the Docker image.server-structured-override The server-structured-override directory is the last resort if you want to make changes to any other files in the image at runtime.
Any files and directories within this directory will be copied to the Platform or PDI Server’s pentaho-server directory the same way they appear in the server-structured-override directory.
If the same files exist in the pentaho-server directory, they will be overwritten.
The relevant Platform or PDI Server files are explained below:
File Actions context.xml The Platform or PDI Server needs this file to connect to the database-specific repository.
A template for this file can be found in the templates project directory.
In the context.xml template, replace the
<DB_HOST_NAME>and<DB_PORT>entries with the values you recorded on the Worksheet for Azure hyperscaler.content-config.properties The content-config.properties file is used by the Platform or PDI Server Docker image to provide instructions on which storage account files to copy over and their location.
The instructions are populated as multiple lines in the following format:
${KETTLE_HOME_DIR}/<some-dir-or- file>=${SERVER_DIR}/<some-dir>A template for this file can be found in the templates project directory.
The template has an entry where the file context.xml is copied to the required location within the Docker image:
${KETTLE_HOME_DIR}/context.xml=${SERVER_DIR}/tomcat/webapps/pentaho/META-INF/context.xmlcontent-config.sh This is a bash script that can be used to configure files, change file and directory ownership, move files around, install missing apps, and so on.
You can add it to the storage account’s file share.
It is executed in the Docker image after the other files are processed.
metastore.zip The Platform or PDI Server can execute jobs and transformations. Some of these require additional information that is usually stored in the Pentaho metastore.
If you need to provide your Pentaho metastore to Pentaho, zip the content of your
local.pentahodirectory with the namemetastore.zipand add it to the root of the file share of the storage account. Themetastore.zipfile is extracted to the proper location within the Docker image.Run the scripts in the sql-scripts folder in the distribution in the numbered order.
Deployment methods for Azure hyperscaler
There are two methods that can used to deploy PDI-CLI based on the required use case:
The following table lists a few differences between these methods:
| Factors | ACI | AKS |
| Scalability | Limited scalability: With ACI, you can only run one single server instance. Multiple server instances and load-balancing cannot be achieved with ACI. | Scalability and high availability: AKS provides automatic scaling and self-healing, which make it ideal for running large and complex workloads that require scalability and high availability. |
| Flexibility | Limited flexibility: ACI is a managed service, which means you have limited control over the underlying infrastructure. | Flexibility: AKS provides more control over the underlying infrastructure and allows for greater customization and flexibility. |
| Cost | Cost-effective: ACI is a pay-per-second model, which means you only pay for the time your container is running. | Cost: AKS can be more expensive than ACI, especially for small workloads that do not require scaling. |
| Maintenance | Minimal maintenance required: ACI is a managed service, so most maintenance tasks are handled by Microsoft. | Maintenance required: AKS requires ongoing maintenance and management, including updates and patches. |
| Feature Set | Limited feature set: ACI lacks some of the advanced features available in AKS, such as automatic scaling, self-healing, and service discovery. | Advanced features: AKS provides advanced features such as service discovery, load balancing, and container orchestration, which make it a powerful tool for managing containerized applications. |
| Complexity | Simple setup: ACI provides a simple and fast way to run containers without the need to manage a cluster. | Complexity: AKS can be more complex to set up and manage than ACI, especially for users who are not familiar with Kubernetes. |
Use Azure Container Instances (ACI)
With ACI, you can only run one single server instance. Multiple servers instances and load-balancing cannot be achieved with ACI. See ACI context creation and prerequisites for more information.
Perform the following steps to deploy Pentaho on an Azure Container Instance:
Procedure
Create a Docker ACI context by entering the following command:
docker context create aci <context name>For
<context name>, choose your existing resource group where you have your ACR.Use the created ACI context by entering the following command:
docker context use <context-name>Open the file docker-compose-server-aci.yml and replace the following values:
Value Setting <image_uri> Image URI from the ACR in the format name:tag<fileshare-name> The file share name created in the storage account <your-storageaccount-name> Your storage account name <transformation-or-job.ext> Replace with the transformation or job name in the storage Replace the following values (1st column) in the docker-compose-server-aci.yml file with the setting in the 2nd column:
Value Setting <DB_HOSTNAME> DB_HOSTNAME property from the Pentaho Worksheet for Azure hyperscaler. <DB_PORT> DB_PORT property from the Pentaho Worksheet for Azure hyperscaler. <STORAGE> STORAGE property from the Pentaho Worksheet for Azure hyperscaler <METASTORE_SRC_DIR> METASTORE_SRC_DIR property from the Pentaho Worksheet for Azure hyperscaler. NoteThis folder contains the license file.Run the following command to update the YAML file:
docker-compose –f docker-compose-server-aci.yml upNoteThe required licenses can be uploaded to the licenses folder in the storage account
Use Azure Kubernetes Service (AKS)
Use Azure Elastic Kubernetes Service (AKS) to create a cluster for running the Platform or PDI Server.
Perform the following steps to deploy Pentaho on the Azure Kubernetes Service (AKS):
Procedure
To create an AKS cluster, you can follow the steps outlined in the Azure documentation: https://docs.microsoft.com/en-us/azure/aks/kubernetes-walkthrough-portal
NoteYou need to have “contributor” built-in role level permissions to work with all the services.Check the specific permissions associated with your custom role by going to the Access Control (IAM) section in the subscription that you have.
Install
kubectlusing this command:az aks install-cliNoteSee Kubectl Install and connect to cluster for more information.Use the following steps to create a namespace (this can also be created in the
yamlfiles application):docker-namespaceGo to the created AKS cluster and go to
namespaces.Click
+Createand specify the name.Record the name of the newly created namespace in the Pentaho Hyperscaler Installation Worksheet.
Use the
This command retrieves and merges the AKS cluster's credentials into your local kubeconfig file. Here is a sample command:az aks get-credentialscommand to retrieve the kubeconfig from an AKS cluster in Azure.az aks get-credentials --admin --name docker-aks --resource-group docker-roverTo configure the Platform or PDI Server YAML file, open the file pentaho-server-azure--ks<lb-type>.yaml in the yaml project directory, where the value for <lb-type> matches the purpose in the table below:
lb-type When to use cloudloadbalancerUse if you want to use the existing AKS Service as load balancer. nginxUse if you have installed the NGINX Ingress Controller. In the secrets.yml file, replace the following variables from the worksheet:
<your-namespace-name>Specify your AKS Namespace name <your-secret-name>Specify your AKS Secret name <your-storage-account-name-base64encoding>Run the command echo -n "<your-storage-account-name>" | base64and specify the output of this command as the value<your-storage-account-key-base64encoding>Run the command echo -n "<your-storage-account-key>" | base64and specify the output of this command as the value<your-storageaccount-name>Specify your storage account name NoteYour storage account details can be found in the Access keys sections. To run this secrets.yml file, enterkubectl apply –f secrets.ymlat the command prompt where the file exists.From the yaml project directory, implement one of two types of loadbalancers:
From the yaml project directory, open the file called
pentaho-server-azure-aks-<LB-TYPE>.yamlwhere<LB-TYPE>is:cloudloadbalancerif you want to work with the default AKS service as a loadbalancer.
nginxif you want to work with the NGINX Ingress Controller as a loadbalancer.
(Optional) If you are using
nginx, enter the following command to install the controller:kubectl apply -f https://raw.githubusercontent.com/kubernetes/ingress-nginx/controller-v1.6.4/deploy/static/provider/cloud/deploy.yamlFor the yaml files, replace the following variables from the Worksheet for Azure hyperscaler:
<image_uri><your-namespace-name><fileshare-name><your-secret-name>
Replace the following variables with values from the Worksheet for Azure hyperscaler:
<DB_HOSTNAME><DB_PORT>
Add the Pentaho license by running one of the following scripts in the distribution.
- Windows: Run
start.bat - Linux: Run
start.sh
- Windows: Run
Complete the configuration page of the Server Secret Generation Tool by adding the license files and using the values you recorded in the Worksheet for AWS hyperscaler.
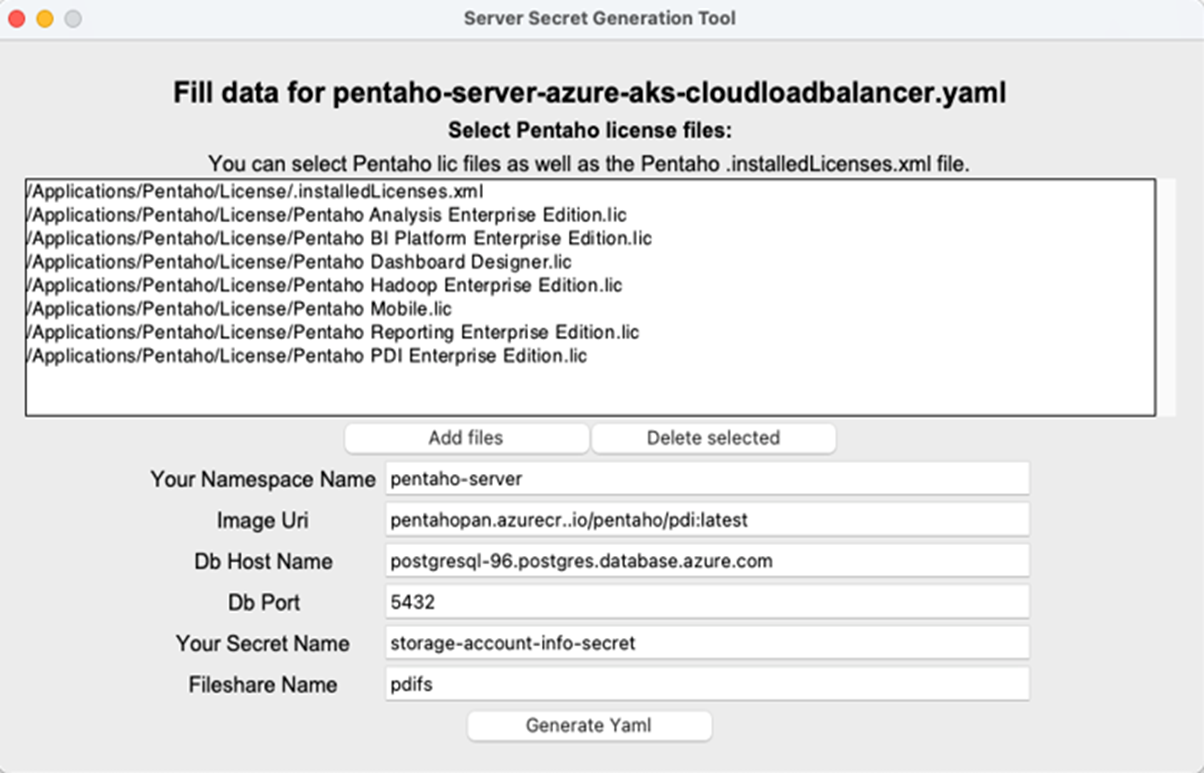
Click Generate Yaml.
Deploy the PDI Server using a Pentaho license file stored on the storage account with the following command:
kubectl apply -f <PATH TO PENTAHO DEPLOYMENT YAML>Use the following steps to test the Pentaho/PDI server:
Retrieve the LoadBalancer Ingress URI by running the following command in your workstation console:
echo $( kubectl get ingress -n <your-namespace-name> -o jsonpath='{.items..hostname}' )NoteThe port number for this load balancer is 80 and not 8080.Open the URI you received in a prior step in a Pentaho supported browser or go to the portal and you can find the URI in the Services and Ingress section of your AKS cluster and you should see Pentaho/PDI Server login screen.
Update a license when stored in a storage account
Perform the following steps to update a license that is stored in a storage account:
Procedure
Navigate to the home/pentaho directory.
Run the load-data.sh script.
Run the installlicenses.sh script.
Worksheet for Azure hyperscaler
To access the common worksheet for the Azure hyperscaler, go to Worksheet for Azure hyperscaler.