Installing the Platform Server or PDI Server on AWS
These instructions provide the steps necessary to deploy Docker images of the Platform Server or PDI Server on AWS.
Prerequisites for installing the Platform or PDI Server on AWS
Observe the following prerequisites before installing the Platform or PDI Server:
- A stable version of Docker must be installed on your workstation.
- You must have an AWS account to complete this installation.
- Amazon AWS CLI must be installed on your workstation.
- The following software versions are supported:
Application Supported version EKS v1.x Docker v20.10.21 or a later stable version AWS CLI v2.x Python v3.x
Process overview for installing the Platform or PDI Server on AWS
Use the following steps to deploy the Platform Server or PDI Server on the AWS cloud platform:
- Download and extract Pentaho for AWS
- Create an Amazon ECR
- Load and push the Pentaho Docker image to ECR
- Create an RDS database
- Create an S3 bucket
- Create an EKS cluster and add a node group
- Install the Platform or PDI Server on AWS
You can also perform the following operations:
- Update the Platform or PDI Server licenses on AWS
- Dynamically update server configuration content from S3
Download and extract Platform or PDI Server for AWS
Download and open the package files that contain the files needed to install Pentaho.
Procedure
Navigate to the Support Portal and download the AWS version of the Docker image with the corresponding license file for the applications you want to install on your workstation.
Extract the image to view the directories and the readme file.
The image package file (<package-name>.tar.gz) contains the following:Directory or file name Content description image Directory containing all the Pentaho source images. sql-scripts Directory containing SQL scripts for various operations. yaml Directory containing YAML configuration files and various utility files. README.md File containing a link to detailed information about what we are providing for this release.
Create an Amazon ECR
Before pushing the Pentaho image to AWS, you need to create an Amazon ECR.
Procedure
Create an ECR repository to load the Pentaho image.
For information on how to create an Amazon ECR, see instructions for creating a private repository on AWS.Record the name of the ECR repository that you have created in the Worksheet for AWS hyperscaler.
Load and push the Pentaho Docker image to ECR
Select and tag the Pentaho Docker image and then push it to the ECR registry.
Procedure
Navigate to the image directory containing the Pentaho tar.gz files.
Select and load the tar.gz file into the local registry by running the following command:
docker load -i <pentaho-image>.tar.gz
Record the name of the source image that was loaded into the registry by using the following command:
docker images
Tag the source image so it can be pushed to the cloud platform by using the following command:
docker tag <source-image>:<tag> <target-repository>:<tag>
Push the image file into the ECR registry using the following Docker command:
docker push <target-repository>:<tag>
The AWS Management Console displays the uploaded image URI.For general AWS instructions on how to push an image to AWS, see Pushing a Docker image.
Record the newly created ECR repository URI in the Worksheet for AWS hyperscaler.
Create an RDS database
Use these instructions to create an Relational Database Service (RDS) database in AWS.
Procedure
Create an RDS PostgreSQL database for Pentaho to use in the ECR.
See the AWS instructions at Creating and connecting to a PostgreSQL DB instance and apply the settings in the table below.Section Actions Create database Choose Standard create.
Select the PostgreSQL engine.
Set the engine version to a PostgreSQL version supported by the Components Reference, such as PostgreSQL 13.5-R1.
Templates It is recommended to select the Free tier option.
NoteFor this installation, the Free tier PostgreSQL database is used with a set of options as an example. However, you are free to use other database servers with different options as necessary.Settings Set the DB instance identifier.
Retain the default user name postgres and set the Master password.
Use the default password authentication setting.
Use the default values for the rest of the settings in this section.
Instance configuration Use the default settings for each section.
Storage Use the default settings for each section.
Connectivity Set the Virtual private cloud (VPC) and the DB subnet group to any of the options available to you. If in doubt, use the default values.
Select Public access.
Make sure that the VPC security groups selected have a rule enabling communication to the database through the PostgreSQL port, which is 5432 by default.
For other options, use the default settings.
Database authentication Use the default setting Password authentication.
Run the scripts in the sql-scripts folder in the distribution in the numbered order.
From the AWS Management Console connection tab, record the database Endpoint and Port number in the Worksheet for AWS hyperscaler.
Create an S3 bucket
You should create an S3 bucket only if you want to do one or more of the following. Otherwise proceed to create the EKS cluster.
- Store the Pentaho license. (Alternatively, you can store the license in the Kubernetes secret. In that case, do not store the license in the S3 bucket as storing a license in both places is not supported by Pentaho.)
- Add third party JAR files like JDBC drivers or custom JAR files for Pentaho to use.
- Customize the default Pentaho configuration.
- Replace the server files.
- Upload or update the metastore.
- Add files to the Platform and PDI Server's /home/pentaho/.kettle directory. This is mapped to the "KETTLE_HOME_DIR" environment variable, which is used by the content-config.properties file.
Procedure
Create an S3 bucket.
To create an S3 bucket, see Creating a bucket. To upload a file to S3, see Uploading objects.Record the newly created S3 bucket name in the Worksheet for AWS hyperscaler.
Upload files into the S3 bucket.
After the S3 bucket is created, manually create any needed directories as shown in the table below and upload the relevant files to an appropriate directory location by using the AWS Management Console. The relevant Pentaho directories are explained below:
The relevant Pentaho files are explained below:Directory Actions /root All the files in the S3 bucket are copied to the Platform and PDI Server's /home/pentaho/.kettle directory.
If you need to copy a file to the /home/pentaho/.kettle directory, drop the file in the root directory of the S3 bucket.
licenses The licenses directory contains the Pentaho licenses files. However, the Server Secret Generation Tool documented in Install the Platform or PDI Server on AWS automatically retrieves the needed license file from the proper location, as long as you download the license file with the image distribution as described in Download and extract Platform or PDI Server for AWS.
Without the license file, the server will ask for the license file the first time you connect to Pentaho. You can provide the file, but it will not be persisted, and the server will ask for it every time you reboot.
This file can be found in the local.pentaho directory.
custom-lib If Pentaho needs custom JAR libraries, add the custom-lib directory to your S3 bucket and place the libraries there.
Any files within this directory will be copied to Pentaho’s lib directory.
Jdbc-drivers If your Pentaho installation needs JDBC drivers, do the following:
- Add the jdbc-drivers directory to your S3 bucket.
- Place the drivers in this directory.
Any files within this directory will be copied to Pentaho’s lib directory.
plugins If your Pentaho installation needs additional plugins installed, do the following:
- Add the plugins directory to your S3 bucket.
- Copy your plugins to the plugins directory.
Any files within this directory are copied to Pentaho’s plugins directory. For this reason, the plugins should be organized in their own directories as expected by Pentaho.
drivers If your Pentaho installation needs big data drivers installed, do the following:
- Add the drivers directory to your S3 bucket.
- Place the big data drivers in this directory.
Any files placed within this directory will be copied to Pentaho’s drivers directory.
metastore Pentaho can execute jobs and transformations. Some of these require additional information that is usually stored in the Pentaho metastore.
If you need to provide your Pentaho metastore to Pentaho, copy your local
metastoredirectory to the root of the S3 Storage bucket. From there, themetastoredirectory is copied to the proper location within the Docker image.server-structured-override The server-structured-override directory is the last resort if you want to make changes to any other files in the image at runtime.
For example, you could use it for configuring authentication and authorization.
Any files and directories within this directory will be copied to the pentaho-server directory the same way they appear in the server-structured-override directory.
If the same files exist in the pentaho-server directory, they will be overwritten.
For instructions on how to dynamically update server configuration content from the S3 bucket, see Dynamically update server configuration content from S3.File Actions context.xml The Pentaho configuration YAML is included with the image in the templates project directory and is used to install this product. You must set the RDS host and RDS port parameters when you install Pentaho. Upon installation, the parameters in the configuration YAML are used to generate a custom context.xml file for the Pentaho installation so it can connect to the database-specific repository.
If these are the only changes required in your context.xml, you don’t need to provide a context.xml in your S3 bucket. On the other hand, if you need to configure additional parameters in your context.xml, please provide the custom.xml file in your S3 bucket.
In the context.xml template, replace the <RDS_HOST_NAME> and <RDS_PORT> entries with the values you recorded on the Worksheet for AWS hyperscaler.
content-config.properties The content-config.properties file is used by the Pentaho Docker image to provide instructions on, which S3 files to copy over and their location.
The instructions are populated as multiple lines in the following format:
${KETTLE_HOME_DIR}/<some-dir-or-file>=${SERVER_DIR}/<some-dir>A template for this file can be found in the templates project directory.
The template has an entry where the file context.xml is copied to the required location within the Docker image:
${KETTLE_HOME_DIR}/context.xml=${SERVER_DIR}/tomcat/webapps/pentaho/META-INF/context.xmlcontent-config.sh This is a bash script that can be used to configure files, change file and directory ownership, move files around, install missing apps, and so on.
You can add it to the S3 bucket.
It is executed in the Docker image after the other files are processed.
metastore.zip Pentaho can execute jobs and transformations. Some of these require additional information that is usually stored in the Pentaho metastore.
If you need to provide your Pentaho metastore to Pentaho, zip the content of your
local.pentahodirectory with the namemetastore.zipand add it to the root of the Cloud Storage bucket. Themetastore.zipfile is extracted to the proper location within the Docker image.NoteThe VFS connections cannot be copied to the hyperscaler server from PDI the same way as the named connection. You need to connect to Pentaho on the hyperscaler and create the new VFS connection.
Create an EKS cluster and add a node group
Use Amazon Elastic Kubernetes Service (EKS) to create a cluster for running the Platform or PDI Server.
Procedure
Create an EKS cluster on AWS.
For instructions, see Create an Amazon EKS cluster. For a beginner's introduction to EKS, see Getting started with Amazon EKS. For information about creating roles to delegate permissions to an AWS service, see Create a role.Settings Actions Cluster service role You can select any existing role, as long as the following policies are attached to the role:
- AmazonEKSClusterPolicy
- AmazonS3FullAccess
- AmazonEKSServicePolicy
VPC In the Networking section, do the following:
- Select an existing VPC. The selected VPC populates a group of subnets. It should be created before you create a computing or cloud stack.
- Make sure that the Auto-assign public IPv4 address property under subnets is set to Yes.
Cluster endpoint access Select the Public and private option.
Amazon VPC CNI
CoreDNS
kube_proxy
Select all three EKS add-ons with their default configurations.
Record the newly created EKS cluster name in the Worksheet for AWS hyperscaler.
On the Compute tab under Node groups, add a node group to the EKS cluster by clicking Add node group.
NoteThe EKS cluster must be in active state before starting the process of creating a node. For further instructions, see Create a managed node group.In the Node group configuration section, add the group Name.
Select a Node IAM role from the list or create a new role. Make sure that the role contains the following policies:
- AmazonS3FullAccess
- AmazonEC2ContainerRegistryReadOnly
- AmazonEKSWorkerNodePolicy
- AmazonEKS_CNI_Policy
Set the instance type to one that has at least 8 GB of memory.
In the Node group scaling configuration section, set the value for Desired size, Minimum size, and Maximum size to the desired number of nodes.
In the Node group network configuration section, select the subnets for your node group.
For the subnets, set the Auto-assign public IPv4 address property to Yes.
For further instructions, contact your AWS administrator or see IP addressing for your VPCs and subnets.Select a load balancer.
For instructions on how to create an AWS Application load balancer, see Application load balancing on Amazon EKS.
Install the Platform or PDI Server on AWS
When your AWS environment is properly configured, you can proceed to install the Platform or PDI Server.
Procedure
Retrieve the kubeconfig from the EKS cluster.
In the workstation console, obtain the kubeconfig from the EKS cluster you created by using the following command:aws eks update-kubeconfig --name <my_eks_cluster_name> --region <my_EKS_region>
To configure the Platform or PDI Server YAML file, open the file pentaho-server-aws-rds-<lb-type>.yaml in the yaml project directory.
lb-type When to use alb Use if you installed the AWS Application load balancer. nginx Use if you have installed the NGINX Ingress Controller. Add the Pentaho license by running one of the following scripts in the distribution.
- Windows: Run
start.bat - Linux: Run
start.sh
- Windows: Run
Complete the configuration page of the Server Secret Generation Tool by adding the license files and using the values you recorded in the Worksheet for AWS hyperscaler.
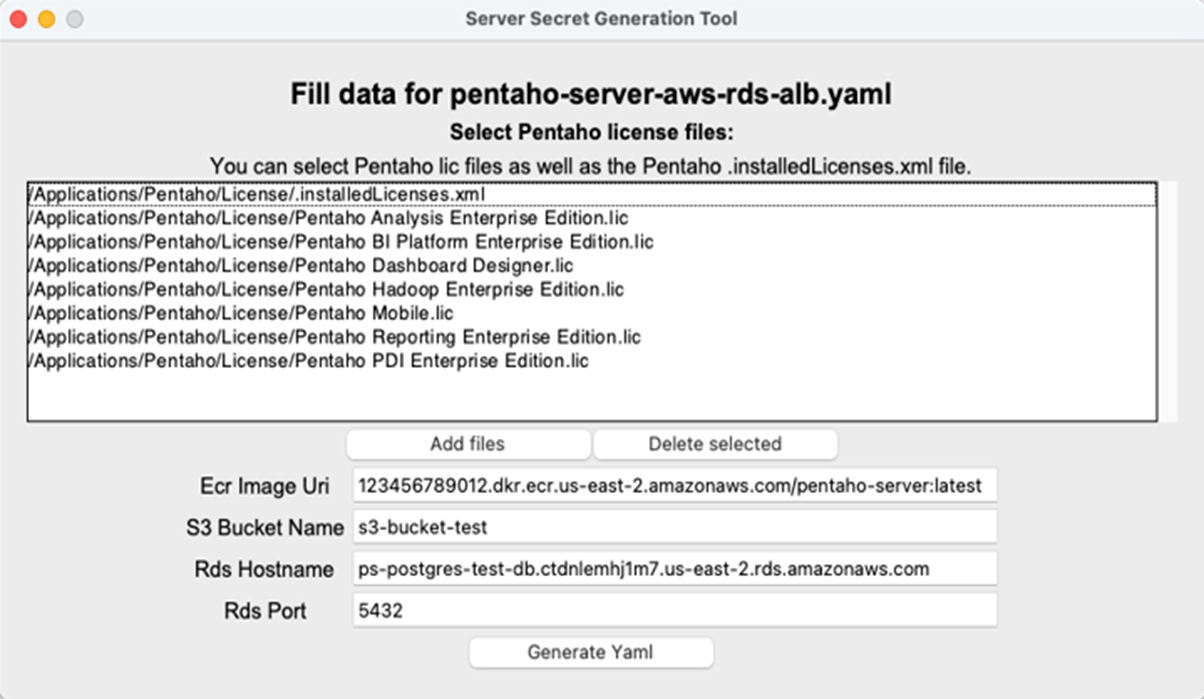
Click Generate Yaml.
Retrieve the Platform or PDI Server entry point URI information.
The Platform or PDI Server entry point URI information can be retrieved by running either of the following commands on the workstation console:kubectl get ingress -n pentaho-server
orecho $( kubectl get ingress -n pentaho-server -o jsonpath='{.items..hostname}' )The port number is 80 by default.If the Pentaho license file is stored in an S3 bucket, deploy the Platform or PDI Server using the following command:
kubectl apply -f <path to Pentaho deployment YAML>
Test the Platform or PDI Server by retrieving the LoadBalancer Ingress URI.
This is done by running the following command in your workstation console:echo $( kubectl get ingress -n pentaho-server -o jsonpath='{.items..hostname}' )NoteThe port number for this load balancer is 80, not 8080.Use the URI that you received in the previous step in a Pentaho-supported browser to open the Platform or PDI Server login screen and access the Platform or PDI Server.
Field Default value Username admin Password password
Update the Platform or PDI Server licenses on AWS
How your license is refreshed or updated depends on how it is stored.
Execute the following instructions from within each of the active the Platform or PDI Server replicas:
Update a license when stored in an S3 bucket
Complete the following steps to update the license:
Procedure
Navigate to the home/pentaho directory within the Docker container.
Run the load-s3-data.sh script.
Run the copy-license.sh script.
Update a license when stored in a Kubernetes secret
If you license is stored in a Kubernetes secret, complete the following steps to update the license:
Procedure
Navigate to the home/pentaho directory.
Run the copy-license.sh script.
Dynamically update server configuration content from S3
If the content of the S3 bucket changed and you need to reflect these changes in the Platform or PDI Server, follow these instructions:
Before you begin
Before deploying the Platform or PDI Server, set the value of the allow_live_config property in the file pentaho-server-aws-rds.yaml to true.
Procedure
Navigate to the relevant directory, where the configuration needs to be updated.
Prepare the configuration update script in a later step by setting the
<config_command>part of the script to one of the command options in the following table.Command option Description load_from_s3 Copies the content of the bucket to the server’s /home/pentaho/.kettle directory. restart Restarts the Platform or PDI Server without restarting the pod. update_config Executes load_from_s3, executes all the configuration and initialization scripts, and then executes therestartcommand.update_license Executes load_from_s3and updates the Platform or PDI Server license from the Kubernetes secret or S3 bucket.NoteWhen using therestartorupdate_configcommand, a disruption occurs in the Platform or PDI Server's use of sticky sessions. Using therestartorupdate_configcommand causes a server restart that impacts the user sessions.Run the configuration update script.
NoteIf you have multiple Platform or PDI Server replicas, remove the comment hashtag in front ofsleep 60.for pod in $( kubectl get pods -o name -n pentaho-server ) do echo "Forwarding port on pod: $pod" pid=$( kubectl port-forward -n pentaho-server $pod 8090:8090 1>/dev/null & echo $! ) while ! nc -z localhost 8090; do sleep 0.1 done echo "Executing command ..." result=$( curl http://localhost:8090/<config_command> ) echo "Command result: $result" echo "Killing port forward pid: $pid" while $(kill -9 $pid 2>/dev/null); do sleep 1 done # sleep 60 done;Check that the servers restart properly.
Worksheet for AWS hyperscaler
To access the common worksheet for the AWS hyperscaler, go to Worksheet for AWS hyperscaler.