Metadata security

If you need to restrict access to certain portions of a metadata model that you are using as a data source, you must edit the model with Metadata Editor and add restrictions. The Pentaho metadata model offers table, column, and row-level authorization control. If you need to prevent certain users or roles from accessing it, you must change and republish the model.
Configure the security service
Perform the following steps to define your security settings:
Procedure
From the Pentaho Metadata Editor main window, select .
The Security Service dialog box appears.Type the correct URL in the Service URL text box.
Select the level of detailed security information you want: All, Users, or Roles.
If you have hundreds of users in your system, you probably only want to return the roles, then use roles for security information properties. The access control lists are returned with all three options.Type admin in the User Name text field.
This is the default Admin user for the Pentaho User Console.Type password in the Password text field.
This password is associated with the default Admin user.Click Test.
If the information you entered is correct, a listing of users and roles appears, as shown in the following example: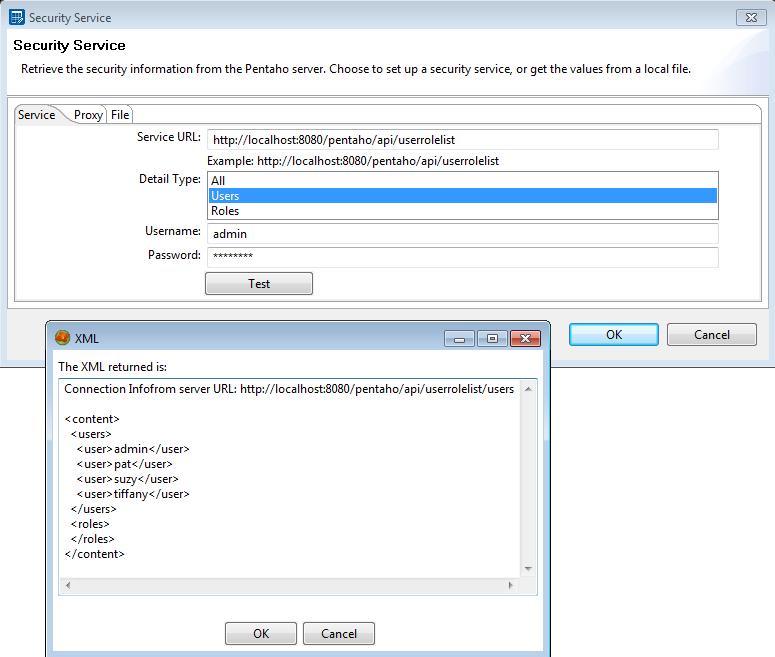
Click OK to exit the test results, and then click OK to exit the Security Service dialog box.
Retrieve security settings offline
Procedure
After you click Test, all of the XML between the
<content>and</content>tags, including the tags, is provided in the XML dialog box.Copy and paste the XML code into a text editor, and save the file as metadata_security.xml in a location of your choice.
Click OK to close the dialog box.
Click the File tab in the Security Service dialog box.
Browse to the file that you just saved.
Click OK to exit the dialog box.
Change security constraints
Procedure
Open the Properties dialog box that contains the table or column you want to change.
Click the Plus Sign to add a property.
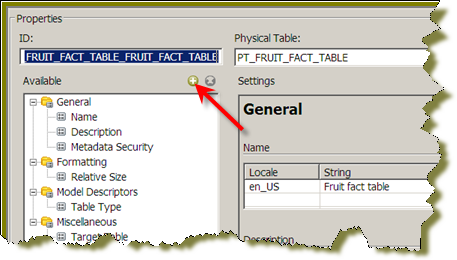 The Add New Property
dialog box appears.
The Add New Property
dialog box appears.Select the Security Information property and click OK.
Scroll down to the Metadata Security section of the Settings panel and add the individual role or user permissions to the business model, table, or column.
These permissions will be enforced in the Pentaho Server after publishing the new metadata model.
Add column-level security constraints
Before you begin
Procedure
In the left pane, right-click the table or column you want to modify, then click Edit from the context menu.
The Physical Table Properties dialog box appears.Click Add Property above the Available field in the middle of the screen.
The Add New Property dialog box appears.Select Metadata Security, then click OK.
Click the new Metadata Security item in the General category.
Click the Plus Sign icon next to the Selected Users/Groups field in the right pane.
A list of users and/or roles (depending on what you selected when configuring the security service earlier) appears.Select the user or role in the Available list, and then click the Right Arrow in the middle of the window to assign permissions.
The user or role moves from the Available list on the left to the Assigned list on the right.Repeat this process for other users or roles you want to assign metadata permissions to, then click OK.
Change any other relevant metadata options, then click OK to return to the Metadata Editor main window.
When you are finished, save the metadata configuration as a domain using the Save As button, then publish it to the Pentaho Server as an XMI schema by selecting Publish from the File menu.
Add global row-level security constraints
Before you begin
Procedure
In the left pane, right-click the table or column you want to modify, then click Edit from the context menu.
The Physical Table Properties dialog box appears.Click the Plus Sign icon above the Available field in the middle of the screen.
The Add New Property dialog box appears.Select Data Constraints, then click OK.
Click the new Data Constraints item in the General category.
Select the Global Constraint option in the right pane.
Type in your constraint in the text box.
Change any other relevant metadata options, then click OK to return to the Metadata Editor main window.
When you are finished, save the metadata configuration as a domain using the Save As button, then publish it to the Pentaho Server as an XMI schema by selecting Publish from the File menu.
When using the Global Constraint, a single MQL formula is used to define security for all users. In addition to the standard MQL functions available, there are also two additional functions:
USER(): Returns the name of the current user.ROLES(): Returns a list of roles associated with the current user.
The following example defines an MQL formula that allows administrators full access:
IN("Admin"; ROLES())NoteAll other users have no access.
Add user or role row-level security constraints
Before you begin
Procedure
In the left pane, right-click the table or column you want to modify, then click Edit from the context menu.
The Physical Table Properties dialog box appears.Click the Plus Sign above the Available field in the middle of the screen.
The Add New Property dialog box appears.Select Data Constraints, then click OK.
Click the new Data Constraints item in the General category.
Select Role Based Constraints option in the right pane.
Click the Plus Sign next to the Selected Users/Groups field in the right pane.
A list of users and/or roles (depending on what you selected when configuring the security service earlier) appears.Click the user or role in the left pane that you want to assign permissions to, then click the Right Arrow in the middle of the window.
The user or role moves from the Available list on the left to the Assigned list on the right.Click the checkboxes for the permissions that you want to assign to the selected user or role.
Repeat this process for other users or roles you want to assign metadata permissions to, then click OK.
Change any other relevant metadata options, then click OK to return to the Metadata Editor main window.
When you are finished, save the metadata configuration as a domain using the Save As button, then publish it to the Pentaho Server as an XMI schema by selecting Publish from the File menu.
Add role model-level security constraints
In the Pentaho Metadata Editor, select the model to which you want to add row-level security, right-click the model, and select Edit.
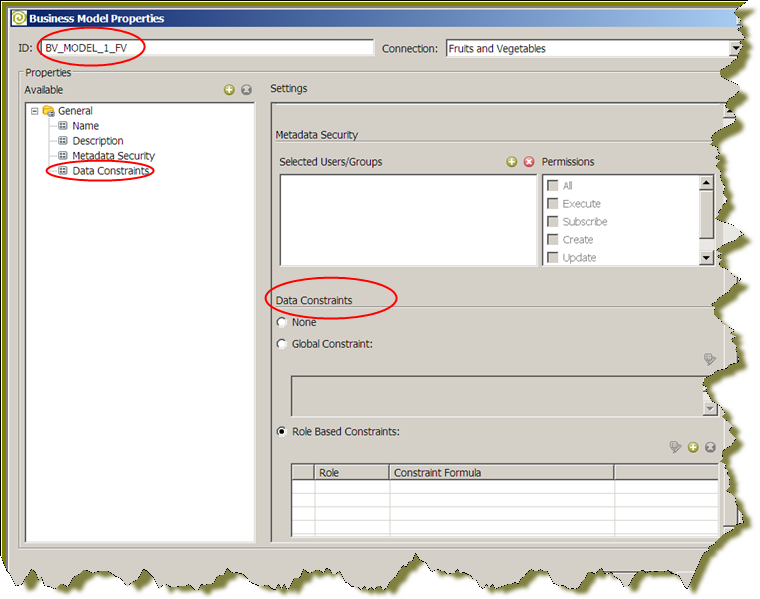
Any data constraints defined below the model level, such as in a business table or business column, is ignored and not used. In the Business Model Properties dialog box, select the .
If you are using Role Based Constraints, the metadata engine determines which MQL constraints are appropriate for the current user and applies them to the current query. Constraints may be added for each Role and User in a system. If zero constraints match a user and his or her roles, no data is returned by the MQL query. If more than one constraint applies to a user, the constraints use the OR function to determine row visibility.
This example below defines an MQL formula for three different roles. The Admin role has full row visibility, the Sales and Engineering roles can access data that joins to rows associated with their specific department only.
| Role | Constraint |
| Admin | TRUE() |
| Sales | [BC_DEPARTMENT]="Sales" |
| Engineering | [BC_DEPARTMENT]="Engineering" |
Row-level security constraints are applied at the MQL layer. The business columns referenced in the MQL security constraints will be resolved down to SQL table columns. The tables which contain column references included in security constraints will be joined to your query, based on the relationships defined in the business model. It is recommended that you do not use outer-joined business columns for the purposes of security constraints.
Remove security from the metadata domain repository
Procedure
Stop the Pentaho Server and User Console.
Edit the /pentaho-solutions/system/pentahoObjects.spring.xml file.
Comment out the
IMetadataDomainRepositoryImplline, and uncomment the similar line below it. Alternatively, you can switch the value ofIMetadataDomainRepositoryImplfromorg.pentaho.platform.plugin.services.metadata.SecurityAwareMetadataDomainRepositorytoorg.pentaho.platform.plugin.services.metadata.PentahoMetadataDomainRepository.<!-- <bean id="IMetadataDomainRepositoryImpl" class="org.pentaho.platform.plugin.services.metadata. SecurityAwareMetadataDomainRepository" scope="singleton"/> --> <!-- Use this schema factory to disable PMD security --> <bean id="IMetadataDomainRepositoryImpl" class="org.pentaho.platform.plugin.services.metadata.PentahoMetadataDomainRepository" scope="singleton"/>Save and close the file.
Restart the Pentaho Server and User Console.
Results