Inspect your data

When working with your transformation, you can gain valuable insights by visualizing and interacting with your data.
You can quickly inspect step data, reducing the amount of iterative work needed while building your transformation. Then you can rapidly publish a data source to share with your teams or across your organization.
Get started
Begin inspecting your data by clicking on a step in the transformation.
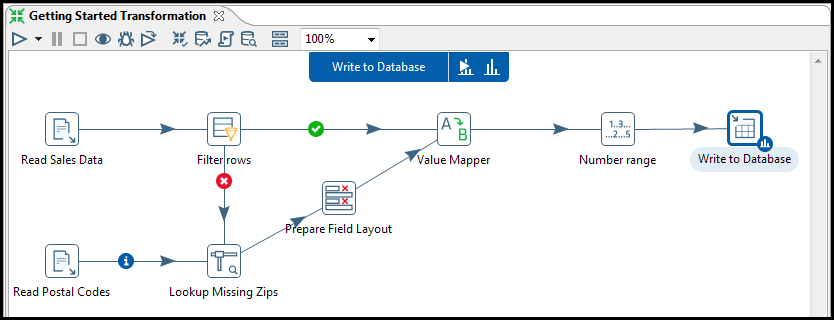
The fly-out inspection bar appears at the top of the transformation canvas . The fly-out inspection bar displays the name of the step selected and contains two buttons for data inspection:

Run and Inspect Data button - Runs the transformation up to the selected step, then lets you inspect your data.
Inspect Data button - Lets you inspect the data of a step once the transformation has run.
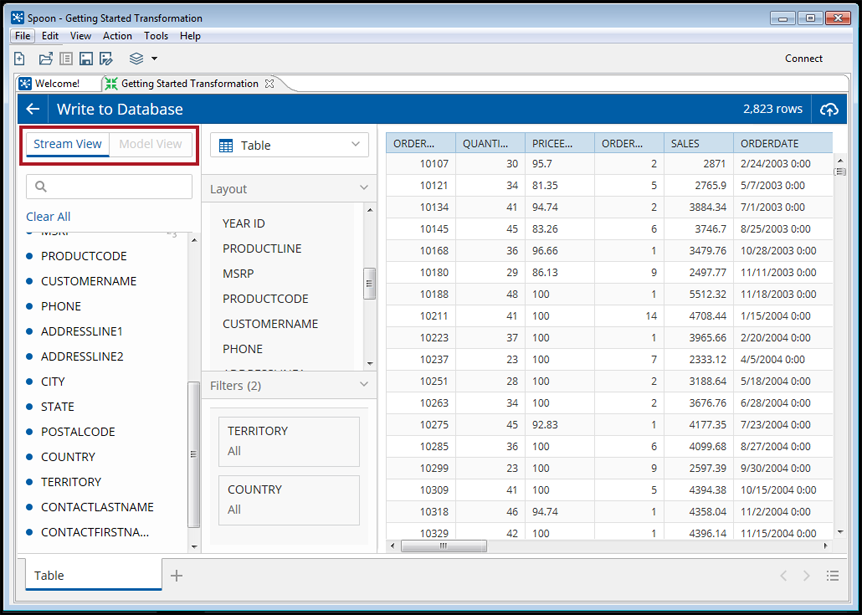
After the transformation runs, a flat table of your step data is displayed with all the available fields selected in Stream View.
Additionally, you can begin inspecting data using these other methods:
- Transformation menu: Right-click on a step and choose either Inspect Data or Run and Inspect Data.
- Preview Data panel: Select the Preview Data tab. Click the Inspect Data button located at the top right of the Preview Data panel.
- Actions menu: Select a step. From the Menu bar, click or .
- Keyboard Shortcuts: Select a step, and then using your keyboard, do the
following:
- In Windows and Ubuntu, press either ShiftCtrlF9 to inspect data, or CtrlF9 to run and inspect data.
- In OS X, press ShiftCommandF9 to inspect data, or CommandF9 to run and inspect data.
Tour the environment
The following illustration shows selected data visualized as a Bar chart in Model View.
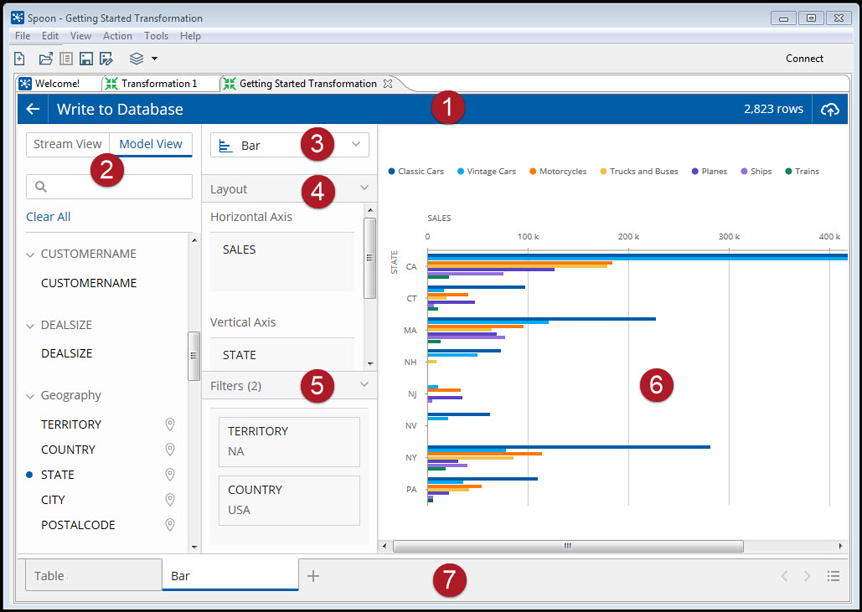
Use the numbered items in the illustration above to reference the sections of the inspection environment in the table below.
| Item | Feature | Description |
| 1 | Header bar |
Use the header bar to access:
|
| 2 | Stream View / Model View |
Toggle between the Stream View and Model View modes to inspect data and build visualizations based on the data sampled.
NoteWhen a visualization mode is
not supported, the unsupported view is disabled.
|
| Search box | Use the Search box to find a specific field in the list of available fields. This feature is especially useful in Stream View where the order of the fields is solely determined by the transformation. | |
| Available fields panel |
The available fields panel lists all available fields from the subset of data being inspected. Field types are automatically assigned as the step data are ingested, including:
From this panel, you can select the specific fields you want to
inspect and exclude others. Selected fields display with a blue disk icon (
| |
| 3 | Visualization selector | Use the visualization selector to choose a visualization type. Selecting a visualization from the drop-down menu produces it on the canvas. |
| 4 | Layout panel | Displays the available drop zones and associated field types needed for the selected visualization. Click the header to collapse this panel and expand the Filters panel, if needed. |
| 5 | Filters panel | Displays all filters applied to a visualization. Click the header to collapse this panel and expand the Layout panel, if needed. To apply a filter, you can drag a field from the available fields panel into the Filters panel. Keyboard shortcuts are available for many filter options. Also, some specific filtering actions can be applied by clicking on the visualization. See the Use Filters to Explore Your Data article for more information. |
| 6 | canvas | The canvas displays the visualization you are using for data inspection. |
| 7 | Tabs bar |
Use the Tabs bar to manage and navigate the tabs:
|
 ), use to return to your transformation.
 icon), which contain date data. (
 icon), which contain numeric data. (
 icon), which contain location data. (
 icon), which contain quantitative data. (
 icon), which contain time data. (
 ) to the left of their names. Click a field to select or clear it, or drag
a field into the
) to the left of their names. Click a field to select or clear it, or drag
a field into the  icon), which contains options for the selected tab (
Use visualizations
Data visualizations have two modes: Stream View and Model View. You can switch between these modes to inspect data and shape visualizations based on the sampled set. Stream View generates SQL queries used in entity-relational modeling and executed in a relational database. Model View builds upon the same tables as Stream View, laying a dimensional model on top of them, and allowing for multidimensional queries, supported in the background by MDX queries to a Mondrian engine.
The first view provided during data inspection is a Stream View of your step data in a flat table on the canvas. To reduce the number of data fields selected, click anywhere on the field name in the available fields panel. The blue disc icon to the left of the name disappears, indicating that the field is no longer selected. To change the visualization type, use the visualization selector. If you select a visualization that requires a model, the mode will automatically switch to Model View. Otherwise, it remains in Stream View, and if available Model View can be manually selected.
Drag the fields you want to visualize from the available fields panel and drop them into the drop zones of the Layout panel. The drop zones and the data they accept are determined by the visualization type. To explore your data with additional visualization types, create additional tabs.
You can further customize your visualization by keeping or excluding fields, by drilling down into data points in the visualization including the legend or axis labels of a chart, and by other filtering options. When you filter, the filtering action is applied to the data and the Filters panel and visualization automatically updates, based on the selected filter. For more information, see the Filters article.
Once you are satisfied with your step data and model, you can make the content available for collaboration by publishing a data source.
Save your inspection session
You can save your data inspection session for later use and sharing. After you
have made changes to the generated data and you exit the application, an inspection icon
( ) appears on the step in the transformation canvas to indicate it has a remembered
session. When you save, this session gets stored as a Kettle transformation
(.ktr) file. The session can then be restored by reopening the saved
file and re-inspecting the step.
) appears on the step in the transformation canvas to indicate it has a remembered
session. When you save, this session gets stored as a Kettle transformation
(.ktr) file. The session can then be restored by reopening the saved
file and re-inspecting the step.
Use tabs to create multiple visualizations
Perform the following steps to change a tab name:
Procedure
Double-click the tab (or select Rename from the tab menu).
Type the new tab name in the text box, and then click outside the text box (or press Enter).
NotePress Esc if you want to cancel your changes.
Results
Publish for collaboration
Procedure
Click the Publish data source button (
 ) at the top right of the header bar to open the Publish Data
Source window.
) at the top right of the header bar to open the Publish Data
Source window.Click Get Started to open the Publish Details window.
Enter the data source information in the following fields:
Fields Description Data Source Name The name used by other Pentaho applications when accessing your data source. Server The default value for this field is your current repository. You can select other repository connections, if you have created them, through the Repository Manager. URL The base URL string used to connect to the server. User Name The user name required to access the server. The user must also have publishing permissions. Password The password associated with the provided user name. When you are done, click Finish.
Once your data source is created, a confirmation will appear. The data source should now be available on the server. Click Close to continue inspecting your data or click View this in User Console to open a new browser window and work with the data source in Analyzer.
Learn more
For more information on inspecting your data, see the following articles: