Packaging the Pentaho Worker Nodes product

Before you install Pentaho Worker Nodes and HCI, consider how you want your system to operate. Below is an example configuration of the Pentaho Worker Nodes product on a typical customer site. Your IT Administrator will need to establish access between the Pentaho Server, the Pentaho Repository, and all product instances you want to run (worker nodes plus services), regardless of where each node is located. For example, in the same way that the Pentaho Server needs to talk to the Pentaho Repository, the worker node container requires the same ability. All the custom configurations you would apply to the Pentaho Server apply to the worker node container you are building.
So, it is mandatory to configure your repository, and all the databases you might
be using or want to use, in the worker node environment. Since the repository will be
accepting multiple remote connections from the worker nodes and the Pentaho Server, you must configure the
repository database to accept multiple remote connections. See Customize Worker Nodes for further information. 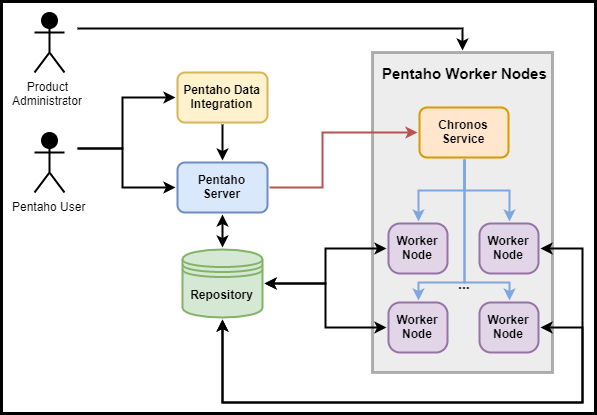
Building the HCI Assembly Artifact
Before you can install and configure Worker Nodes, you must build the HCI Assembly Artifact.
The artifact must meet the following requirements:
- Java JDK 1.8. (Later Java releases are not supported.)
- 64-bit Linux distribution
- Docker version 1.10.3 or later
The product containing the necessary scripts to package the worker-node service and to package the final product can be downloaded from the Customer Support Portal under the name pentaho-workernodes-8.0.0.0-XXX-dist.zip.
Build the HCI Assembly Artifact
Procedure
On the server where you want to deploy the Pentaho Worker Nodes Product, open a command line interface and navigate to the folder where the pentaho-workernodes-8.0.0.0-XXX-dist.zip is located.
For example:cd /home/user/Downloads
Extract the pentaho-workernodes-8.0.0.0-XXX-dist.zip file.
unzip pentaho-workernodes-8.0.0.0-XXX-dist.zip
Navigate to the
workernodesfolder that was created from the previous step.cd pentaho-workernodes-8.0.0.0-XXX
Run the EULA installer.
java -DINSTALL_PATH=pentaho-worker-nodes -DEULA_ACCEPT=true -jar pentaho-workernodes-8.0.0.0.0-XXX/installer.jar -options-system
When complete, navigate to the INSTALL_PATH (In the previous example,
pentaho-worker-nodes.)cd pentaho-worker-nodes
Extract the worker nodes archive using the following command:
tar -zxf pentaho-workernodes-8.0.0.0.0-XXX.tar.gz
Download the pentaho-server-8.0.0.0.zip file.
NoteFile names and licenses are checked during the component build process. Missing or incorrectly named files will halt the build process. Be sure to check the accuracy of your files and licenses prior to downloading.Copy the
For example:pentaho-serverarchive into the pentaho-ee-foundry/services/worker-node-service/docker folder.cp ~/Downloads/pentaho-server-8.0.0.0.xxx.zip pentaho-ee-foundry/services/worker-node-service/docker
Customize Worker Nodes
Before running the build scripts, you must add any customizations for the Worker Nodes, which can range from simple configuration file changes to complex custom plugins. For example, a simple configuration file change might include a debugging file that is required to have a worker node communicate with the repository you are using, while a more complex customization might include a custom PDI plugin that you want the worker node to be able to use.
Add custom configuration files and plugins
Once you have planned your Worker Nodes setup, use the following guidelines to add custom configuration files and plugins.
Within the pentaho-ee-foundry/services/worker-node-service/docker/ directory add your custom configuration files and plugins in the following locations:
OSGi Kettle and Platform Plugins
Drop any OSGi kettle plugins in the pentaho-server/pentaho-solutions/system/karaf/deploy directory.
Customized Configuration Files
Place customized configuration files in the same location on the directory structure as they are in the main pentaho-server directory structure. For example, the pentahoObjects.spring.xml file should go in the pentaho-server/pentaho-solutions/system/ directory just like in a default build of the Pentaho Server.
Kettle Legacy Plugins
Drop any legacy kettle plugins in the directory structure in the pentaho-server/pentaho-solutions/system/kettle/plugins/steps directory.
Platform Legacy Plugins
Drop legacy platform plugins in the pentaho-server/pentaho-solutions/system/ directory.
Best practices for applying customizations
It is recommended that you do not explicitly reference IP and port values in your XML files so you do not unintentionally bind your Docker images to these specific values. Otherwise, your Docker images would be unusable in different deployment environments that require different IPs and ports. For example, the IP and port you use to set up Worker Nodes for demonstration purposes differ from the IP and port you use in a production environment.
Replace explicit values with tokens
You can replace these values with tokens as follows:
Procedure
In your
repository.xmlfile, look for patterns such as the following:jdbc:postgresql://10.0.51.5:5432/jackrabbit
Replace the above pattern with the following pattern:
jdbc:postgresql://${repository.ip}:${repository.port}/jackrabbitIn your
postgres.hibernate.cfg.xmlfile, look for patterns such as the following:jdbc:postgresql://10.0.51.5:5432/hibernate
Replace the above pattern with the following pattern:
jdbc:postgresql://${repository.ip}:${repository.port}/hibernateEnter the explicit values in the
pentaho.worker.node.cfgfile on the Pentaho Server. Using the above example, the file would resemble the following:wn-setup-environment-variables=\ REPOSITORY_IP=10.0.51.5,\ REPOSITORY_PORT=5432
Caution for modifying file with mandatory shipped customizations
While you are modifying files with your customizations, be aware that some files in the directory already contain required customizations. The following is a list of files and their shipped customizations which will need to be present after you complete your modifications:
pentaho-server/tomcat/webapps/pentaho/WEB-INF/web.xml
- Line 27:
<web-appmetadata-complete="true"> - Line 29:
<absolute-ordering/> - Line107: Proxy Trusting filter, add
${trust.ip}
- Line 27:
pentaho-server/tomcat/webapps/pentaho/META-INF/context.xml
This file references Quartz by default. Make sure the Quartz database is removed or commented out in this file.
pentaho-server/pentaho-solutions/system/hibernate/postgresql.hibernate.cfg.xml.
- Note that while this directory structure uses the Hibernate database, your database may be different.
- Make sure to use
${repository.ip}and${repository.port}instead of pointing to static db ip and port.
pentaho-server/pentaho-solutions/system/jackrabbit/repository.xml
- Make sure to use
${repository.ip}and${repository.portinstead of pointing to static db ip and port. - For the cluster journal, a configuration required to have more than one
jackrabbit instance talking to the same database, make sure the Cluster ID has
"${jackrabbit.cluster.node.id}" - Make sure that the
AccessControlProviderpoints toorg.apache.jackrabbit.core.security.authorization.acl.WorkerNodePentahoACLProvider
- Make sure to use
pentaho-server/pentaho-solutions/system/karaf/etc/org.apache.karaf.features.cfg
If you have any custom karaf features enabled, please make sure that
featuresBootcontainspentaho-worker-nodes-ee.pentaho-ee-foundry/services/worker-node-service/docker/licenses
To properly create Worker Nodes, place your license files in this directory.
Installing the Pentaho Worker Nodes product
These instructions assume that you have built your HCI Assembly Artifact and customized your files for your deployment of Worker Nodes. When you are ready to create the final HCI product, start up the host machine where you want to deploy HCI.
There are several sections within these instructions, including:
- Download the Pentaho Worker Nodes product files
- Download the required licenses
- Build Worker Nodes service components
- Build required keys to build the Worker Nodes product
Download the Pentaho Worker Nodes product files
pentaho-workernodes-8.0.0.0-XXX-dist.zip is installed in the
pentaho/* folder.Procedure
Download the Pentaho Server 8.0.0.0 ZIP file.
Copy the ZIP file into the pentaho-ee-foundry/services/worker-node-service/docker folder.
Download the required licenses
A best practice is to use the pentaho-hci-trial-license.plk license when deploying the product. This license is only valid for using the Pentaho functionality within HCI and is valid for a period of one year.
Procedure
Download and copy the pentaho-ee licenses into the /pentaho-ee-foundry/services/worker-node-service/docker/licenses folder.
For more information about how to download Pentaho licenses using the command line, see Manage licenses using the command line interface.Navigate to the location where you unpacked the pentaho-workernodes-8.0.0.0.0-XXX.tar.gz file. Copy the pentaho-hci-trial-license.plk file into the /pentaho-ee-foundry/services/worker-node-service/docker/licenses folder.
Build Worker Nodes service components
Procedure
Navigate to the pentaho-ee-foundry folder and run the ./create-pentaho-product-components.sh script
NoteIf your site is behind a proxy firewall, you may need to adjust your docker file and component shell scripts to allow for passing a proxy value. If this situation applies to you, see "Troubleshooting: Adjust the Docker File and Component Shell Scripts to Pass Proxy Values."This script performs the following:- Creates the Docker images for Worker Nodes services and saves the image tar.gz file to the pentaho-ee-foundry/services/worker-node-service/service-components folder.
- Under the
service-componentsfolder, creates the service plugin archive using the following three components:- Docker image
- service plugin JAR
- pkg tar.gz
Check that the service plugin archive is copied to the pentaho-ee-foundry/product-components folder.
Build required keys to build the Worker Nodes product
Procedure
Using the tool GPG tool (also known as GnuPG), generate the keys. Follow the instruction and note the USER_NAME and password.
gpg2 --gen-key
Export the public key using the USER_NAME chosen during the key generation. This export will pipe the value into a file called public.key.
gpg2 --export -a "<USER_NAME>" > public.key
Export the private key using the USER_NAME chosen during the key generation. This export will pipe the value into a file called private.key.
gpg2 --export-secret-keys -a "<USER_NAME>" > private.key
Optionally, if the
gpg2 --gen-keyfails, follow these additional steps:Run the following command:
sudo apt install pinentry-qt
Unset DISPLAY.
Even though GPG2 instructs moving the mouse, typing commands, or doing something else with the system, the key generation steps can take a long time. To reduce this time, you can install the random number generation tool using the following command:
sudo apt install rng-tools
Next steps
PentahoWorkerNodes product by
executing the script./create-pentaho-product.sh. This script
expects the public.key to be in the current folder.Next step: Install on a single instance of HCI
After packaging the Pentaho Worker Nodes Product, see Install Pentaho Worker Nodes on a single instance of HCI for an example of how to install your package on a single instance of HCI.