Manage Pentaho licenses
Pentaho offers a 30-day trial license as well as a full enterprise license.
If you are a trial user and the trial period has ended, you must acquire a full license to continue to use the product.
This section includes the following information:
Acquire a trial license
You can obtain a Pentaho trial license to test the product before you acquire it. You need internet access to activate a trial license and run the installed trial version. It is not possible to run it for en extended period of time while disconnected from internet.
The temporary license expires thirty days after the start of the evaluation period.
Procedure
To request a trial activation ID, go to the Pentaho download page on the Hitachi Vantara website.
Alternatively, contact the Pentaho Sales team.On the download page, click Start a Free 30 Day Trial to open the trial registration form.
Complete the trial registration form and click Submit.
The trial entitlement and activation ID is sent to you by email.Download and install the Pentaho product.
When launching the product, the Add License window opens.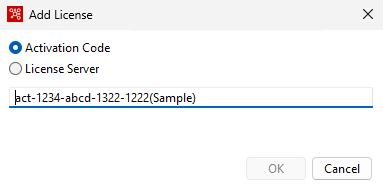
Select Activation Code.
Copy the activation ID that you received from the local license manager, paste it into the provided field, and click OK.
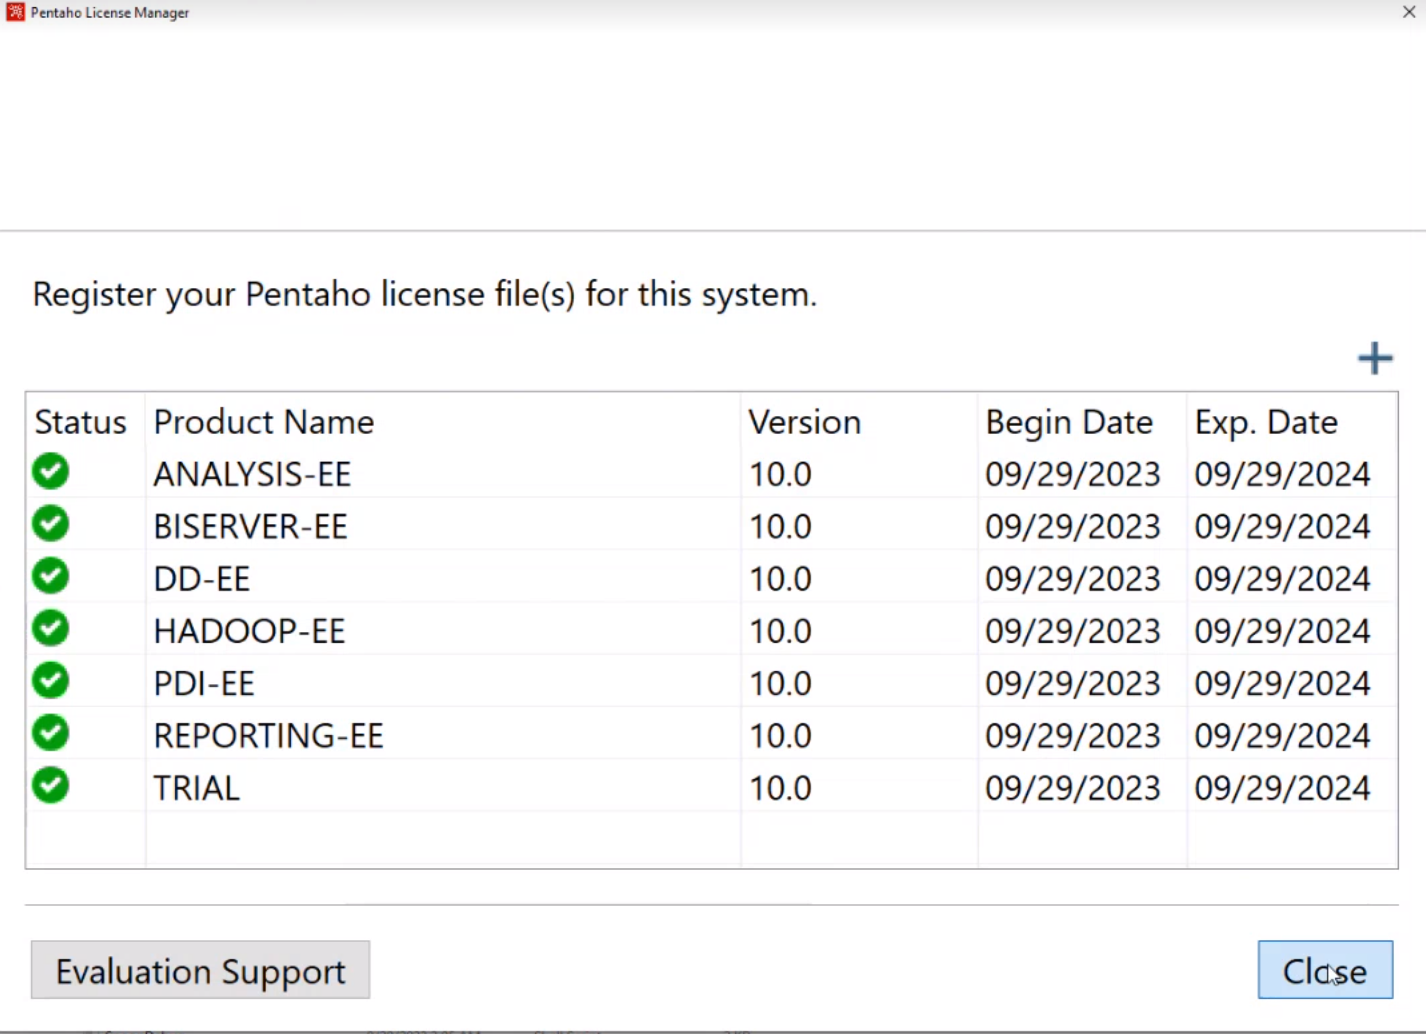
The Licenses window displays the trial license now available to you.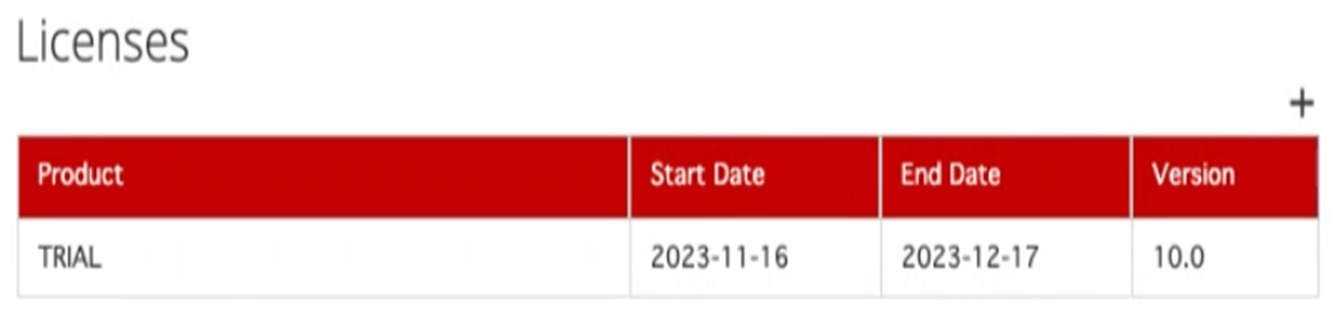
Acquire and install enterprise licenses
If you are an existing customer wanting to upgrade from Pentaho 9.x or earlier supported versions, do not start the server before upgrading the licenses. You must install the new version of the product before activating the licenses.
Process overview for enterprise licenses
Follow this process to acquire, activate, and install an enterprise license.
- Contact the Sales team and acquire Pentaho licenses.
- Use a cloud license server or a local license server to manage license activation.
- Allocate licenses within your organization.
- Install the Pentaho product and provide the URL for the license server you are using. This unlocks the components available to you.
Acquire an enterprise license
Contact the Pentaho Sales team to purchase licenses for the product.
When you have acquired your licenses, you will receive an email with an activation ID or cloud license server information, which is needed to unlock the purchased components.
Activate a license using a cloud license server
If you are able to access our cloud license server without any security restrictions, this is the quickest way to get up and running with Pentaho.
Copy the cloud license server URL that Hitachi Vantara emails you into the License Server field of the Add License dialog box that opens when you launch the product and click OK. See Install licenses using PUC or Install licenses using the PDI client for more information.
Activate a license using a local license server
If you cannot access a cloud license server but need a license server behind your firewall, you can install either a Linux or a Windows version of the local license server. The local license server is a command line tool that is used to activate the acquired licenses and perform various administrative tasks.
During the process of installing the local license server, you are provided with a URL for the product to connect with the license server. When you subsequently install the product, it will ask you for the license server URL. The local license server communicates which licenses are available and the proper components are unlocked and made available to you.
This is described in more detail in the following topics.
Install and manage a local license server
You can install a local license server to activate and manage licenses inside your firewall. This is supported on Linux or Windows operating systems.
Install a local license server (Linux)
You can install a local license server for activating and allocating Pentaho licenses on Linux. The local license server communicates with the installed product and activates the components that you purchased licenses for.
Before you begin
Before installing the local license server, observe the following prerequisites or their equivalents:
- Operating System: Ubuntu 20.04 LTS or later
- CPU Cores: 4
- RAM: 8 GB
- Storage: 200 GB
- Set JAVA_HOME as an environment variable.
- Port 7070 must be open for communication with the local license server.
- Sudo privileges are needed for certain tasks.
Procedure
Download the local license server file enterprise-local-license-server<build_version>.tar.gz to the Ubuntu server.
Set the necessary permissions to open the downloaded file using the following command:
chmod 777 enterprise-local-license-server<build_version>.tar.gz
Open the download package using the following command:
tar -xvzf enterprise-local-license-server<build_version>.tar.gz -C <destination_folder>
Navigate to the folder where the installation file is located using the following command:
cd /<destination_folder>/enterprise-local-license-server/server
Run the license server executable using the following command:
sudo ./install-systemd.sh
Change passwords after deploying the server using the following command:
flexnetlsadmin -server <licenseServer_baseURL> -authorize <defaultAdminName> {<defaultAdminPassword>|-<passwordConsoleInput>} -users -edit admin {<newAdminPassword>!|-<passwordConsoleInput>}Default admin user account information is included in the producer-settings.xml file:
- Default username:
admin - Default password:
Password!01
- Default username:
Start the local license server using the following command:
sudo systemctl start flexnetls-pentaho
Perform a
systemdstatus check to see if the Flex Net service is running using the following command:sudo systemctl -l status flexnetls-pentaho
If the system status check shows that it is running, check the status of the Flex Net server using the following command:
./flexnetlsadmin.sh -authorize admin <password> -server <http://<server_ip_address>:7070/api/1.0/instances/~> -statusActivate and populate the pool of licenses on the server using the activation ID mailed to you by Hitachi Vantara using one of the following methods:
- Online activation:
./flexnetlsadmin.sh -authorize <admin_name> <password> -server <licenseServer_baseURL> -activate -id <activation_id> -count <no_of_entitlements_you_want_to_activate>
- Offline activation: See Activate offline entitlements for a local license server.
- Online activation:
Check which licenses have been activated using the following command:
./flexnetlsadmin.sh -authorize admin <password> -server <http://<server_ip_address>:7070/api/1.0/instances/~> -licenses -verbose
Install a local license server (Windows)
You can install a local license server for activating and allocating Pentaho licenses on Windows. The local license server communicates with the installed product and activates the components that you purchased licenses for.
Before you begin
Before installing the local license server, observe the following prerequisites or their equivalents:
- Operating System: Windows 10 or 11
- CPU Cores: 4
- RAM: 8 GB
- Storage: 200 GB
- Set JAVA_HOME as an environment variable.
- Port 7070 must be open for communication with the local license server.
- Windows administrator privileges.
Procedure
Download the local license server file enterprise-local-license-server<build_version>.zip to the Windows server.
Open the downloaded zip file using the following command:
unzip enterprise-local-license-server<build_version>.zip
The installation files are extracted to <installation_path>\enterprise-local-license-server-<version>.Navigate to directory you extracted the files to and execute the following install batch file:
install.bat
Review and accept the terms of the license agreement.
The directory enterprise-local-license-server is created.Navigate to <installation_path>\enterprise-local-license-server\server (or the folder containing the files flexnetls.jar and flexnetls.bat in the license server installation).
In the same directory, run the following command to install the license server as a service:
flexnetls.bat -install
After deploying the server, change the passwords by running the following command in the <installation_path>\enterprise-local-license-server\enterprise folder:
flexnetlsadmin -server http://<localhostName>:7070/api/1.0/instances/~ -authorize admin <old_password> -users -edit admin <new_password>Default admin user account information is included in the file producer-settings.xml:
- Default username:
admin - Default password:
Password!01
- Default username:
Start the local license server using the following command:
flexnetls.bat -start
Check the status of the license server using the following command:
flexnetls.bat -status
If the server is running, it reports the statusService running.Open the Windows Services application by running the command services.msc at the Windows command line and verify that the service
To stop the service, runFlexNet License Server - <admin_name>has started.flexnetls.bat -stop.Using the following command, activate and populate the pool of licenses on the server using the activation ID mailed to you by Hitachi Vantara:
flexnetlsadmin.bat -authorize <admin_name> <password> -server <licenseServer_baseURL> -activate -id <activation_id> -count <no_of_entitlements_you_want_to_activate>
where<licenseServer_baseURL>ishttp://<localhostName>:7070/api/1.0/instances/~Check which licenses have been activated using the following command:
flexnetlsadmin.bat -authorize admin <password> -server <licenseServer_baseURL> -licenses -verbose
Check the status of the server using the following command:
flexnetlsadmin.bat -authorize admin <password> -server <licenseServer_baseURL> -status
Administrative commands for local license server
You can use various CLI commands to perform basic license management operations.
| File | Location | Description |
| access_request.log | /var/opt/flexnetls/<identityName>/logs | Server endpoint request logs |
| flexnetls.log | /var/opt/flexnetls/<identityName>/logs | Various server logs |
-authorize admin <password>
- Default username:
admin - Default password:
Password\!01
| File/command | Location | Description |
| ./flexnetlsadmin.sh -authorize admin <password> -server <http://<server_ip_address>:7070/api/1.0/instances/~> -status | /home/<user>/revenera/flexnetls-x64_linux-2023.05.0/enterprise | Checks the status of the Flex Net service. |
| ./flexnetlsadmin -authorize admin <password> -server <http://<server_ip_address>:7070/api/1.0/instances/~> -config | /home/<user>/revenera/flexnetls-x64_linux-2023.05.0/enterprise | Checks the configuration of the license server. |
| ./flexnetlsadmin.sh -authorize admin <password> -server <http://<server_ip_address>:7070/api/1.0/instances/~> -licenses -verbose | /home/<user>/revenera/flexnetls-x64_linux-2023.05.0/enterprise | Checks which entitlements have been activated. |
| ./flexnetlsadmin.sh -authorize admin <password> -server <licenseServer_baseURL> -activate -id <activation_id> -count <no_of_lic> | /home/<user>/revenera/flexnetls-x64_linux-2023.05.0/enterprise | Activates or populates the pool of licenses on the server after entitlements are created. |
| File/command | Location | Description |
| local-configuration.yaml | /opt/flexnetls/pentaho | Local license server configuration. |
| producer-settings.xml | /opt/flexnetls/pentaho | Server configuration that has been set up by Hitachi Vantara. |
sudo systemctl daemon-reload | Not applicable | The systemctl commands must be executed when updating the server configuration, such as when performing updates to local-configuration.yaml. |
sudo systemctl stop flexnetls | Not applicable | System-wide commands. |
sudo systemctl enable flexnetls | ||
sudo systemctl disable flexnetls | ||
| sudo systemctl status flexnetls |
Set up Self-Signed Certificate (SSL)
You can apply SSL to the server configuration using the following procedure:
Before you begin
Port 1443 must be open for communication with the local license server.
Procedure
Navigate to the following folder:
cd /usr/lib/jvm/<java_installation_folder>/lib/security
Example: /usr/lib/jvm/java-1.11.0-openjdk-amd64/lib/securityGenerate the self-signed SSL certificate by running the following command:
sudo keytool -genkey -keyalg RSA -alias selfsigned -keystore keystore.jks -storepass changeit -validity 3600 -ext san=ip:<ip_address>,ip:<local_host>
Export the generated certificate to file using the following command:
sudo keytool -export -alias selfsigned -keystore keystore.jks -rfc -file server_cert.certs
Import the file into the keystore using the following command:
sudo keytool -import -trustcacerts -keystore /usr/lib/jvm/java-1.11.0-openjdk-amd64/lib/security/cacerts -storepass changeit -alias selfsigned -file server_cert.cert
Update local-setting.xml as follows:
# HTTPS server mode
https-in:
  # Set to true to enable
  enabled: false
  # HTTPS listening port
  port: 1443
  # Path to keystore
  keystore-path: <path-to-your-keystore>
  # Keystore password. You can obfuscate this with java -jar flexnetls.jar -password <your-password>
  keystore-password: changeit

  # Choice of TLS cipher suites. One of MODERN, COMPATIBLE or WEAK.
  tlsCipherSuites: COMPATIBLE

# HTTPS client mode. You generally don't need to specify this, unless you have an in-house CA chain.
https-out:
  # Set to true to enable
  enabled: false
  # Path to truststore containing server certificate.
  truststore-path: <path-to-your-truststore>
  # Truststore password. You can obfuscate this with java -jar flexnetls.jar -password <your-password>
  truststore-password: changeit
  # Switch off if you're having host validation problems (not recommended)
  host-verify: true
  # Set to true if you're using self-signed certificates (not recommended)
  self-signed: false
Results
Activate offline entitlements for a local license server
If your environment has a security restriction that prevents the license server from reaching the back-office URL, you can use this procedure to activate your offline entitlements.
Procedure
Obtain the activation ID from the sales support team.
Create a request file (capabilityRequest.bin) to activate granted entitlements by executing the following command on your local license server:
cd /<destination_folder>/enterprise-local-license-server/enterprise

# Linux:
./flexnetlsadmin.sh -server http://<license_server_ip_address>:7070/api/1.0/instances/~ -authorize admin Password!01 -activate -id <activation_id> -count <no_of_entitlements_you_want_to_activate> -o capabilityRequest.bin

# Windows:
./flexnetlsadmin.bat -server http://<license_server_ip_address>:7070/api/1.0/instances/~ -authorize admin Password!01 -activate -id <activation_id> -count <no_of_entitlements_you_want_to_activate> -o capabilityRequest.bin
A capabilityRequest.bin file is generated in the directory where you ran the command.Send the capabilityRequest.bin file to Pentaho customer support.
Customer support generates a capabilityResponse.bin file and sends it to you.Load the capabilityResponse.bin file to the local license server using the following command:
Linux:./flexnetlsadmin.sh -server http://<license_server_ip_address>:7070/api/1.0/instances/~ -authorize admin Password\!01 -activate -load capabilityResponse.binWindows:./flexnetlsadmin.bat -server http://<license_server_ip_address>:7070/api/1.0/instances/~ -authorize admin Password\!01 -activate -load capabilityResponse.binCheck which licenses have been activated using the following command:
./flexnetlsadmin.sh -authorize admin <password> -server <http://<server_ip_address>:7070/api/1.0/instances/~> -licenses -verbose
Results
Uninstall a local license server (Linux)
To uninstall the local license server from your Linux environment, complete the following steps:
If a device is associated with your Linux machine from FlexNet Operations before you uninstall and there are activated entitlements, change the state of that device to obsolete before re-installing the local license server. Otherwise, you might encounter an activation ID mismatch.
Procedure
Shut down the flexnetls-pentaho service using the following command:
sudo systemctl stop flexnetls-pentaho
Prevent the service from starting automatically when rebooting the system using the following command:
sudo systemctl disable flexnetls-pentaho
Remove the following files that are associated with the service:
sudo rm /etc/systemd/system/flexnetls-pentaho.service
sudo rm -r /etc/systemd/system/flexnetls-pentaho.service.d
(Optional) If you are planning to do a clean re-install, remove the following files as well:
File location Command Trusted storage files in /var/opts/flexnetls/producer_name (.ks, .db, and .0 files)
rm -rf /var/opts/flexnetls/pentahoLog files in /var/opts/flexnetls/producer_nama/logs
rm -rf /opt/flexnetls/pentaho
Uninstall a local license server (Windows)
To uninstall the local license server from your Windows environment, complete the following steps:
Procedure
Shut down the flexnetls-pentaho service using the following command:
flexnetls.bat -stop
Uninstall the license server service using the following command:
flexnetls.bat -uninstall
To properly clean up your environment, run the following command:
sc delete FNLS-pentaho
Delete the files in the license server’s installation directory.
(Optional) If you are planning to do a clean re-install, remove the following files as well:
Files Default file location Trusted storage files C:\Windows\ServiceProfiles\NetworkService\flexnetls\pentaho (.ks, .db, and .0 files) Log files C:\Windows\ServiceProfiles\NetworkService\flexnetls\pentaho\logs NoteTrusted storage and log file locations are defined by the license server policies server.trustedStorageDir and logging.directory, respectively, the defaults for which are based on ${bases.dir}. Depending on the values set for these policies on your server, your trusted storage and log files might be in different locations than those mentioned in this step.
Install licenses using PUC
Follow the procedure below to install the Pentaho Server licenses by using the Pentaho User Console (PUC).
Before you begin
Before installing the Pentaho Server licenses, you must complete the following prerequisites:
- Acquire a license and receive an activation ID or cloud license server information via email.
- Verify that you can access a cloud license server (see Activate a license using a cloud license server). If you cannot access a cloud license server, you must install a local license server (see Install and manage a local license server).
- Download the Pentaho Server to your environment.
- Verify that you have administration privileges.
Procedure
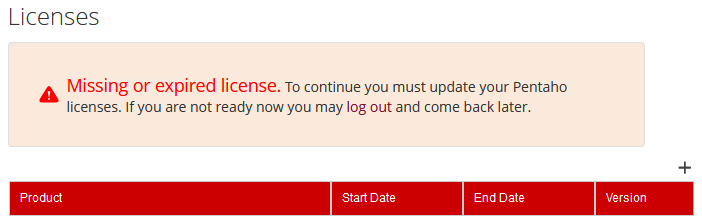
If you do not have valid licenses, the first time you log on the License page appears.
Click the plus sign (+) to open the Add License window.
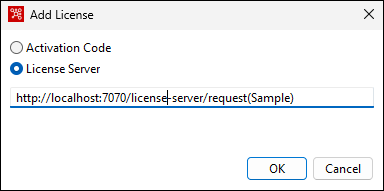
Select the License Server option, enter either the cloud license server URL or the local license server URL, and click OK.
NoteThe Activation Code option is only for activating a trial license.A license summary informs you what components you are now entitled to use.
Install licenses using the PDI client
Follow the procedure below to install your licenses using the PDI client (also called Spoon).
Before you begin
Before installing the licenses, observe the following prerequisites:
- Acquire a license and receive an activation ID or cloud license server information via email.
- Verify that you can access a cloud license server (see Activate a license using a cloud license server). If you cannot access a cloud license server, you must install a local license server (see Install and manage a local license server).
- Download the PDI client to your system.
Procedure
Start the PDI client.
See Learn about the PDI client for more information about the PDI client. If no valid license for the PDI client exists, the Pentaho License Manager dialog box appears.From within the Pentaho License Manager, click the add button (+) to open the Add License dialog box.
Select the License Server option, enter either the cloud license server URL or the local license server URL, and click OK.
NoteThe activation code is only for activating a trial license.A license summary informs you what components you are now entitled to use.
Manage licenses using the command line interface
You can set the license path environment variable or you can install, update, list, or remove license files.
Setting the license path environment variable
To ensure that the Pentaho Server uses the same location to store and retrieve your Pentaho licenses, you must create a PENTAHO_LICENSE_INFORMATION_PATH system environment variable for your Pentaho user account if it does not exist. It does not matter what location you choose; however, the location needs to be available to the user account(s) that run the Pentaho Server.
Set the license path environment variable on Linux
Procedure
Open the /etc/environment file with any text editor.
Add this line in a convenient place (changing the path if necessary):
export PENTAHO_LICENSE_INFORMATION_PATH=/home/pentaho/.elmLicInfo.plt
The license information file is saved in the /home/user/…/.pentaho folder.Log out and log back into the operating system for the change to take effect.
Verify that the variable is properly set using the following command.
env | grep PENTAHO_LICENSE_INFORMATION_PATH
Results
Set the license path environment variable on Windows
Before you begin
Move the installed license .elmLicInfo.plt file from where it was installed (C:\Users\<user>\.pentaho) to C:\Windows\ServiceProfiles\LocalService\.pentaho or to the location where you are running the Windows service.
Procedure
Under Windows settings, locate and open the Windows system environment variables file for editing.
In the System Variable section, click New.
A dialog box will ask for a variable name and value.Type PENTAHO_LICENSE_INFORMATION_PATH into the name field, and specify the directory where you intend to install the licenses. Type .elmLicInfo.plt in the value field, then click OK.
C:/pentaho/.elmLicInfo.plt
The license information file is saved in the /home/user/…/.pentaho folder.In the parent window, click Apply Changes.
Restart your computer for the change to take effect.
Verify that the variable is properly set, using the following command at the command prompt:
echo %PENTAHO_LICENSE_INFORMATION_PATH%
Results
Next steps
Install or update license files from the command line
Procedure
Navigate to the /license-installer/ directory where the Pentaho PDI tool is installed (the license-installer subfolder).
Run the license installation script as follows to see examples of how to use it:
- Linux:
install_license.sh --help
- MacOS:
install_license.sh --help
- Windows:
install_license.bat --help
- Linux: