Manage data sources

With Lumada Data Catalog, you can process data from file systems and relational databases. Data sources can contain structured or unstructured data.
Data Catalog supports the following unstructured document types:
- Adobe PDF (.pdf)
- Email (.eml without attachments)
- Microsoft Excel (.xls and .xlsx)
- Microsoft PowerPoint (.ppt and .pptx)
- Microsoft Rich Text Format (.rtf)
- Microsoft Word (.doc and .docx)
- OpenOffice (.odf and .odg)
- Text (.txt)
You can scan and profile these unstructured documents to determine document properties, identify sensitive data, and detect the language of the content. To add business terms to unstructured data, see Tag unstructured data.
All properties displayed in the Data Canvas are then available for tagging and evaluation using business rules.
You can also use JSON documents in a NoSQL MongoDB as a data source. The following data sources are supported:
| Type | Data source |
| File System |
|
| File Storage |
|
| Relational Databases |
|
| NoSQL Databases |
|
| Data Platforms |
|
| Object Stores |
|
| Other |
NoteSelect above option for Snowflake and Vertica data sources.
|
| * To ignore selected MongoDB databases in scan or schema jobs, use the MongoDB databases to be restricted configuration setting to specify the databases to ignore. | |
To process data from these systems, Data Catalog establishes a data source definition. This data source stores the connection information to your sources of data, including their access URLs and credentials for the service user.
You can connect to an Apache Atlas data source. See Apache Atlas integration.
Adding a data source
If your role has the Manage Data Sources privilege, perform the following steps to create data source definitions.
Specify data source identifiers
Procedure
Click Management in the left navigation menu.
The Manage Your Environment page opens.Click Data Source then Add Data Source, or Add New then Add Data Source.
The Create Data Source page opens.Specify the following basic information for the connection to your data source:
Field Description Data Source Name Specify the name of your data source. This name is used in the Data Catalog interface. It should be something your Data Catalog users recognize. NoteNames must start with a letter, and must contain only letters, digits, and underscores. White spaces in names are not supported.Description (Optional) Specify a description of your data source. Agent Select the Data Catalog agent that will service your data source. This agent is responsible for triggering and managing profiling jobs in Data Catalog for this data source. Data Source Type Select the type of your data source. You are then prompted to specify additional connection information based on the file system or database type you are trying to access. NoteYou need to specify a source path for each data source type. The source path must indicate a folder or schema, and should not directly reference a single resource (file or table).Specify additional connection information based on the file system or database type you are trying to access.
See the following sections for details:
ADLS data source
You can connect to an instance of Microsoft’s Azure Data Lake Storage (ADLS) system through a Shared Key, OAuth 2.0, and Other configuration method. Regardless of the method you choose, specify the following base fields:
| Field | Description |
| Source Path | Directory where this data source is included. It can be the root
of JDBC or it can be a specific high-level directory. To include all databases,
use "/".NoteMake
sure the specified user can access the data in the JDBC database. Data Catalog can only
process the required data if the user has access to the data within the JDBC
data source. |
| File System | The parent location that holds the files and folders |
| Account Name | The name given to your storage account during creation |
If you are using the OAuth 2.0 configuration method, you must also specify the client credentials, such as ClientID, Client Secret, and Client Endpoint.
AWS S3 data source
You can connect to an Amazon Web Services (AWS) Simple Storage Service (S3) bucket with your data source URL containing the Elastic MapReduce (EMR) file system name of the S3 bucket, for example, s3://acme-impressions-data/. Access requirements differ depending on whether you are running Lumada Data Catalog on an EMR instance or on another instance type.
Specify the following additional fields for AWS access:
| Field | Description |
| Source Path | Directory where this data source is included. |
| Endpoint | Location of the bucket. For example, s3.<region containing S3 bucket>.amazonaws.com |
| Access Key | User credential to access data on the bucket. |
| Secret Key | Password credential to access data on the bucket. |
| Bucket Name | The name of the S3 bucket in which the data resides. For S3 access from non-EMR file systems, Data Catalog uses the AWS command line interface to access S3 data. These commands send requests using access keys, which consist of an access key ID and a secret access key. You must specify the logical name for the cluster root. This value is defined by dfs.nameservices in the hdfs-site.xml configuration file. For S3 access from AWS S3 and MapR file systems, you must identify the root of the MapR file system with maprfs:///. |
| URI Scheme | Version of S3 used for the bucket. You can select either S3 or S3A. |
| Assume Role | For S3 access from EMR file systems, the EMR role must include s3:GetObject and s3:ListBucket actions for the bucket. By default, the EMR_DefaultRole includes s3:Get* and s3:List* for all buckets. The bucket must allow access for the EMR role principal to perform at least s3:GetObject and s3:ListBucket actions. |
| Additional Properties | Any additional properties needed to connect. The syntax for additional properties is property = value. For S3 access from Kerberos, you must specify the connection URL, the keytab, and principal created for the Data Catalog service user. The Kerberos user name in the Data Catalog configuration, the cluster proxy settings, and the KDC principal are all case-sensitive. Kerberos principal names are case-sensitive, but operating system names can be case-insensitive.NoteA mismatch can cause problems that are difficult to troubleshoot. |
Generic file mount
Generic file mount allows a user on a client computer to access files on a remote server as if they are local files. The protocol uses a client-server model, where the server provides the shared file system, and the client mounts the file system and accesses the shared files as if they are on a local disk.
You can add data to Data Catalog from any file-sharing network system if the data is transferrable via Network File System (NFS), Common Internet File System (CIFS), and Server Message Block (SMB) protocols using generic file mounts.
Common Internet File System (CIFS) and Server Message Block (SMB)
Common Internet File System (CIFS) and Server Message Block (SMB) are Windows file-sharing protocols used in storage systems. You can add data to Data Catalog from a file-sharing protocol CIFS or SMB to the remote agent or local agent, thereby enabling the creation of a data source as CIFS or SMB with the local file system path.
Create mount point on remote agent
Procedure
Install the remote agent. For more information, see Remote agent.
Install CIFS-utils as a sudo user with access to the remote agent.
sudo yum -y install cifs-utils
Create a mount point.
sudo mkdir /mnt/cifs-share
Mount the CIFS share on the mount point.
sudo mount -t cifs -o user=example1,password=badpass // <IP/Hostname>/ public/ /mnt/cifs-share
In the code snippet,
<IP/Hostname>is the IP or Hostname of the CIFS data source where the folders or files are set up.
Results
/mnt/cifs-share location identified in the command.Next steps
Create a mount point on a local agent
Data Catalog uses the csi-driver-smb driver plug-in as it supports dynamic provisioning of Persistent Volumes (PV) via Persistent Volume Claims (PVC) for CIFS mounts. This driver allows Kubernetes to access an SMB server on both Linux and Windows nodes.
Perform the following steps to create a mount point on the local agent installed on the Kubernetes cluster:
Procedure
Install the Container Storage Interface (CSI) driver in Kubernetes via the Helm chart.
helm repo add csi-driver-smb https://raw.githubusercontent.com/kubernetes-csi/csi-driver-smb/master/charts
helm install csi-driver-smb csi-driver-smb/csi-driver-smb --namespace kube-system
It installs the CSI driver plug-in into thekube-systemnamespace.Create a Kubernetes secret to access the CIFS mount.
kubectl create secret generic smb-creds \
    --from-literal username="example1" \
    --from-literal password="badpass"
It creates thesmb-credssecret in the default namespace.Update custom-values.yaml with CIFS configuration values.
agent:
  smbConfig:
   serverName: 10.98.124.0 # add the CIFS-server IP
   # subDir: proj # uncomment this if you want to mount only the sub directory under the shared volume
   shareName: public
   secretName: smb-creds
   # secretNameSpace: default # uncomment this and update the namespace, if you have created the secret in a different namespace
   storageSize: 1Gi
CautionMake sure you use the correct values while installing the solution, because you cannot change CIFS/SMB configuration details when the installation is complete; you can only editstorageSizeandsecretName. If you try to modify the configuration values in custom-values.yaml and do a Helm upgrade, the installation will fail as these values cannot be changed.
Results
/smb-share location. By default, PVC is created with ReadOnlyMany. Next steps
Network File System (NFS)
Network File System (NFS) is a distributed file system protocol that enables remote access to files over a network, generally on Unix and Linux networks. You can mount data as a local file system to the remote agent or local agent, thereby enabling the creation of a data source as NFS with the local file system path.
Create mount point on remote agent
sudo mount <IP/Hostname>:/nfs-share /mnt/nfs-share
Next steps
Create mount point on local agent
agent:
  nfsConfig:
   server: 172.16.10.249 # add the nfs-server IP here
   path: /tmp/nfs-files  # path to NFS shared files
   storageSize: 1Gi
It creates Persistent Volumes (PV) and Persistent Volume Claims (PVC) for the NFS share and mounts it under the /nfs-share directory into the agent, driver, and executor pods.
Next steps
Configure data source
After creating file mounts on the agent, specify the following additional fields:
| Field | Description |
| Configuration Method |
How to configure the connection. By default, it is URI, as the connection is configured using a URL. |
| Source Path | The local directory of the data source. It can be the root of the file-sharing protocol. |
| URL | Location of the file-sharing protocol root. It is file:///. |
| Always Run Jobs in Local Mode (Optional field) | When checked, all triggered jobs will be executed with the --master local parameter. |
Refer to the following image as an example. 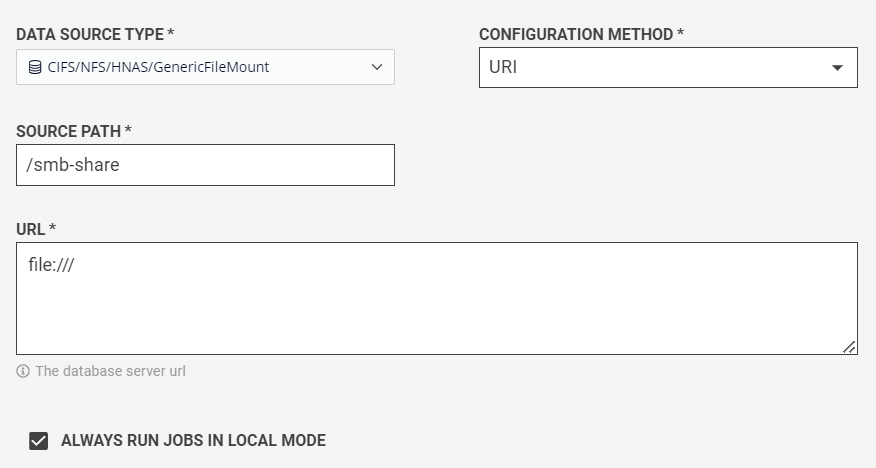
HCP data source
You can add data to Data Catalog from Hitachi Content Platform (HCP) by specifying the following additional fields:
| Field | Description |
| Source Path | Directory where this data source is included. |
| Endpoint | Location of the bucket. (hostname or IP address) |
| Access Key | The access key of the S3 credentials to access the bucket. |
| Secret Key | The secret key of the S3 credentials to access the bucket. |
| Bucket Name | The name of the bucket in which the data resides. |
| URI Scheme | The version of S3 used for the bucket. |
| Additional Properties | Any additional properties needed to connect. |
HDFS data source
You can add data to Data Catalog from files in Hadoop Distributed File System (HDFS) file systems by specifying the following additional fields:
| Field | Description |
| Configuration Method | How to configure the connection. For example, to configure the connection using a URL, select URI. |
| Source Path | A HDFS directory that this data source includes. It can be the root of HDFS, or it can be a specific high-level directory. Enter a directory based on your needs for access control. To indicate the root of the file system, use the slash "/". |
| URL | Location of the HDFS root. If the cluster is configured for high-availability (HA), this URL may be a variable name without a specific port number, for example, HDFS: hdfs://<name node>:8020. The <name node> address can be a variable name for high availability. Other examples include:
|
Hive data source
You can add data to Data Catalog from a Hive database by specifying the following additional fields:
| Field | Description |
| Configuration Method | How to configure the connection. For example, to configure the connection using a URL, select URI. |
| Source Path | The Hive database that this data source includes. It can be the Hive root, or it can be a specific database. Enter a database based on your needs for access control. To indicate the Hive root, use the slash "/". To indicate a specific database, use a slash "/" followed by the database name. For example, /default where default is the name of the Hive database. |
| URL | Location of the Hive root. For example, jdbc:hive2://localhost:10000. |
JDBC data source
You can add a Data Catalog data source connection to the following relational databases using JDBC connectors:
- MS SQL
- MySQL
- Oracle
- PostgreSQL
Other JDBC sources include:
- Denodo
- Snowflake
- Vertica
Specify the following additional fields:
| Field | Description |
| Configuration Method | How to configure the connection. For example, to configure the connection using a URL, select URI. |
| Source Path | Directory where this data source is included. It can be the root of JDBC or it can be a specific high-level directory. To include all databases, use the slash "/".NoteMake sure the specified user can access the data in the JDBC database. Data Catalog can only process the required data if the user has access to the data within the JDBC data source. |
| URL | Connection URL of the database. For example, a MYSQL URL would look like jdbc:mysql://localhost:<port_no>/. |
| Driver Name | Driver class for the database type. To connect Data Catalog to a database, you need a driver class of the database. Data Catalog auto-fills the Driver Class field for the type of database selected from the drop-down list. NoteWhen you select Other JDBC to enter the database type, you must provide the Driver Class and import the corresponding JDBC JARs which will restart the agent being used to run the data source's profiling jobs. |
| Username | Name of the default user in the database. |
| Password | Password for the default user in the database. |
| Database Name | Name of the related database. |
After a JDBC data source connection has been successfully created by a Data Catalog service user, any other user must provide their security credentials to connect to and access this JDBC database.
ClassNotFoundException or NoClassDefFoundError, your JDBC driver is not available on the class path.MongoDB data source
You can add data to Data Catalog from a MongoDB database by specifying the following additional fields:
| Field | Description |
| Configuration Method | Select URI as the configuration method. |
| Source Path | Enter the MongoDB database path. For example, the default
database path for MongoDB is /data/db. |
| URL | Enter the MongoDB server URL, for example,
mongodb://localhost:27017. |
| Username and password | Enter username and password to connect to the MongoDB server. |
See MongoDB onboarding and profiling example video for a demonstration of creating a MongoDB data source and profiling it.
OneDrive data source
You can add OneDrive data to Data Catalog by adding OneDrive as a data source.
Before you begin, make sure that you have the following information and permissions:
- Get the following information from your System Administrator Client ID, Tenant ID, and Client Secret, which are required while adding OneDrive as the data source in Data Catalog.
- Enable the following Microsoft Graph API permissions in the Microsoft Azure portal:
User.Read.All, Files.Read.All, and
(Optional) Site.Read.All. You only need to enable
Site.Read.All permission if you want to add data for
sites.
Microsoft Graph API permissions are required for Data Catalog to access OneDrive content.
Enable or disable OneDrive in Data Catalog
OneDrive as a data source is enabled by default in Data Catalog. You can disable the OneDrive feature if you do not need it. You can also enable OneDrive if it is not showing in the Data Source Type drop-down list on the Create Data Source page.
Perform the following steps to enable or disable the OneDrive feature:
Procedure
Click Management in the left navigation menu, then click Configuration.
Under app-server Categories, navigate to MISC, and click the View Details button (greater-than sign) in its row.
The Enable/Disable OneDrive feature setting appears. By default the setting is set to true.To change the setting value, expand the Enable/Disable OneDrive feature setting. Select the value true or false from the Value drop-down.
Click Save Change.
Add OneDrive as a data source
Specify the following additional fields to add OneDrive as a data source:
| Field | Description |
| Source Path | Path to your OneDrive folder. |
| Tenant ID | Tenant ID for your OneDrive account. |
| Client ID | Client ID for your OneDrive account. |
| Client Secret | Client secret for your OneDrive account. NoteIf you have configured the expiration date for the client secret, make sure to update the client secret after it expires. You will need to create a new client secret and update the OneDrive data source information in Data Catalog with the new client secret. |
Results
- If the Personal folder is shared, it will show in both the Personal and Site folders. Data Catalog considers it as two different entities.
- If you have not enabled Microsoft Graph API Site.Read.All permission, then the Sites folder will not show any data.
- For the Sites, only Document Library is supported. For other supported types like List, Page, space, and so on, the folder is created in Data Catalog, but it will not show any data.
Test and add your data source
Procedure
Click Test Connection to test your connection to the specified data source.
If you are testing a MySQL connector and you get the following error, it means you need a more recent MySQL connector library:java.sql.SQLException: Client does not support authentication protocol requested by server. plugin type was = 'caching_sha2_password'
- Go to MySQL :: Download Connector/J and select option Platform Independent.
- Download the compressed (
.zip) file and copy to/opt/ldc/agent/extwhere/opt/ldc/agentis your agent install directory, and unpack the file.
(Optional) Enter a Note for any information you need to share with others who might access this data source.
Click Create Data Source to establish your data source connection.
Next steps
Add an external data source
- Push business terms to Atlas.
- Pull lineage information from Atlas.
If your role has the Manage Data Sources privilege, perform the following steps to create an external data source for Apache Atlas:
Procedure
Click Management in the left navigation menu.
The Manage Your Environment page opens.Click Add New in the Data Sources card then Add External Data Source.
The Create External Data Source page opens.Specify the following information for the connection to your external data source:
Field Description External Data Source Name Specify the name of your data source. This name is used in Data Catalog, so it should be something your Data Catalog users recognize. NoteNames must start with a letter, and must contain only letters, digits, and underscores. White spaces in names are not supported.Description Specify a description of your data source. External Data Source Type Select Atlas to establish a connection with your data source and the Atlas service. URL Connection URL for the Atlas service. This URL should include the host name and port for the Atlas service. Atlas Username Name of the Atlas user with the applicable permissions to perform the import and export operations. Atlas Password Password for the Atlas user. Atlas Cluster Name Name of the cluster containing Atlas. Click Test Connection to test your connection to the specified data source.
(Optional) Enter a Note for any information you need to share with others who might access this data source.
Click Create Data Source to establish your data source connection.
Results
Edit a data source
Two data sources can have overlapping source paths such that the same Source Path and URL are used, but they should have different names. For example, if a data source ds1 has the path "/" and the URLhdfs://aa:2000, you can create another data source with the same path and URL, named ds2.
Perform the following steps to edit a data source:
Procedure
Click Management in the left navigation menu and click Data Sources.
Locate the data source that you want to edit and then click the View Details (>) icon at the right end of the row for the data source.
The Data source page opens.Edit the fields, then click Test Connection to verify your connection to the specified data source.
Click Save Data Source.
Remove a data source
Perform the following steps to remove the root virtual folder of a data source:
Procedure
Click Management in the left navigation menu and click Data Sources.
Locate the data source that you want to remove, then click the View Details (>) icon at the right end of the row for the data source.
The Data source page opens.Click Remove Data Source.
The Delete dialog box opens. The Delete dialog box lists the detected dependencies of the data source.Review the dependencies, enter the name of the data source to be removed, and click Confirm.
Results