Backing up Data Catalog

This article includes procedures for backing up Data Catalog’s Solr™ data and indexes, the Postgres database, the keystore, and optionally, discovery metadata and UI logs.
You should make regular backups of all Data Catalog metadata such that it can be used to restore the catalog to a snapshot in time. To back up Data Catalog metadata, you should regularly back up the following software:
- Solr data and indexes.
- Postgres database that contains audit information for Data Catalog functions.
- Keystore file that contains the encrypted passwords for the current installation.
The upgrade process generally backs up the keystore, but it is good practice to have a separate backup in case the upgrade is unable to restore the keystore.
Depending on your requirements, you can also back up the following:
Data Catalog discovery metadata
Discovery metadata supports Data Catalog discovery operations and, if not maintained, it can be reproduced as needed. The discovery metadata location is set during Data Catalog installation, and is stored in the
ldc.metadata.hdfs.MetadataServiceHdfsPathproperty in the configuration.json file in the conf directory.Data Catalog UI logs
Web server logging information may include access attempts. For complete auditing of login attempts, back up the
ldc-ui.logfiles.
Backup process overview
The process to back up Data Catalog includes several steps. As a best practice, perform these steps in the following order:
Before you begin
Procedure
Make sure there are no Data Catalog jobs running.
As the Data Catalog service user, shut down the Data Catalog web service:
$ sudo su ldcuser
$ /opt/ldc/app-server/bin/app-server stop
Make backup locations
Before you back up Data Catalog, you need backup locations for which the service user is granted write access. See the following table to make backup locations or to verify the write permissions for existing locations:
| Write accessed by | Location | Example |
| Solr service user | Computer where a Solr instance is running. | /tmp/ldc-backups |
| Data Catalog service user |
Either of the following options:
| /tmp/ldc-backups |
| Data Catalog service user | HDFS | /backups/ldc/backup_discovery_metadata/20170901 |
Back up the Solr collection
Optionally, instead of using the steps below, you can choose one of the following methods for backing up Solr data and indexes:
Use third-party backup utilities and storage
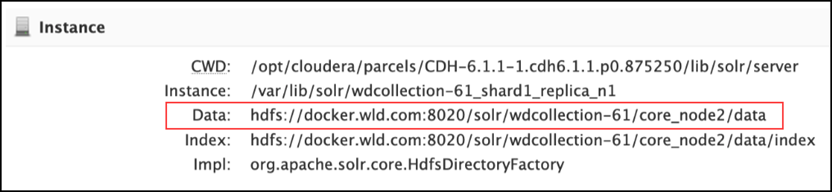
Back up the data location as shown in the Solr admin page:
Use NAS for the data
When creating the Data Catalog collection, you can choose local storage rather than HDFS and point the local storage location to the Network-Attached Storage (NAS).
Use the following steps to back up the Solr collection.
Procedure
For CDH, EMR, HDP (local/HDFS storage), run the applicable command for your environment:
For a one shard collection
curl ‘http://solrnode1:8983/solr/wdcollection_shard1_replica1/replication?command=backup&name=wdcollection_shard1_replica1_backup&location=/tmp/wd-backups’The command above backs up
shard1. If you have more than one shard, you must run the same command for all the respective shards.For a 2-shard collection
Run the following command in addition to the command above. Enter this command as a single line:
$ curl ‘http://solrnode1:8983/solr/wdcollection_shard2_replica1/replication?command=backup&name=wdcollection_shard2_replica1_backup&location=/tmp/wd-backups’For example, if your backup location is /tmp/ldc-backups, the command above will create /tmp/ldc-backups/backup_solr_index in the local file system.
If SSL is enabled
Use the following command with a reference to the SSL certificate:
$ curl --cacert /certs/cert1.pem ‘http://solrnode1:8983/solr/wdcollection_shard1_replica1/replication?command=backup&name=wdcollection_shard1_replica1_backup&location=/tmp/wd-backups’If Kerberos is enabled
Use the following command to activate authentication (the user specified here is not actually used):
$ curl --negotiate -u solradmin ‘http://solrnode1:8983/solr/wdcollection_shard1_replica1/replication?command=backup&name=wdcollection_shard1_replica1_backup&location=/tmp/wd-backups’If Kerberos and SSL are enabled
Use the following command:
$ curl --negotiate --cacert /certs/cert1.pem -u solradmin ‘http://solrnode1:8983/solr/wdcollection_shard1_replica1/replication?command=backup&name=wdcollection_shard1_replica1_backup&location=/tmp/wd-backups’
If using SolrCloud, backup the ZooKeeper configuration.
Your values may be different for the ZooKeeper port number and the Data Catalog collection name. Use the same path for the backup as in the previous step (/tmp/wd-backups). Name the configuration directory so you can identify it again, such as backup_zk_config.CDH
$ solrctl --zk localhost:2181/solr instancedir --get wdconfig /tmp/ldc-backups/backup_zk_config
HDP
$ /opt/lucidworks-hdpsearch/solr/server/scripts/cloud-scripts/zkcli.sh -zkhost localhost.localdomain:2181 -cmd downconfig -confname wdconfig -confdir /tmp/wd-backups/backup_zk_config
EMR
$ /opt/solr/server/scripts/cloud-scripts/zkcli.sh -zkhost zkhost:zkport -cmd downconfig -confname wdconfig -confdir /tmp/wd-backups/backup_zk_config
Back up Postgres
Procedure
Log in to the node where Postgres is installed.
$ ssh <ssh-user>@<postgres-host>
Navigate to the Postgres backup directory, typically /data/postgres_backups.
Back up Postgres to a file using the pg_dump command, similar to the following:
<pg-bkup>$ pgsql/bin/pg_dump -U ldc -f 20190929_postgres.bak -d ldc_db
Compress the backed up file:
<pg-bkup>$ gzip 20190929_postgres.bak
Upgrade the Postgres backup file to an archive store.
Back up discovery metadata
ldc.metadata.hdfs.MetadataServiceHdfsPath property in the conf/configuration.json file. Use the following steps to back up the discovery metadata.
Procedure
Verify the location of the discovery metadata in ldc/conf/configuration.json, the value of the
ldc.metadata.hdfs.large_properties.pathproperty.Name the discovery metadata directory so you can identify it again, such as backup_hdfs_metadata.
NoteUse the same path for the backup as in the previous steps: /tmp/ldc-backups.Example:$ hdfs fs -get /user/ldcuser/.ldc_hdfs_metadata/* /tmp/ldc-backups/backup_discovery_metadata
Back up the keystore
Each installation creates a unique secret key that is valid and essential for the Data Catalog functions of that installation.
Use the following steps to back up the keystore:
Procedure
Back up the keystore for the LDC Application Server in this path:
<LDC Install location>/app-server/jetty-distribution-9.4.18.v20190429/ldc-base/etc/keystoreBack up the keystore for the LDC Metadata Server in this path:
<LDC Install location>/metadata-server/conf/keystoreBack up the keystore for the LDC Agent server in this path:
<LDC Install location>/agent/conf/keystore
Next steps
$ /opt/ldc/app-server/bin/app-server start