Update the product details
The product is created with default settings. After you create the product, you can edit and preview the product details.
When you preview the product, you can see all the sections. However, when you are publishing the product for approval, make sure to ask your Marketplace Manager to show only the configured sections on the marketplace.
Product configuration mapping table
The following image illustrates the product configuration mapping on the marketplace:
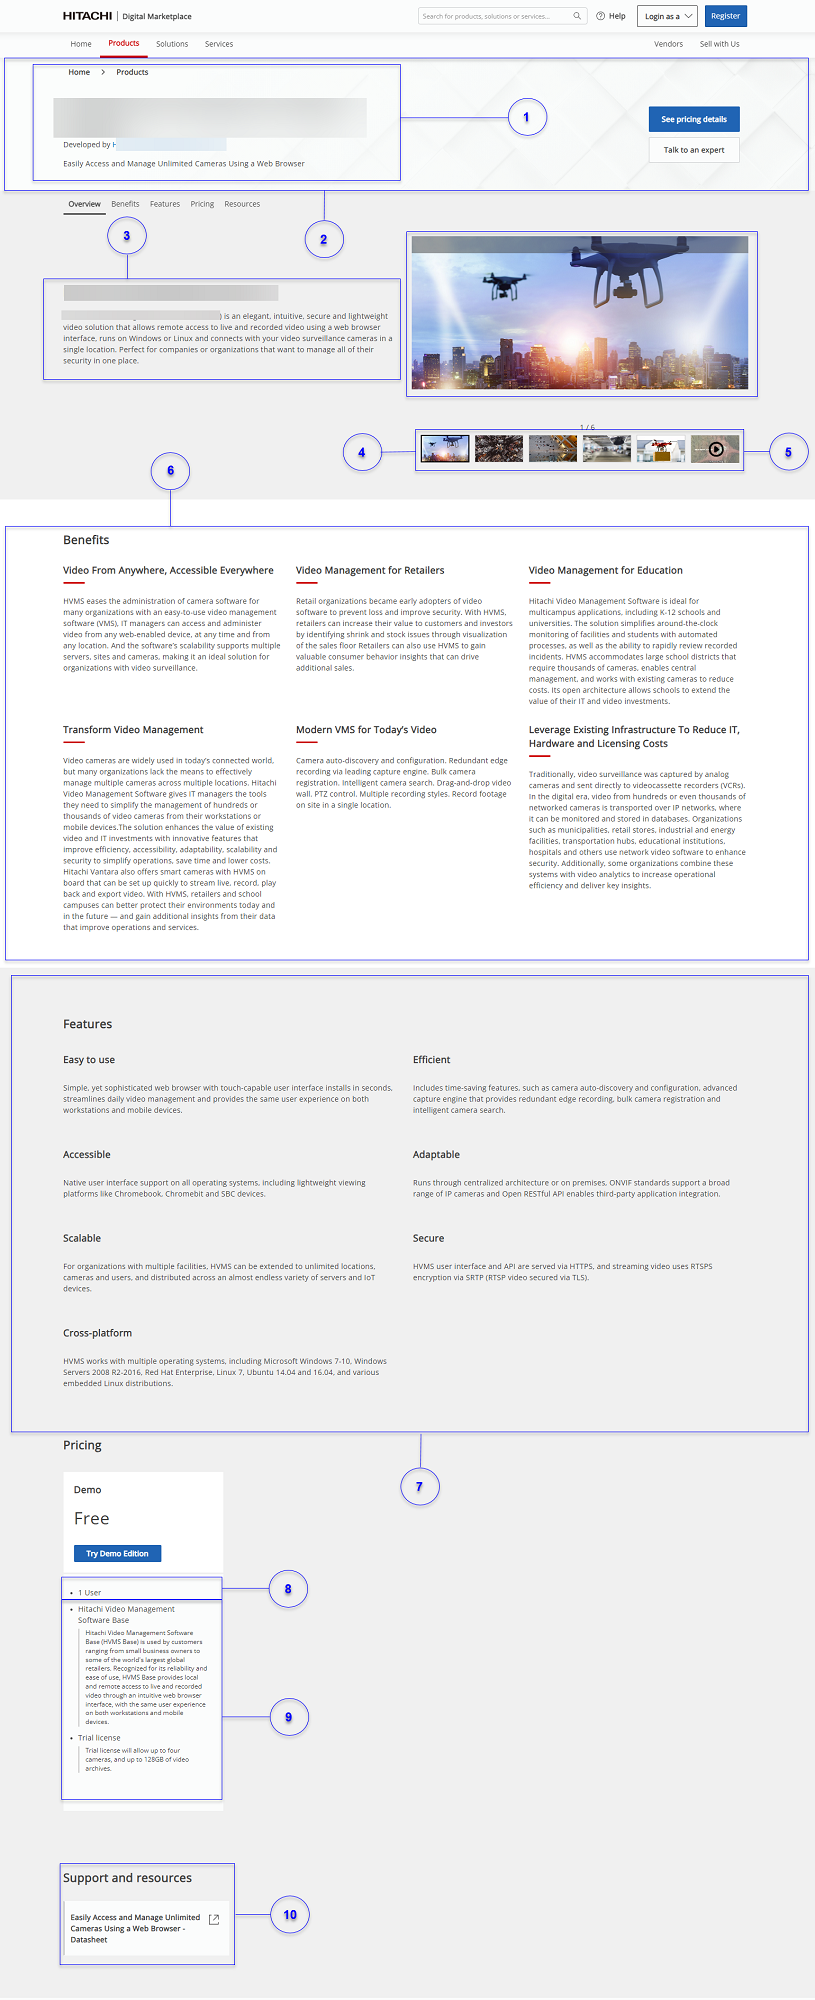 Use the following table to understand how each section on the marketplace is mapped with the sections in the Edit page:
| Item Number | Sections in the Edit page | Marketplace page |
| 1. | Basic Information | Listing |
| 2. | Overview image |
The Overview image appears in the following locations:
|
| 3. | Overview Information | Overview |
| 4. | Screenshots | Overview |
| 5. | Embedded video URL | Overview |
| 6. | Benefits | Benefits |
| 7. | Feature information | Features |
| 8. | Unit and quantity type | Editions and Pricing |
| 9. | Edition Features and Benefits | Editions and Pricing |
| 10. | Product documentation label and link | Support and resources |
The following table lists the additonal sections that can be configured:
| Sections in the Edit page | Marketplace page |
| Cart during checkout |
| Cart during checkout |
| Edition tile |
| Subscription email |
| Feature characteristics | Features |
| Customers and Media | |
| Featured customers |
| Reviews |
| Support | Manage Apps > Overview |
| Editions | Pricing |
| Shared features and footnotes | |
| Included in all plans |
| Overview |
Update the product profile and branding
The product profile and branding information are shown on the marketplace after the product is published. You can update the listing and profile information, product features, customer reviews, support information, and additional resources any time.
Update the listing information
You can update the product overview, privacy policy, terms and conditions, logos, and associate your product with the relevant industry, offer type, technology, and service type.
Procedure
On the Manage Your Products page, click Edit for your product.
Click Listing Info.
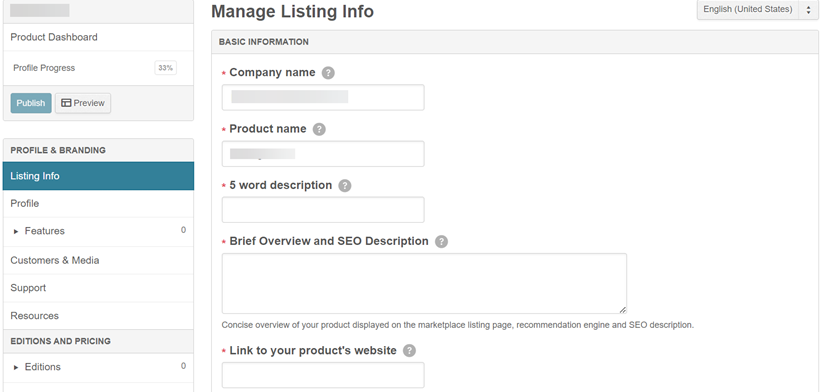
Update the company name, product name, description, product overview, and Search Engine Optimization (SEO) description.
(Optional) Provide the starting price of the product.
If you want to override the default starting price, select Manual and enter the price, unit, and billing frequency for your product.(Optional) Specify the links to the generic privacy policy and terms and conditions associated with the product.
(Optional) Upload your application listing and profile logo. Make sure that the listing logo image size is 512 x 512 pixels and that the profile logo is 230 x 230 pixels.
Select the product category based on industry, offer type, service type, or technology.
Save the settings.
Click Save and Preview to view and confirm your marketplace product details.
Update the profile information
You can update the product profile. This information appears on the marketplace product profile page.
Procedure
Click Profile.
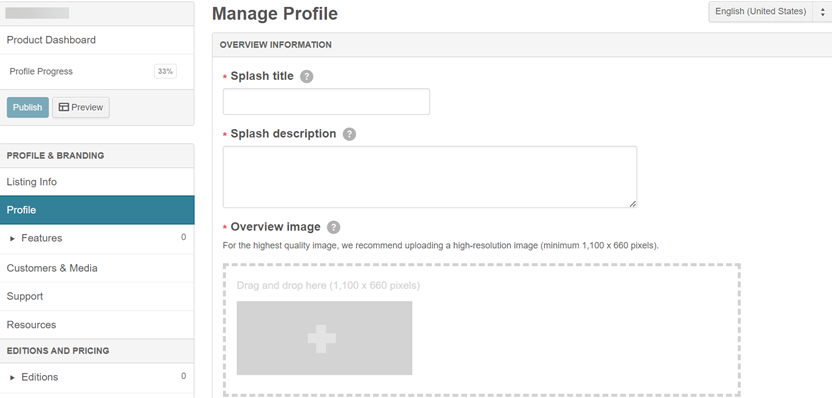
Add the product overview information, such as splash title, description, and image. Make sure the image size is 1400 x 300 pixels.
(Optional) Provide a link to the product video.
(Optional) Add product screenshots and captions. The screenshots are shown in the product Overview section on the marketplace.
(Optional) Add your product benefits.
Add the following product custom attributes:
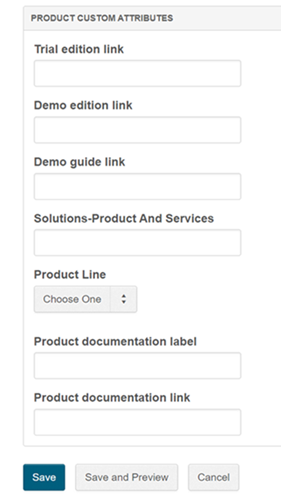
Trial edition link
Specify the external URL for the Trial edition to direct the buyer to a product-specific URL.
Demo edition link
Specify the external URL for the Demo edition to direct the buyer to a product-specific URL.
Demo guide link
Specify the location of the product demo guides from product team. The demo guide must include instructions on how to use the Demo edition of the product. The link to this guide is included in the subscription email sent to the buyer.
Solutions - Product And Services
Enter comma-separated product IDs of the products that you want to show under Products and Services in the Solutions page on the marketplace. For more information, see Configure the product display.
Product IDs are generated after the Marketplace Manager publishes the product to the marketplace. Click a product on the marketplace to view the product ID on the address bar.

Product Line
Select your product category. The available options are Products, Solutions, and Services. For example, select Services to show your product under Services on the marketplace. For more information, see Configure the product category.
Product documentation label and Product documentation link
Provide a suitable label and include the link to your documentation website. The product documentation label and link appears on the product detail page under the Support and resources section.
Resource label and Resource link
If there are any additional product links, add a suitable label and include the link in Resource label and Resource link. The additional product links appear along with the product documentation links under the Support and resources section.
Save the details.
Click Save and Preview to view and confirm your marketplace product details.
Add product features
You can describe your product features and include feature images.
On the marketplace, the features are shown under the Features section for products and solutions. For services, the product features are shown under Services > Process.
Procedure
Click .
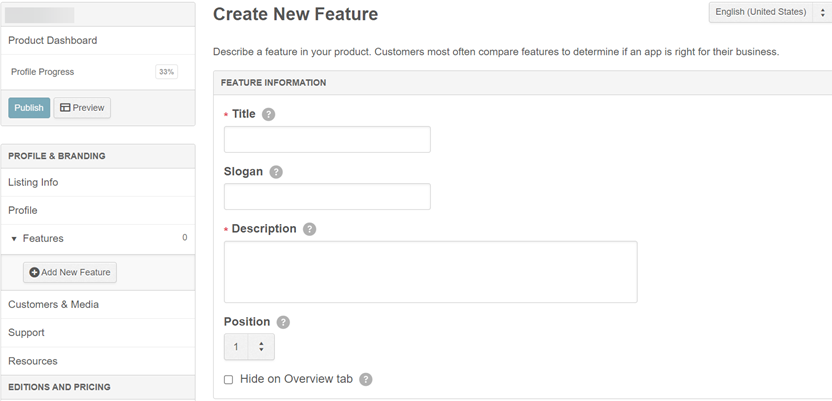
Update the product feature details, such as the title and description.
(Optional) Update the product slogan, specify the order in which each feature must be shown, and show or hide the features on the marketplace.
(Optional) Upload an image that describes the feature.
(Optional) Add information about the product characteristics.
Save the settings.
Click Save and Preview to view your marketplace product details.
(Optional) Include customer reviews
You can select the companies that currently use your product. The logos of the selected companies are shown on the marketplace.
You can also select the media sources that have featured your product in their blog posts, newspapers, or magazines.
Procedure
Click Customers & Media.
Select the companies that use your product. You can select up to ten customers.
Select the media source that mentioned or reviewed your product.
Enter the media source link and associated quote or description of the article, blog post, or product reviews.
Save the settings.
(Optional) Update the product support information
You can include the contact details of your product support team. The information appears under Policies & Support on the marketplace.
Procedure
Click Support.
Enter the contact phone number and email address of your support team.
Specify the link to the support portal, documentation portal, or other support resources.
Enter any additional support details. For example, support center business hours and additional phone numbers in different geographic locations.
Save the settings.
Click Save and Preview to view your marketplace product details.
(Optional) Update additional resources
You can update additional product resources, such as documents, videos, white papers, and FAQs.
Procedure
Click Resources.
Perform any of the following actions:
- Upload any PDF files such as the product demo guides from the product team. You can upload up to 15 PDF files, each not exceeding 25MB.
- Embed documents from your Scribd account into your product profile. Specify the Scribd document name, ID, and key.
- Include your product video links from YouTube or Vimeo.
Save the settings.
Click Save and Preview to view your marketplace product details.
Update the product edition and pricing
You can add the product features and benefits, pricing, and payment plans in an edition. You can build upon this edition and create new editions, such as Demo, Trial, POC, and Purchase with different features.
- Demo - Buyer can try the product for free before selecting a subscription. A Demo edition provides a shared environment with read-only access to multiple users. Buyer cannot upload any data in the Demo edition.
- Trial - Buyer can use the product for free for a limited period, after which they have to end the subscription or choose a paid subscription. Based on the product availability, the Trial edition is made available in any of the following ways:
- Buyer is assigned a dedicated instance with write access. After the limited period (30 days), the Trial instance is deleted. Buyer cannot upload any data in the Trial edition.
- Buyer is directed to the URL configured for the Trial edition.
- POC - Buyer can subscribe to the POC edition and download the product specific to their operating system. Buyer can use the product for free for a limited period, after which they can choose a paid subscription.
- Purchase - Buyer can subscribe to the Purchase edition by submitting the lead information. The Hitachi Marketplace support team will contact the buyer and help with the next steps.
Update the edition
You can edit the edition details, pricing, and payment plans for an edition.
Procedure
Expand Editions and select the edition created during the product creation process.
Add the pricing edition details:
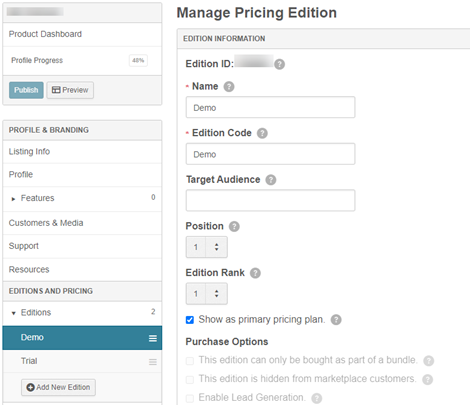
Field Description Name and Edition Code Update the name and edition code from Free Edition to Demo, Trial, POC, or Purchase. Target Audience Customize the product edition button label. For example, you can enter Contact Us, Try Unlimited Demo, or Request. Position If you have multiple editions, use Position to show the editions in a defined order on the marketplace. Edition Rank Define the hierarchy flow when there is a subscription plan change. Set the edition rank as follows: - Purchase - 1
- POC - 2
- Trial - 3
- Demo - 4
Purchase and POC are ranked higher than Trial and Demo.
When the subscription plan changes from Demo to Trial or Trial to POC, it is an Upgrade.
Show as primary pricing plan Select to highlight the current edition as the best seller on the marketplace. Purchase Options By default, the purchase options are disabled. For Demo, retain this setting.
For Trial and POC, do not select any purchase option.
For Purchase, clear Show as primary pricing plan and select Enable Lead Generation. For more information, see Configure lead generation for a product edition.
Restrictions - For Demo, select the options to upgrade and cancel.
- For Trial, select the options to upgrade and cancel.
- For POC and Purchase, do not select an option.
(Optional) Specify the links to the privacy policy and terms and conditions associated with this product edition.
If you are adding a Hitachi Vantara product, use the following links:If you are not part of Hitachi Vantara, contact your company legal team to get a free trial contract. You also have the option to use your own contract version. For more information, click Contact Support.
Set the payment plan:
Field Description Free Trial Period Specify the free trial period for your product in days or months. For example, if you want the customers to try your product free for 30 days, enter 30 days.
Expired Free Trial Grace Period Enter the grace period after the free trial ends during which the buyer must upgrade to the next available edition. Do not specify 0 days as the grace period. Doing so changes the order and subscription cancels after the free trial period. The buyer cannot recover the account even after purchasing the next available edition.
Revenue Model Select the free revenue model for your product. The product does not have any pricing structure. However, you must configure an expiration date. After the expiration date, the buyer cannot access the product and must switch to another edition.
(Optional) Add the services you want to include with this edition.
(Optional) Enter the features and benefits for the product edition.
Save the settings.
You can also Save and Preview to view your marketplace product details. Repeat the instructions to add another product edition.
(Optional) Update the shared features and footnotes
You can create a list of features and benefits that are common to all product editions. Using footnotes, you can provide additional information of the product.
Update the product integration details
The option to integrate is shown only when you select Full Integration as your integration type during the product creation.
The Hitachi Marketplace technical team is responsible for integrating your product with the marketplace.
After you have updated the listing, profile, features, edition, and pricing details, Contact Support to update the product integration details. You will receive a notification after the integration details are updated.
The following topics provide the product integration steps:
- Set up credentials
- Configure the integration details
- Run ping tests
- Run the integration report
- (Optional) Configure the bookmark authentication
- (Optional) View events
- (Optional) View accounts
- (Optional) Import and export product settings
Set up credentials
You can add the inbound and outbound API credentials used for product integration.
Procedure
Click .
From INBOUND CREDENTIALS, generate the client ID and secret.
Make sure to copy and store this information in a secure location.The integrated product uses this client ID and secret to retrieve an access token. You must include the access token in the authorization header of all inbound API requests.
From OUTBOUND CREDENTIALS, select the authentication type as OAuth 2.0 or Basic Authentication for outbound notifications and configure the credentials.
Authentication Type Description OAuth 2.0 (client credentials) Specify the token endpoint to request an OAuth 2.0 access token.
Enter the client ID and secret to request OAuth 2.0 access token from the configured token endpoint.
(Optional) Enter the scope values associated with the requested OAuth 2.0 access.
Basic Authentication Specify the username and password for basic authentication. Save the credentials.
Configure the integration details
You can configure the product integration and specify the endpoint URLs to receive notifications when there is any action on the marketplace for your product. For example, create or cancel subscriptions.
Before you begin
- For the integration endpoint URL of your product, click Contact Support.
Procedure
Click Edit Integration.
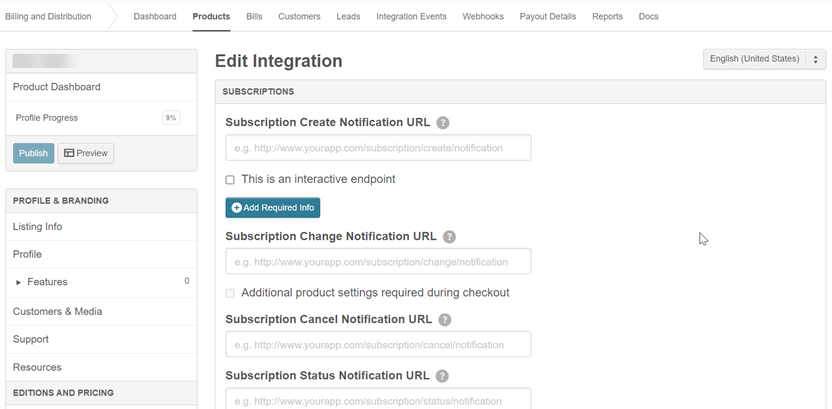
In Subscriptions, enter the integration endpoint URL of the Hitachi Marketplace backend fulfilment layer for every subscription event, such as create, change, or cancel subscriptions. The integration endpoint URLs must contain an {eventUrl} parameter at the end of the URL, which is replaced by the URL of the relevant event at runtime.
NoteFor the current release, the integration endpoint URL is manually entered and not replaced at runtime.The following table provides the format to enter integration endpoint URLs for the subscription events:
Field Description Trigger Subscription Create Notification URL Enter your product URL instance. When a Demo or Trial edition is purchased. Subscription Change Notification URL Enter your product URL instance. When the subscription is changed, for example, an upgrade to Trial from Demo.
Subscription Cancel Notification URL
Enter the URL for Subscription Cancel Notification. When the subscription is canceled. Subscription Status Notification URL
Get Subscription Status URL
Enter the Subscription Status Notification URL and Get Subscription Status URL. When the subscription status is changed, or to get the current subscription status. NoteThe Subscription Status Notification URL and Get Subscription Status URL are not supported in this release.(Optional) Update the access management, user information, and domain management details.
Save the settings.
Run ping tests
The integration endpoint URLs that you specified under Edit Integration are listed under Run Ping Tests. You must run the ping tests to verify the integration endpoint URLs before publishing the product.
During the ping tests, dummy events are sent to the URL endpoints to check the connection. If you receive a success response, the endpoints are working.
Procedure
Click Run Ping Tests.
Click Run Test next to each subscription event or click Run All Tests. A dummy event is sent to the URL endpoints to check the connection.
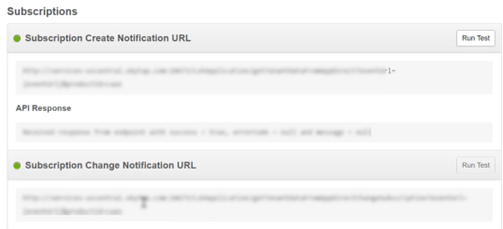
Check the responses. If successful, the specified endpoints are working.
Run the integration report
You must complete all the tests successfully in the integration report to confirm whether the product integration is successful.
Running the integration report includes testing the live integration URL endpoints with the subscription events and performing manual verifications.
Your integration report must show 100% completion status before you can proceed and publish the product.
Procedure
Click Integration Report.
Click Run Test against each subscription event. You are directed to the Purchase page of the subscription event.
Complete all the steps in the subscription workflow.

After completion, the Integration Report page appears, and each subscription event shows Success.
Click Mark Complete after completing the manual tasks under Properly link UI elements within your application and Prepare for API Availability Monitoring.
(Optional) Click Mark Complete after completing the requirements under Send metered usage information to invoice customers.
Your integration report shows the status as 100%. You are now ready to publish your product.
(Optional) Configure the bookmark authentication
Using the bookmark authentication method, you can add a redirect URL. When you click MyApps on the marketplace, you are redirected to the URL configured for the landing page.
Procedure
Click Edit Authentication.
Select Bookmark as the authentication method.
Enter the landing URL.
Save the settings.
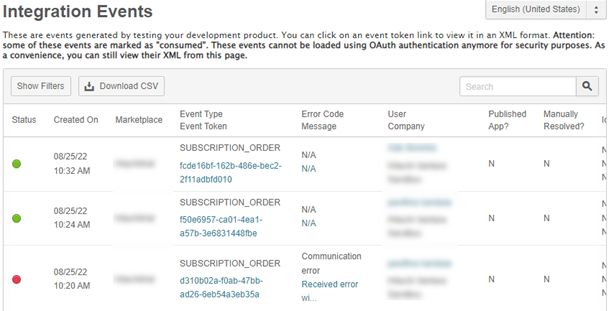
(Optional) View events
Every event triggered during the integration testing is logged and shown on the Integration Events page.
Click Events to view the event list.
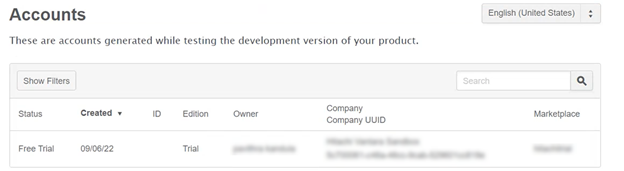
(Optional) View accounts
You can view your account details under Accounts. The account details are generated when testing the purchase flow of your product edition.
(Optional) Import and export product settings
Your product details such as profile and branding, editions and pricing, and integration settings can be exported into a .zip file. This file contains the XML file and images for every product setting.
Also, you can import the product settings from the exported zip file. The import feature updates an existing product, but does not create a new one.
Click Settings > Product Settings and perform any one of the following actions:
- To import, browse and select the product file and click Import.zip. The existing product on the marketplace is updated.
- To export, click Export.zip. The file is downloaded to a default download folder on your computer.