Integrate the product with the marketplace
The product team provides the product image of their on-premises product or URL of the SaaS product to the Hitachi Marketplace technical team.
Based on the product, the Hitachi Marketplace technical team provides the integration endpoint URL, which is updated in the Edit Integration section under Product Dashboard. This action integrates the product with the marketplace.
Integrate a product using Skytap
The Hitachi Marketplace technical team uses Skytap for creating virtual machine (VM) environments for integrating on-premises products.
As a seller, you can also request access to the product's VM environment. Make sure to add this request on the seller form during the Hitachi Marketplace registration. You will then receive an email with the sharing portal URL for accessing your product’s VM environment.
High-level workflow
To onboard an on-premises product using Skytap, use the following steps:
Procedure
Create an environment on Skytap using the pre-defined templates. For more information, see Create an environment.
Upload the product binaries to the VM running in the environment. For more information, see Upload product binaries to the VM.
Create a published service for the port in which the application is running. For more information, see Create a published service for virtual machines.
Verify that the published service URL is accessible. For more information, see Test the product instance.
Add tags for the product in which the product instance is running. For more information, see Add product tags.
Create an environment
The Hitachi Marketplace technical team builds the product environment on Skytap after gathering basic product details from the seller’s team, such as the supported operating system, number of VMs, storage, and other specifications.
Procedure
Access Skytap at, https://cloud.skytap.com/login.
Enter Skytap credentials and sign in.
Click .
A list of pre-defined templates appears.Select a template and click New Environment.
This creates a new environment, which appears under Environments.
Upload product binaries to the VM
Before you begin
Collect the URL to download the product binaries from the seller.
The Hitachi Marketplace technical team uploads the product binaries to the VM. If a seller has contacted the Hitachi Marketplace support team to upload the product binaries, a shared portal URL is sent to the seller through an email. For more information, see Share environment access using sharing portal.
Procedure
Click Environment.
Select the product environment.
The VMs running in the environment are listed.Click the VM where you want to upload the product binaries.
Open the URL sent by the seller in any browser.
Download the product binaries.
Install the demo instance.
Create a published service for virtual machines
Before you begin
The Hitachi Marketplace technical team creates a published service URL for the port where the VM is running. This URL is shared with the buyers to access the Demo or Trial subscription.
Procedure
Click Environment.
Select an environment.
The VMs running in the environment are listed.Click the Gear icon on the VM that is running.
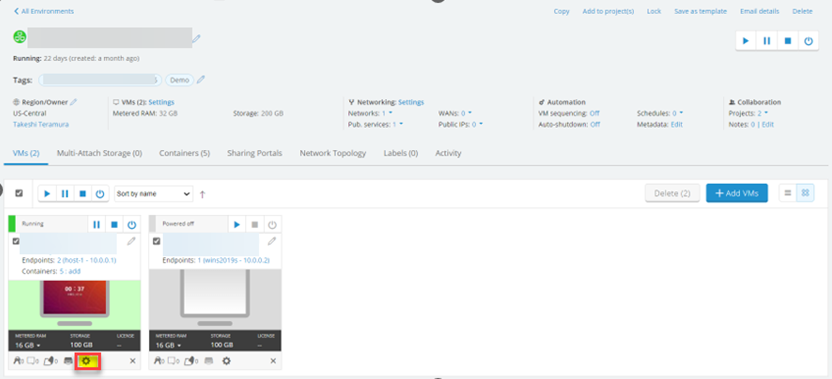
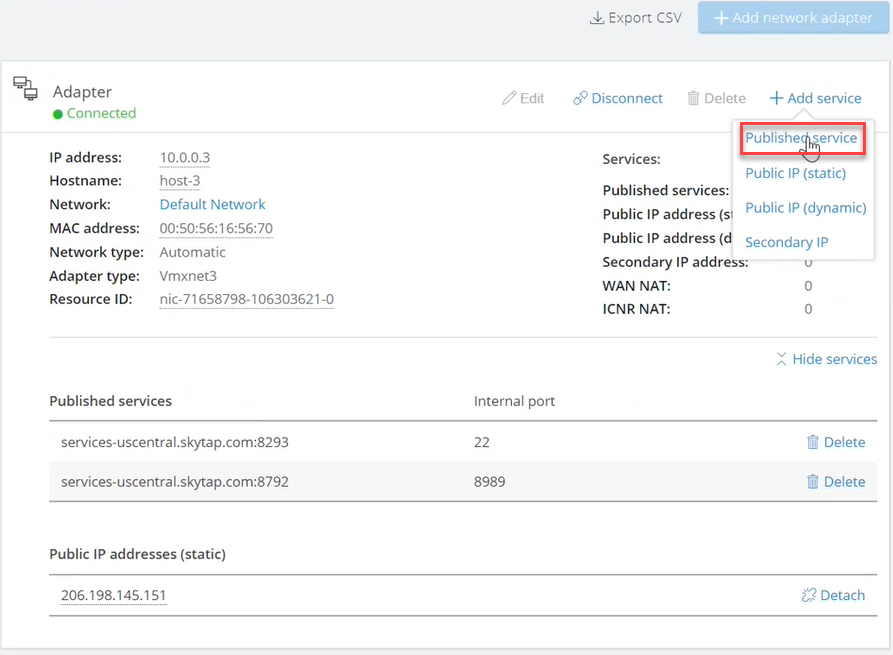
Click Network Adapters.
The network details, port number, and IP address are shown.Click Add service and select Published service.
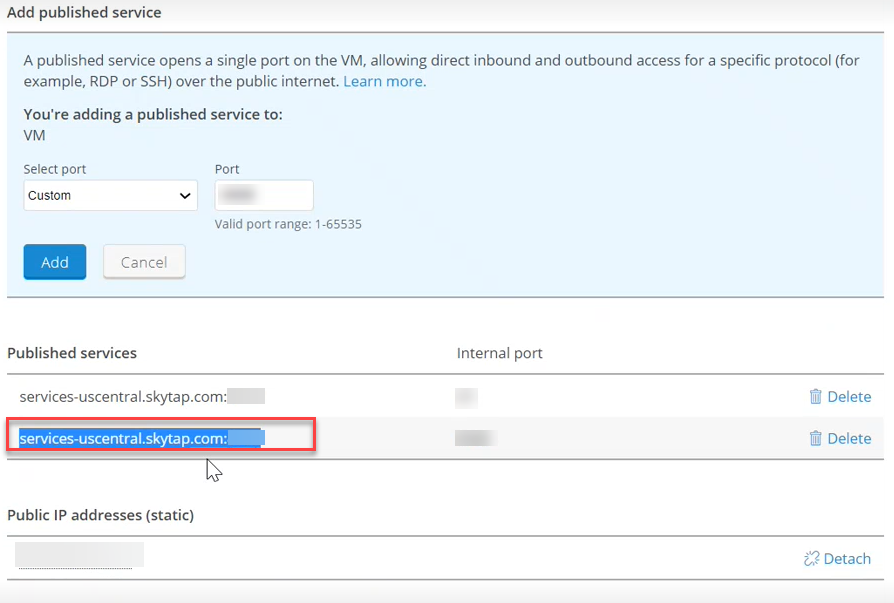
In Add Published service, select a port and enter the port number.
Click Add.
The published service URL is created and appears next to the internal port number.
Test the product instance
Before you begin
- Make sure the published service URL is created for the product. For more information, see Create a published service for virtual machines.
- Product login credentials from the seller’s team.
Procedure
Open the published service URL in a browser.
Either the login or home page of the product appears depending on the product configuration.Enter the login credentials provided by the seller’s team.
The product page opens.
Add product tags
The Hitachi Marketplace technical team adds tags for all the products that are available in the marketplace. The tags are used to retrieve the environment details and send the published service URL by email when an edition is purchased.
Procedure
Click Environment.
Select an environment.
Click the Edit icon next to Tags.
Add Tags as follows:
- Specify the product edition that is available in the marketplace in the following format: product edition name, for example: Demo.
- Specify the product name and ID that are available in the marketplace in the following format: productname<space>productid

Share environment access using sharing portal
The Hitachi Marketplace technical team follows these steps to grant access to the seller for the VMs or environments using the sharing portal:
Procedure
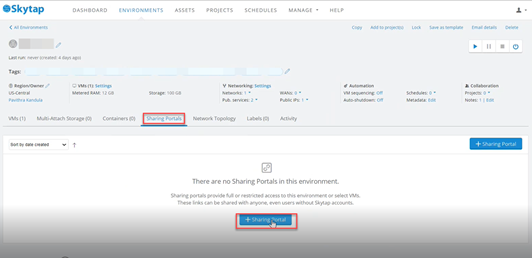
Click Environment.
Select the environment that you want to share.
Click Sharing Portals.
The sharing portals for the environment is listed.Click +Sharing Portal.
The Create sharing portal window appears.
Select Do not require a password and select Single Sharing portal as Portal Type.
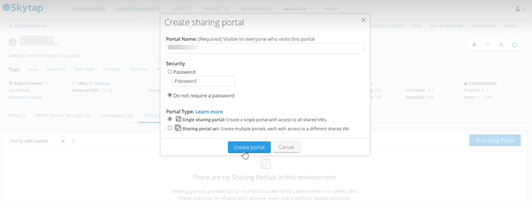
Click Create Portal.
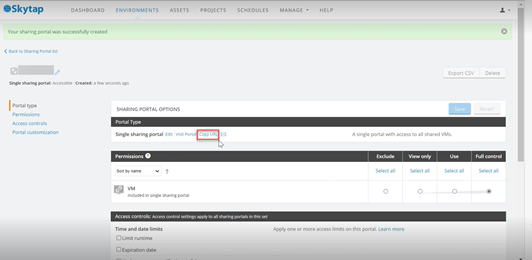
The Sharing Portal Options page appears.Select Copy URL and share the URL by email with the sellers.
The sellers can now access the shared URL and upload the product binaries to the VM.
Integrate a SaaS product
This section describes the process followed by the product team and Hitachi Marketplace technical team to integrate a SaaS product with the marketplace.
The product team provides the URL of a fully functional product to the Hitachi Marketplace technical team along with the access permissions.
The Hitachi Marketplace technical team uses the URL to create a tenant environment and then provides the endpoint integration URL, which is updated in the Edit Integration section to integrate the product with the marketplace.