Using the Shared Dimension step for SDR

The Shared Dimension step works in much the same way as the Annotate Stream step, refining your data through the creation of dimensions which can be shared for later use. You will need to designate one annotation in the shared dimension step as the dimension key.
You can create multiple annotations on the same field, such as an attribute and a dimension key. For example, in the Shared Dimension step, you can select the field Year and annotate it as a dimension key. You may also select the field Year again to annotate as an attribute. You can also create multiple annotations to modify the same data model.
The transformation which builds a shared dimension should run before the Build Model job entry or in a separate job
which runs before the Build Model. Here is an example
transformation for a shared dimension. 
After you are done with your data model, you will be ready to publish it.
Create a shared dimension
Procedure
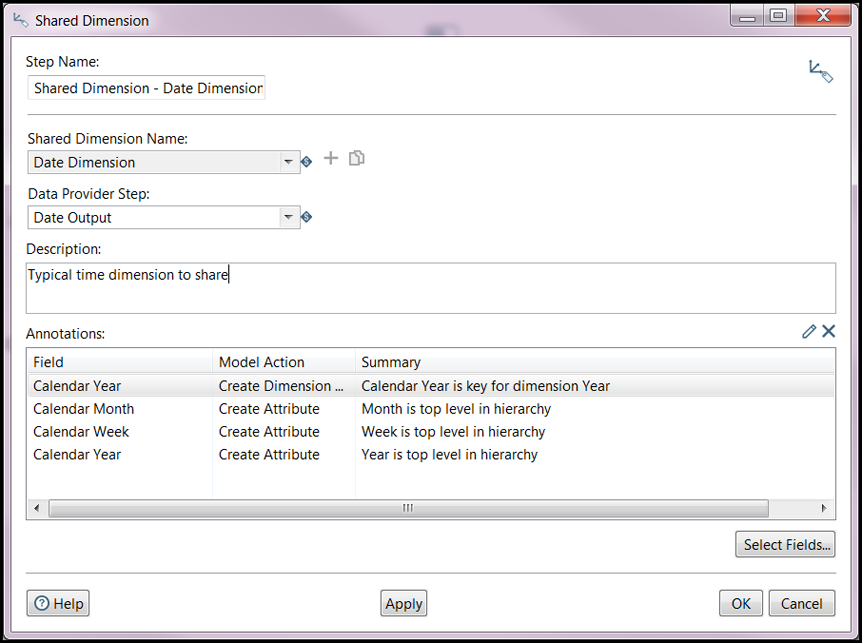
In the Design tab, click the Flow folder, and then double-click the Shared Dimension step icon. Alternatively, you can drag the step icon on to the transformation canvas.
Double-click the Shared Dimension icon to open the Shared Dimension dialog box.
Enter a name for the step in the Step name field.
If you are basing your new dimension on an existing shared dimension, select it from the Shared Dimension Name drop-down list of available shared dimensions, or enter a new name for it.
Select a source to associate your dimension from the Data Provider Step drop-down list.
The following steps are valid sources:- Combination Lookup
- Database Lookup
- Dimension Lookup
- Insert/Update
- Table Output
- Vertica Bulk Loader
Enter a description of the shared dimension in the Description field.
Select available fields for annotation.
Click the Select Fields button to open the Select Fields to Annotate dialog box.
Double-click the fields in the Available Fields list to add them to the Selected Fields list.
For example, you might select Year to annotate as your dimension key and Year, Month, and Week to annotate as attributes Optionally, you can use the arrows to move one or more fields to the Selected Fields list.When finished, click OK to close the dialog box. The selected fields now display in the Annotations table featuring the following columns:
Column Description Field Lists the names of the fields selected for annotation. Model Action Specifies which model action is being taken: - Creating attributes
- Create a dimension key: the selected field will be designated as the dimension key for the shared dimension.
Summary Displays a summary of that specific annotation.
Now you can create annotations for the selected fields.
To annotate a field, double-click it in the Annotations section. Optionally, you can select the select the field in the Annotations table and then select the Edit (Pencil icon) in the upper-right corner.
The Annotate dialog box appears for the selected field.In the Actions field, click the drop-down arrow to select one of the following actions:
- Create Attribute. See Creating attributes.
- Create Dimension Key. See Create a dimension key.
You can use the Previous and Next buttons to navigate through the fields. When finished, click OK to continue or Cancel to close the dialog box without saving your annotations.
NoteYou can remove a field from the Annotations section by selecting it in the table and then clicking the Delete (X icon) in the upper-right corner.
Click Apply to save changes you made to an annotation. Click OK to continue or Cancel to close the dialog box.
Create a dimension key in Shared Dimension step
Procedure
If you have not done so already, complete steps 1-8 of Create a shared dimension.
Select Create Dimension Key from the Actions menu.
The Name - Value table auto-populates with the Dimension attribute.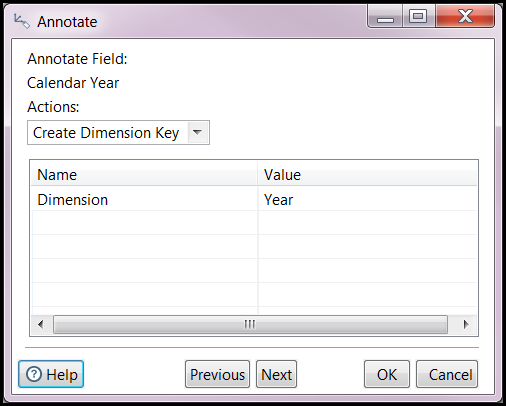
Enter or select a dimension in the Value field for Dimension. The selected field will be used as the key for this dimension.
Click OK to finish or click Cancel to exit.
In the Shared Dimension dialog box, the selected field will now appear with the summary that it is the key for the shared dimension. For example, the field 'Calendar Year' may display 'Calendar Year is key for dimension Year' in the Summary column.
Next steps
Metadata injection support
All fields of this step support metadata injection. You can use this step with ETL metadata injection to pass metadata to your transformation at runtime.
When using metadata injection with the Shared Dimension step, the system will load the currently defined annotations in the shared dimension step, whether or not the shared dimension name is a match. The new set of annotations are saved to the transformation and in the metastore. If a shared dimension with the same name already exists in the metastore, it will be overwritten with the new shared dimension.