Use a Pentaho Repository in PDI

The PDI client (also known as Spoon) offers several different types of file storage. A Pentaho Repository stores transformations, jobs, and schedules in a central environment through the Pentaho Server. It is recommended for enterprise deployments and fully supported features.
Get started with a Pentaho Repository
If your team needs a collaborative ETL (Extract, Transform, and Load) environment, we recommend using one or more than one Pentaho Repository. In addition to storing and managing your jobs and transformations, A Pentaho Repository provides full revision history for you to track changes, compare revisions, and revert to previous versions when necessary. These features, along with enterprise security and content locking, make using a Pentaho Repository an ideal platform for collaboration.
Create a connection in the PDI client
Procedure
-
Verify the Pentaho Server is running, and then start the PDI client.
-
Click Connect in the upper right corner of the PDI client toolbar.
The Repository Manager dialog box opens.NoteIf Connect is replaced by a different link name, you are already connected to a repository. -
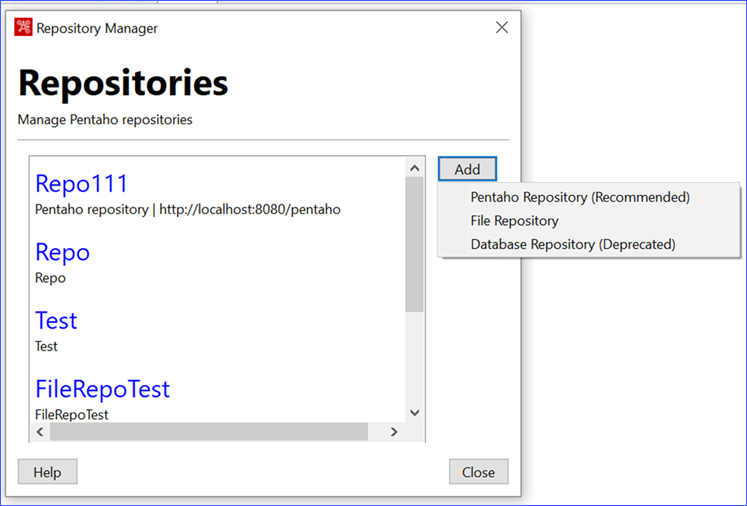
Click Add.
-
Select from the following options:
- Pentaho Repository - Uses a central environment through the Pentaho Server to store transformations, jobs, and schedules. This is the recommended repository to be used.
- File Repository - Uses your local file system to store the metadata.
- Database Repository - Uses a central relational database to store your ETL metadata.
NoteDatabase and file repositories are not supported or recommended for production use. -
Enter or update the Display Name property.
-
Modify the URL associated with your repository, if necessary.
-
(Optional) Provide description in the Description field.
-
Click Save to create repository.
The repository is created and is listed in the Repository Manager dialog box.
Next steps
If you choose to close, you can connect to the repository later through the menu next to the Connect link in the upper right corner of the PDI client toolbar.
Connect to a Pentaho Repository
Procedure
-
Select a repository in the Connect menu.
-
Log on to the repository by entering your User Name and Password credentials. For example, User Name = admin, Password = password.
-
Click Login.
NoteIf the connection fails, ensure that the port number and URL are correct. If you installed PDI using the Pentaho Installation Wizard, then you can get the correct port in theYour user name and repository display name will appear in the upper right corner of the PDI client toolbar.installation-summary.txtfile, in the root directory where PDI is installed.NoteIf you want the Repository Connection window to automatically appear when the PDI client starts, go to and click Show repository dialog at startup.
Manage repositories in the PDI client
After a repository is created, a menu appears next to the Connect link. You can use the menu to connect to any repository you created. If you connect to a repository, the Connect link in the PDI client toolbar is replaced by your user name and the display name of the repository.
This menu can also be used to access the Repository Manager or disconnect from your current repository.
Repository Manager
You can Add, Edit, or Delete your repositories through the Repository Manager dialog box.
If you set a repository as the default on startup, you can clear this behavior by checking Launch connection on startup again.
You can also click on an item in the list to select it. Once selected, you can either Edit or Delete that repository. If you choose Edit, the Connection Details dialog box will appear.
Connection details
Use the Connection Details dialog box to specify the settings of your repository.
| Setting | Description |
| Display Name | Identifies the repository within the PDI client. |
| URL | Defines the web address of the repository. The default value is http://localhost:8080/pentaho. You can change this setting to any web address pertaining to your specific collaboration project. |
| Description | Describes the repository, such as its type and any other useful information. |
| Launch connection on startup | Indicates the repository should open by default when starting the PDI client. |
Unsupported repositories
You can also create either a database repository (which uses a central relational database to store your ETL metadata) or a file repository (which uses your local file system to store the metadata). You can create these types of repositories through the Other Repositories link in the Pentaho Repository welcome dialog box.
From the Other Repositories dialog box, you can Get Started by selecting either the Database Repository or the File Repository from the list.
Database repository
Similar to the Pentaho Repository, you connect to the database repository by entering a Display Name into the Connection Details dialog box. After specifying a name, you need to select Database Connection, which leads to a list in the Select a database connection dialog box. From this dialog box, you can either create a new database, or Edit and Delete an existing connection. When you create a new connection or Edit, the Database Connection dialog box appears. Use this dialog box to specify your database connection, then select Test and click OK. In the Select a database connection dialog box, click on what database connection you want to use and then go Back to the Connection Details dialog box. After Display Name and the Database Connection are specified, click Finish to test the connection to repository.
File Repository
Besides entering in a Display Name, you will need to specify the Location of the local file system that you want to use as a file repository. You can Browse to this location from the Connection Details dialog box. After you specify a repository name and file system location, you can click Finish to test the connection. Unlike with other repositories, when you connect to a file repository, the link in the upper right corner will only show the display name of file repository.
Use the Repository Explorer
The Repository Explorer contains options for managing connections, clusters, security, partitions, access control and version history.
Advanced topics
The following topics help to extend your knowledge of a Pentaho Repository beyond basic setup and use:
- Import and export PDI content
Repository content can also be imported and exported through either the PDI client or a command line interface.
- Purge transformations, jobs, and shared objects from the Pentaho Repository
If the Pentaho Repository becomes too large for effective system performance consider purging some of the data.
- Backup and restore Pentaho repositories
Perform routine backups to minimize potential data loss through machine failure, theft, disaster, or accidental change.