Manage users and roles in the PDI client

This section provides an overview of the default assignments for users and roles, the permissions included, and the management of users and roles in the Pentaho Repository. You must login to the PDI client (also known as Spoon) as an administrator (or be assigned to a role that has administer security permission) to manage users and roles for Pentaho security.
Here is how you can manage users:
Here is how you can manage roles:
- Add roles
- Edit roles
- Delete roles
- Make changes to the administrator role
- Assign user permissions in the repository using the PDI client
- Enable system role permissions
Before changing security settings, play it safe and back up these relevant files:
- If you installed PDI using the Pentaho suite installer or custom methods, back up all Data Integration directories.
- If you installed PDI using the manual method, back up the pentaho.war file and solutions.
You can control users and roles in the Pentaho Repository with a point-and-click user interface. The users and roles radio buttons allow you to switch between user and role settings. You can add, delete, and edit users and roles from this page.
Sample users, default roles, and permissions
Procedure
Open the PDI client and login to the repository.
Click , then select the Security tab.
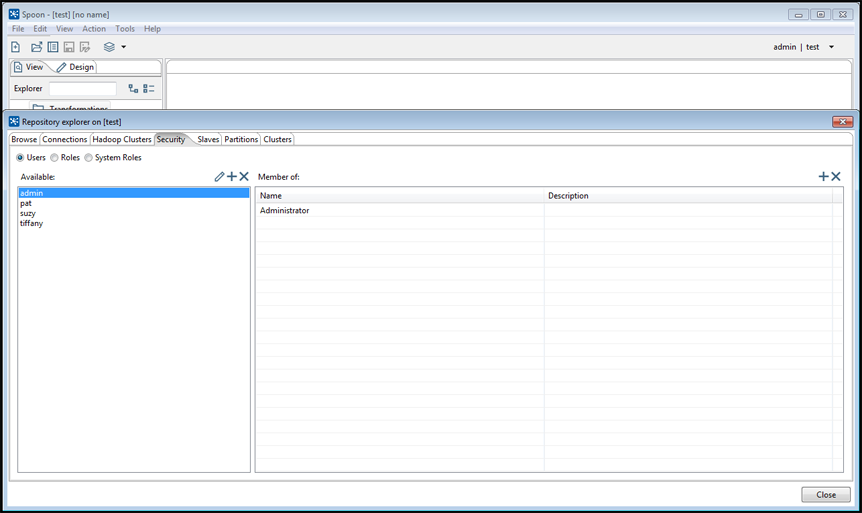
Choose if you want to manage security by Users, Roles, or System Roles:
- Select Users then highlight a user to display the user's role and a description, if any.
- Select Roles then highlight a role in the
Available list to display
Permissions for the user's role, as defined by
the checked boxes. These roles, added for your convenience, can be removed
or altered based on your needs.
Default Pentaho security settings Default Role Sample User Permissions Administrator admin - Administer Security
- Schedule Content
- Read Content
- Publish Content
- Create Content
- Execute
- Manage Data Sources
Power User suzy - Schedule Content
- Read Content
- Publish Content
- Create Content
- Execute
Report Author tiffany - Schedule Content
- Publish Content
Business Analyst pat - Publish Content
Each default role and sample user comes with a standard set of permissions, which provides for a specific set of capabilities when using Pentaho tools and the Pentaho Server.
Permissions defined Permissions Definition Administer Security The default Administrator role automatically conveys all operation permissions to users assigned to that role, even if the check box next to it is cleared. This includes the Read Content and Create Content permissions, which are required for accessing the Administration perspective: - Allows access to and the ability to manage all content in each perspective.
- Allows the ability to view and work with all user schedules in the Schedules perspective.
Schedule Content - Allows the user to schedule reports and content.
- Gives the user the ability to view, edit, or delete their own schedules using the Schedules perspective.
Read Content - Gives the user the ability to view content in each perspective.
Publish Content - Allows the user to store reports or data models in the Pentaho Repository.
Create Content - Allows the user to create, import, delete, and save jobs and transformations to the repository.
- Gives the user the ability to see the data sources that are used to create jobs and transformations.
- When the user is also granted the Execute permission, users can export jobs and transformations, copy and paste, and save the file in a virtual file system (VFS).
Execute - Allows the user to run, preview, debug, replay, verify, and schedule.
- When the user is also granted the Create permission, users can export jobs and transformations, copy and paste, and save the file in a VFS.
Manage Data Sources - Allows the user to create, edit, or delete new data sources.
- Gives the user the ability to see a list of repository data sources.
- Select System Roles then highlight a role in the Available list to display the Permissions for the user's system role. System roles are built-in roles used to control default behaviors and permissions of the repository, handled implicitly or through system configuration, with automatic assignments.
Hide a user Home folder in PDI
If your organization implements multi-tenancy, you may not want individual users to see their Home folders for security reasons. If you need to keep all PDI user-created content in a centralized, secure folder location, you can hide individual users' Home folders.
Add users
Select Users, then click the Plus Sign next to Available.
The Add User dialog box appears.Enter the User Name and Password associated with your new user account in the appropriate fields.
An entry in the Description field is optional.If you have available roles that can be assigned to the new user, under Member, select a role and click OK.
The role you assigned to the user appears in the right pane under Assigned.Click OK to save your new user account and exit the Add User dialog box.
The name of the user you added appears in the list of available users.
Change user passwords
Select Users, then highlight the user for whose password you want to change then click the Edit icon.
The Edit User dialog box appears.In the Password field, type the new password. Click OK.
The password is changed and the user is able to login with the new password.NoteWhen you log in to the PDI client for the first time, it is a best practice to change the default administrator password.
Delete users
Procedure
Select Users, then highlight the user to be deleted in the Available list.
Next to Available, click the X icon.
A security message appears.Click Yes to remove the user.
The specified user is deleted.
Next steps
| If... | Then... |
| You are disabling a role | Unassign all current members associated with the role. |
| You are disabling a user | Reset the password to a password that is so cryptic that it is impossible to guess and is unknown to any users. |
Assign users to roles
Click Roles.
The list of available roles appears.Select the role to which you are assigning users.
If the role has users currently assigned to it, the names of the users appear in the table on the right under Members. You can assign or unassign any users to a role. You can select a single item or multiple items from the list of members. Click Remove to remove the user assignment.Next to Members, click the Plus Sign.
The Add User to Role dialog box appears.Select the users you want assigned to the role and click the Right Arrow.
The users assigned to the role appear in the right pane.Click OK to save your entries and exit the Add User to Role dialog box.
The specified users are assigned to the specified role.
Edit user information
Select Users, then highlight the user you want to edit in the Available list.
Click the Edit icon.
The Edit User dialog box appears.Make the appropriate changes to the user information.
Click OK to save your changes and exit the Edit User dialog box.
Add roles
Click Roles.
The list of available roles appear.Click the Plus Sign next to Available.
The Add Role dialog box appears.Enter the Role Name.
An entry in the Description field is optional.If you have users to assign to the new role, select them (using SHIFT or CTRL) from the list of available users and then click the Right Arrow.
The user(s) assigned to your new role appear in the right pane.Click OK to save your entries and exit the Add Role dialog box.
The specified role is created and is ready to be assigned to user accounts.
Edit roles
Click Roles.
The list of available roles appear.Select the role you want to edit and click the Edit icon.
The Edit Role dialog box appears.Make the appropriate changes.
Click OK to save your changes and exit the Edit Role dialog box.
Delete roles
Click Roles.
The list of available roles appears.Select the role you want to delete from the Available list.
Click the X icon next to Available.
A security message appears.Click Yes to remove the role.
The specified role is deleted.
Make changes to the administrator role
These are the scenarios that require a configuration change that is unavailable through the PDI client:
- You want to delete the administrator role
- You want to unassign the administrator permission from the administrator role
- You want to configure LDAP
Follow these instructions to change the administrator role:
Procedure
Shut down the Pentaho Server.
Open the repository.spring.xml file located at pentaho-server/pentaho-solutions/system.
Locate the element with an ID of immutableRoleBindingMap.
Replace the entire node with the XML code shown below.
Make sure you change yourAdminRole to the role that will have Administrate permission.<util:map id="immutableRoleBindingMap"> <entry key="yourAdminRole"> <util:list> <value>org.pentaho.di.reader</value> <value>org.pentaho.di.creator</value> <value>org.pentaho.di.securityAdministrator</value> </util:list> </entry> </util:map>Restart the Pentaho Server.
The administrator role changes according to your requirements.
Assign user permissions in the repository using the PDI client
Procedure
Click Roles.
The list of available roles appears.In the Available list, highlight the role to which you are assigning permissions.
In the Permission list, select the check boxes to enable (or deselect to disable) permissions, then click Apply.
The permissions you enabled for the role take effect the next time the specified user(s) login.
Enable system role permissions
Procedure
Click System Roles.
System roles appear in the Available list.Select the Authenticated role.
Under Permissions, select the check boxes to enable (or clear to disable) permissions for this role.
Click Apply to save your changes.
The specified permissions are enabled for the authenticated system role.