Table Output

The Table Output step loads data into a database table. The Table Output step is equivalent to the SQL operator INSERT and is a solution when you only need to insert records. If you just want to update rows, you should use the Update step. To perform both INSERT and UPDATE commands, see the Insert/Update step.
This step provides configuration options for a target table and performance-related options such as Commit size and Use batch update for inserts. There are performance settings specific to a database type that can be set within the database connection JDBC properties. Refer to your database documentation for specific JDBC performance settings. See also Special database issues and experiences.
AEL considerations
When using the Table output step with Adaptive Execution Layer (AEL), consider the following factors for Hive database connections, which can affect performance and results.
- Because of limitations
for CDS Powered by Apache Spark in CDH 6.x, AEL does not support Hive or Impala in YARN mode. If you would
like specific information, see the Cloudera documentation:
- When communicating with a Hive metastore, Spark SQL does not respect Sentry ACLs.
- Using the JDBC Datasource API to access Hive or Impala is not supported.
- Using the ORC file format is not supported.
- Writing Hive tables containing data files in the ORC format from Spark applications is not supported. As an alternative, you can use the Parquet data format for columnar data using Impala.
- You can use Hortonworks to access Hive managed tables in ORC format, as described in Configuring the AEL daemon for the Hive Warehouse Connector.
- You can use AEL with managed tables in Hive to execute joined Table input to Table output transformation steps. However, you must follow a specific workflow for correct data processing. For details, see Using Table input to Table output steps with AEL for managed tables in Hive.
- If you are using AEL with external tables in Hive, then use the Hadoop input and Hadoop output steps to process tabular data.
Connect to a Hive database
When using the Table input and Table output steps, you can connect to Hive in one of two ways to achieve the best processing rate for small and large tables within the same cluster:
- Use AEL to access small unmanaged Hive tables on a secure HDP cluster or an Amazon EMR cluster. For details, see Configure the AEL daemon for a Hive service.
- Use AEL with the Hive Warehouse Connector (HWC) to access managed tables or large unmanaged tables in Hive on a secure HDP cluster. For details, see Configuring the AEL daemon for the Hive Warehouse Connector on your Hortonworks cluster.
General
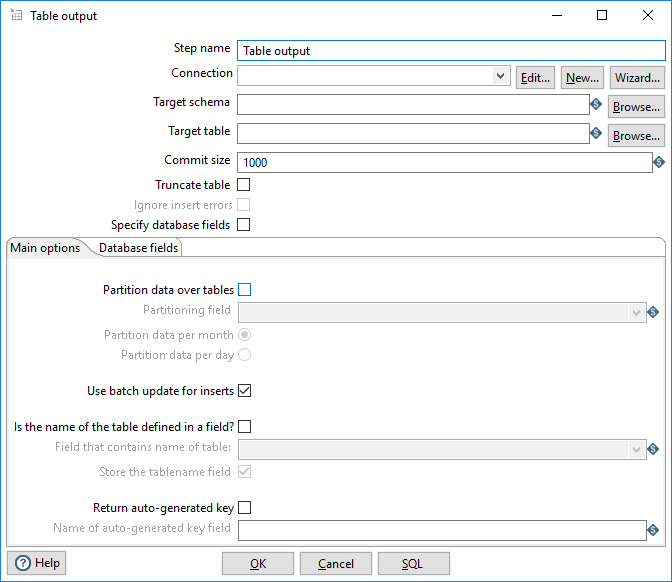
The table below describes the general options for the Table Output step:
| Option | Description |
| Step name | Specifies the unique name of the Table Output step on the canvas. You can customize the name or leave it as the default. |
| Connection | Use the list to select the name of an existing database
connection where you want your data to be written. Select the connection according
to the database you are modifying.
If you do not have an existing connection, click New or Wizard. If you need to modify an existing connection, click Edit. See Define Data Connections for instructions. |
| Target Schema | Specify the name of your database schema. |
| Target table | Specify the name of the table where you want to write your data. |
| Commit size | Specify the size of the commit batch. The size is the number of
INSERT statements to be performed before sending
a COMMIT command to the database. Specifying a
commit size may change the performance. Transactions are not supported on all database platforms. |
| Truncate table | Select to truncate the table before the first row is inserted into the table. If you will run the transformation on clusters or with multiple copies of this step, you must truncate the table before you start the transformation. |
| Ignore insert errors | Select to ignore all insert errors such as violated primary keys. A maximum of 20 warnings will be logged. This option is not available for batch inserts. |
| Specify database fields | Select to specify the fields in the Database fields tab. Otherwise all fields are inserted by default. This option must be selected to use the Get fields and the Enter field mapping tools in the Database fields tab. |
| SQL (button) | Click to open the Simple SQL Editor. The editor automatically generates the SQL needed to create the output table. You can modify the SQL statements if necessary, or click Execute to run the SQL and generate the table. The SQL Editor creates a target table with the name specified in the Target table field. |

Options
The Table Output step features several tabs with fields. Each tab is described below.
Main options tab
| Option | Description |
| Partition data over tables | Select to split the data over multiple tables based on the value of the date field specified in the Partitioning field. When this option is selected, data is inserted into tables whose names follow the pattern <target-table>_<date-format>. These tables must be created manually before running the transformation in order for data to be inserted in these tables. See Partition data per month/Partition data per day for details on the date format. |
| Partitioning field | Specify the date field you want to use to determine how to split values across multiple tables. This value is used to generate a dated table name into which data will be inserted. |
| Partition data per month/ Partition data per day | Determines the date format used in the table name when partitioning the table: yyyyMM for Partition data per month and yyyyMMdd for Partition data per day. |
| Use batch update for inserts | Select to use batch inserts. This option groups INSERT statements, which limits round trips to the
database. This option is enabled by default. The batch mode is only used when the following conditions are met:
There are limiting factors depending on the database type and further step options. |
| Is the name of the table defined in a field? | Select to specify the name of the target table in the Field that contains name of table. This option allows you to store data from each row in a different table, based on the value of the Field that contains name of table. For example, if you store customer data in a field named gender, the data might end up in tables Male and Female. |
| Field that contains name of table | Specify the field name to use for the name of the table when the option Is the name of the table defined in a field? is selected. |
| Store the table name field | Select to store the table name in the output. When using this option, the table must contain a column with the name you defined in the Field that contains name of table. |
| Return auto-generated key | Select to return the key that was generated by inserting a row into the table. |
| Name of auto-generated key field | Specify the name of the new field in the output rows that contains the auto-generated key. |
Database fields tab
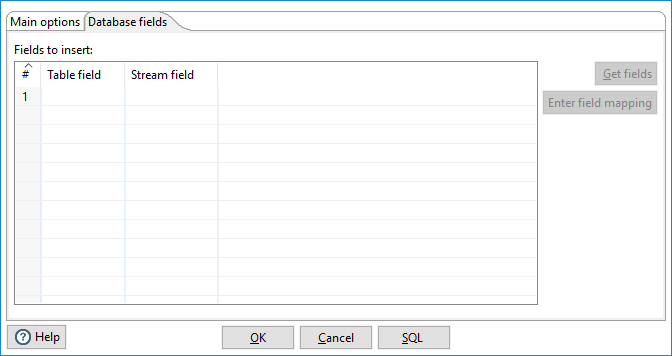
The Database fields lets you specify which fields from your input to insert into the table. You can map fields from the input to columns in the output.
| Field | Description |
| Table Field | The name of the database column into which data is being inserted. |
| Stream Field | The stream field being read from the source/input steps and inserted into the database. |
| Get fields (button) | Click to import the fields from your data source into the Database fields table. The Specify database fields option in the general area must be selected for this tool to be active. |
| Enter field mapping (button) | Click to open the Enter Mapping window. The Specify database fields option in the general area must be selected for this tool to be active. |
Enter Mapping window
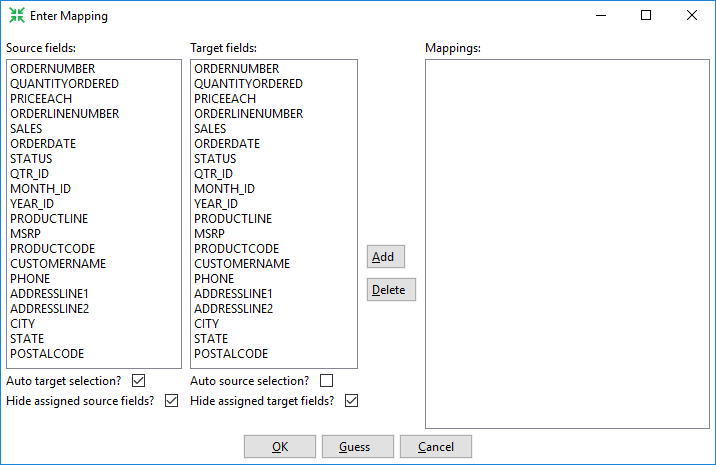
| Field | Description |
| Source fields | The list of field names from the incoming stream. |
| Target fields | The fields in the output table. When using this step with Spark on AEL, output fields types are converted for processing. For example:
See Supported data types for a complete listing of the conversions. |
| Add (button) | Click Add to move a selected combination of a field name and a column name to the Mappings pane. |
| Delete (button) | Click Delete to move a mapped combination from the Mappings pane back to the Source fields and Target fields panes. |
| Mappings | The field to column mapping designating the incoming field and the table column where the field will be assigned. |
| Auto target selection? | Select to have the step perform mapping to a target. |
| Hide assigned source fields? | Select to remove a field from the Source fields pane when it has been matched and moved to the Mappings pane. |
| Auto source selection | Select to automatically select a field from the Source fields pane when a column name is selected. |
| Hide assigned target fields? | Select to remove a field from the Target fields pane when it has been matched and moved to the Mappings pane. |
| Guess (button) | Click Guess to perform automatic matching of all fields and population of the Mappings pane. |
Metadata injection support
You can use the Metadata Injection supported fields with the ETL metadata injection step to pass metadata to your transformation at runtime. The following options and value fields of the Table Output step support metadata injection:
Options:
- Target schema
- Target table
- Commit size
- Partitioning field
- Store the table name field
- Name of auto-generated key field
- Truncate table
- Specify database fields
- Ignore insert errors
- Use batch update for inserts
- Partition data over tables
- Partition data per
- Is the name of table defined in a field
- Return auto-generated key
- Connection
Database fields:
- Table field
- Stream field