Microsoft Excel Writer

The Microsoft Excel Writer step writes incoming rows from PDI out to an MS Excel file and supports both the .xls and .xlsx file formats. The .xls files use a binary format which is better suited for simple content, while the .xlsx files use the Open XML format which works well with templates since it can better preserve charts and miscellaneous objects.
General
Enter the following information for the step:
- Step Name: Specifies the unique name of the step on the canvas. The Step name is set to Microsoft Excel writer by default.
Options
The Microsoft Excel Writer transformation step features two tabs with fields. Each tab is described below.
File & Sheet tab
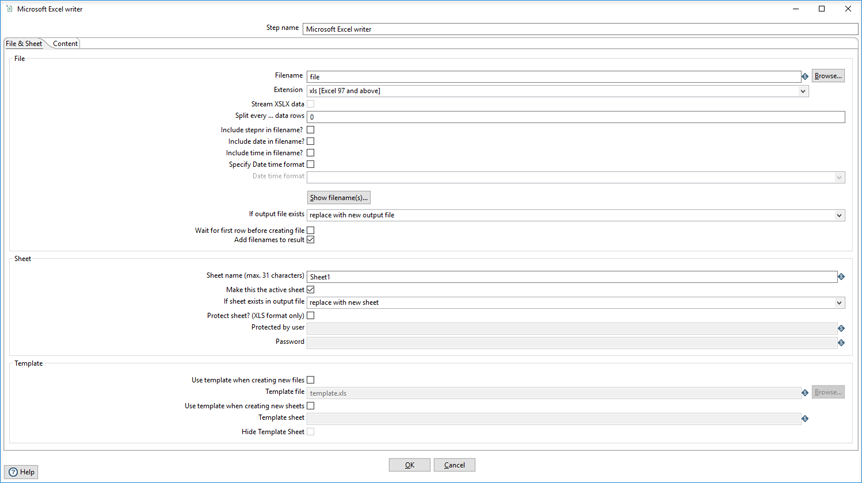
This tab includes the following panels and fields:
File panel
This panel includes fields for choosing the result file name, extension, and timestamp information. If the data is split over a number of rows, multiple files are created. You can also preview the results from this panel.
| Field | Description |
| Filename | Specify name and location of the Excel file in which to write the incoming rows from PDI. Variables or parameters can be used in this field. Do not include a file extension when the date and time are to be appended and the Extension option is specified. |
| Extension |
Select the Excel file extension to append to the file name. Options include:
The default extension is .xls. |
| Stream XSLX data (check box) |
Select this option when writing large XLSX files to the output file.
This option is only available if you select the '.xlsx [Excel 2007 and above]' option in the Extension field above. |
| Split every ... data rows | Specify a positive number to create a new output file every 'n' data rows. For example, if you want to split the file every 200 data rows, then enter 200 in this field. The files will be numbered. |
| Include stepnr in filename? (check box) |
Select this option to include the copy number in the file name (_0, for example) when you run the step in multiple copies, such as launching several copies of a step simultaneously.
|
| Include date in filename? (check box) |
Select this option to include the system date in the file name, such as in the format _20181231, for example.
|
| Include time in filename? (check box) |
Select this option to include the system time in the file name, such as in the format _235959, for example.
|
| Specify Date time format? (check box) |
Select this option to include the date and time in the file name using a format from the Date time format field below.
|
| Date time format | From the list, select the date and time format you want to include in the file name. See Common Formats for information on valid date and time formats you can use in this step. |
| Show filename(s)... (button) | Click to display a list of the files which will be generated. |
| If output file exists |
If the output file already exists, decide if you want to replace it with the new file or keep the original file.
|
| Wait for first row before creating file (check box) |
If this option is selected, the step creates the file only after it has detected a row. If this option is cleared, the output file is always created, regardless of whether rows are actually written to the file or not.
|
| Add filenames to result (check box) |
Using this option adds file names to the MS Excel output file.
|
Sheet panel
This panel includes fields for setting security for the spreadsheet in the MS Excel output file.
| Field | Description |
| Sheet name (max. 31 characters) | Specify the name of the worksheet within the MS Excel file in which to write the incoming rows from PDI. Variables or parameters can be used in this field. |
| Make this the active sheet (check box) |
If checked, the MS Excel file will open by default on the above sheet when the file is opened in Excel.
|
| If sheet exists in output file |
If the sheet already exists in the output file, decide if you want to replace it with the new sheet or keep the original sheet. For example, you may be using a template sheet or writing to existing files, and therefore may choose to overwrite or replace the sheet.
|
| Protect sheet? (XLS format only) (check box) |
The XLS file format allows to protect an entire sheet from changes. If selected, you need to provide a password. MS Excel will indicate that the sheet was protected by the user you specify here.
|
| Protected by user | Specify the name of the user you want shown in MS Excel as password-protecting this sheet. Variables or parameters can be used in this field. |
| Password | Specify the password for unlocking the editing features for this sheet in MS Excel. Variables or parameters can be used in this field. |
Template panel
When you create new files or replace existing files, you may choose to create a copy of an existing template file instead. Please make sure that the template file is of the same type as the output file: both must be either .xls or .xlsx. This panel includes fields for using template files and sheets in your Excel output file.
| Field | Description |
| Use template when creating new files (check box) |
Select this option if you want to use a specified MS Excel template to create the output file.
|
| Template file | If you selected the Use template when creating new files check box above, then enter the template file name you want to use, or click the Browse button and navigate to it. |
| Use template when creating new sheets (check box) |
Select this option if you want to use a specified template sheet to create the output sheet.
|
| Template sheet | If you selected the Use template when creating new sheets check box above, then enter the template sheet name you want to use, or click the Browse button and navigate to it. |
| Hide Template sheet (check box) |
Decide if you want the template sheet to be visible when the MS Excel output file is opened.
|
Content Tab
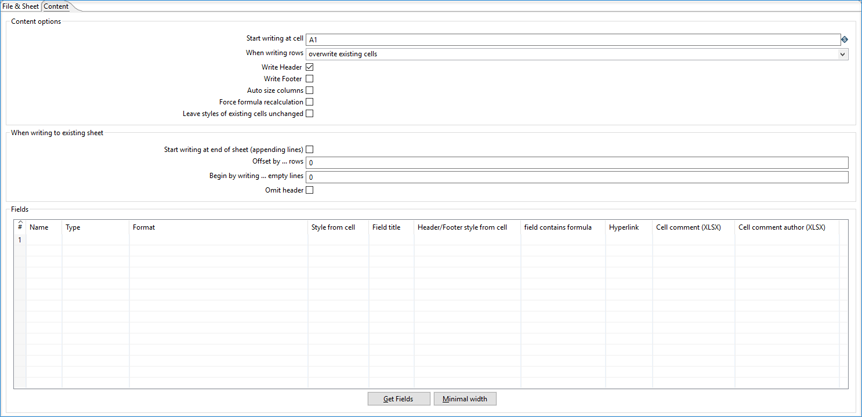
This tab includes the following panels and fields:
Content options panel
This panel includes options for customizing the format of the spreadsheet.
| Field | Description |
| Start writing at cell | Specify the cell in the MS Excel spreadsheet (letter column, number row) to start writing to in Excel notation, for example, A1. |
| When writing rows |
Specify how to write in new rows when the spreadsheet contains existing rows with data. Select one of the following options:
|
| Write Header (check box) |
Decide whether you want to use the first row as the header row in the output spreadsheet.
|
| Write Footer (check box) |
Decide whether you want to use the last row as the footer row in the output spreadsheet.
|
| Auto size columns (check box) |
Decide whether the columns should automatically resize to fit the content. Note that auto-sizing is not a feature that the XLS and XLSX file formats directly support, so results may vary.
To ensure the most accurate column-width calculations when using the auto-size feature, install the appropriate fonts on your server environment. |
| Force formula recalculation (check box) |
Decide whether you want the step to attempt to update all the formula fields in the output file. When this option is selected for the XLS file format, a flag is set by the step. The formulas are recalculated as soon as the file is opened in MS Excel. When this option is selected for the XLSX file format, the step itself must attempt to recalculate the formula fields. The underlying POI library does not support the full set of Excel formulas, which may contribute to errors if the step cannot recalculate the formulas.
|
| Leave styles of existing cells unchanged (check box) |
Decide whether you want the step to set the style of existing cells it is writing to. This option is useful when you are writing to pre-formatted template sheets.
|
When writing to existing sheet panel
This panel includes options for customizing how you want content to appear when it is written to an existing spreadsheet.
| Field | Description |
| Start writing at end of sheet (appending lines) (check box) |
Decide if you want the output to begin at the last defined row of the spreadsheet.
|
| Offset by ... rows | Specify any non-zero number to cause the step to move this amount of rows down (positive numbers) or up (negative numbers) before writing rows. Negative numbers may be useful if you need to append to a sheet, but still preserve a pre-styled footer. |
| Begin by writing ... empty lines |
Specify any positive number to cause the step to leave this amount of rows empty. When writing to an existing sheet, you may decide to write a few empty lines first. This option is useful if you want to append a few rows to an existing sheet, but offset them to see the bounds of each generated block of rows. |
| Omit header (check box) |
Decide if you want to include a header when writing to an existing spreadsheet. Omitting a header is useful if you want to generate new files with a header, but you do not want to repeat the header in subsequent runs where you append to the same file.
|
Fields panel
This panel includes Fields table for specifying the fields that are written to the Excel files. The Fields table contains the following columns:
| Column | Description |
| Name | The name of the field. |
| Type | The data type of a field: String, Date, or Number. |
| Format | The Excel format to use in the sheet. Please consult the Excel manual for valid formats. There are some online references as well. |
| Style from cell | A cell in the Excel spreadsheet (letter column, number row) such as A1, B4, etc., to copy the styling from for this column. This value is usually a pre-styled cell in a template. |
| Field title | If set, this is used for the Header/Footer instead of the Kettle field name. |
| Header/Footer style from cell | A cell to copy the styling from for the Header/Footer (usually some pre-styled cell in a template). |
| field contains formula |
Set to Yes if the field contains an Excel formula. You do not need to include the notation = before your field value. |
| Hyperlink | A field that contains the target to link to. Supported targets can be links to other Excel spreadsheet cells, website URL's, ftp's, email addresses, or local documents. |
| Cell comment (XLSX) | The XLSX format allows to put comments on cells. If you would like to generate comments, you may specify fields holding the comment and author for a given column. |
| Cell comment author (XLSX) | The XLSX format allows to put comments on cells. If you would like to generate comments, you may specify fields holding the comment and author for a given column. |
Metadata injection support
You can use the Metadata Injection supported fields with ETL metadata injection step to pass metadata to your transformation at runtime. The following Value fields of the Microsoft Excel Writer step support metadata injection:
- Name, Type, Format, Style from Cell, Field Title, Header/Footer Style from Cell, Field Contains Formula, Hyperlink, Cell Comment (XLSX), and Cell Comment Author (XLSX)