Microsoft Excel Output

The Microsoft Excel Output step allows you to write data to one or more Excel files.
The following sections describe the features available for configuring this step.
Options
The Microsoft Excel Output step has the following tabs and options:
| Option | Description |
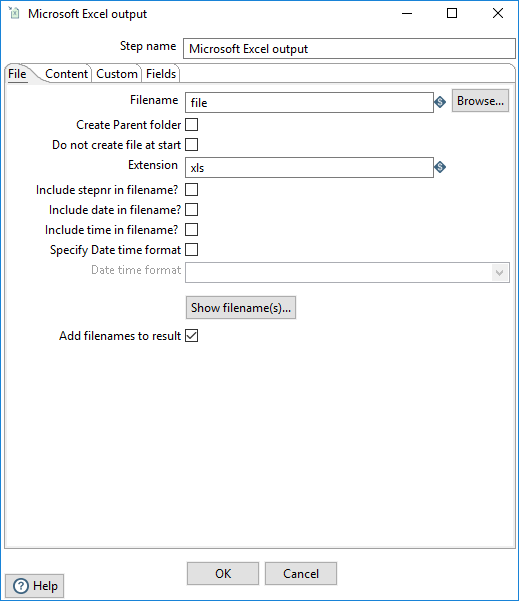
| Step name | Specify the unique name of the Microsoft Excel Output step on the canvas. You can customize the name or leave it as the default. |
| Filename | Specify the filename of the spreadsheet for this step to read. |
| Create parent folder | Select to create a parent folder. |
| Do not create file at start | Select to create the output file after completion of this step. This avoids the creation of empty files when no rows are in the data stream. |
| Extension | Specify a three-letter file extension to append to the created file name. |
| Include stepnr in filename | Select to add a copy number in the output file names before the extension. For example: nnnn_0.ext |
| Include date in file name | Select to include the system date in the filename. For example: _20101231 |
| Include time in file name | Select to include the system time in the filename. For example: _235959 |
| Specify Date time format |
Select to create a filename which includes a date and time stamp that follows the selection you choose from the enabled down-down list. Selecting this option disables the Include date in filename option and the Include time in file name option. |
| Date time format | Specify the chosen date and time format for the filename. This option requires Specify Date time format (above) to also be selected. |
| Show file name(s) (button) | Click to display a simulated list of the files this step will generate. The simulation depends on the number of rows that will go into each file. |
| Add filenames to result | Select to add the filenames to the internal filename result set. This internal result set can be later used to process all the created files. |
Content tab
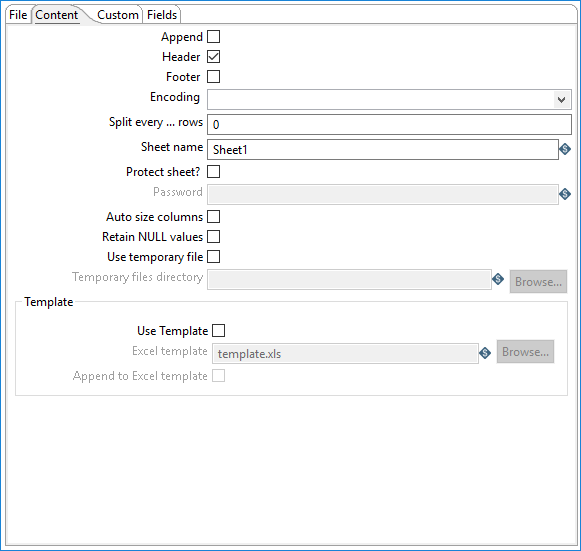
The content tab has the following options:
| Option | Description |
| Append | Select to append lines to the end of the specified file. If the file does not exist, a new one will be created. |
| Header | Select to display a header (defined in the Custom tab). The header will appear before the spreadsheet grid data. |
| Footer | Select to display a footer following the spreadsheet grid data. |
| Encoding |
Specify the text file encoding to use:
On first use, the PDI client searches your system for available encodings and populates this list accordingly. |
| Split every . . . rows | Specify a number of rows at which to split the file and start a new spreadsheet in which to continue data output. |
| Sheet name | Specify the name of the worksheet within the spreadsheet file. |
| Protect sheet? | Select to password protect the worksheet. You must also specify a password in the Password field. |
| Auto size columns | Select this option to automatically size the worksheet columns to the largest value. |
| Retain NULL values |
Select this option to preserve null values in the output. If this option is not selected, nulls are replaced with empty strings. |
| Use temporary file |
Select to create a temporary file that will be used during the generation of the workbook. If this option is not selected, the workbook is built entirely in memory. Setting this option involves an assessment of the trade-offs between memory usage and performance. |
| Temporary files directory | Specify a temporary files directory. |
| Use Template | Select to use a specified Excel template to create the output file. If you select this option, you must also specify the template filename in the Excel template field. |
| Excel Template | Specify the Excel template to be used. |
| Append to Excel Template | Select to append the output to the specified Excel template. |
Custom tab
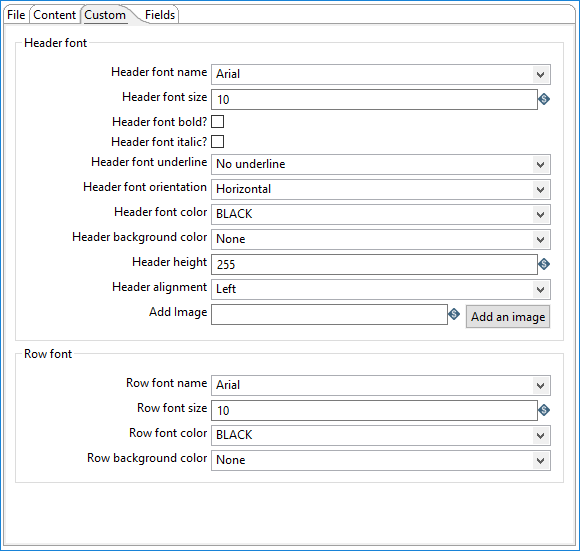
The Custom tab includes font options for the headers and rows:
Header font
| Option | Description |
| Header font name | Specify the font name for the text in the header. |
| Header font size | Specify the font size for the text in the header. |
| Header font bold? | Select to make the header text boldface. |
| Header font italic? | Select to set the header text in italics. |
| Header font underline | Specify whether to underline the header text. |
| Header font orientation | Specify an attribute for the header font if you want left-slanted text (minus), right-slanted text (plus), stacked text, horizontal text, or vertical text. |
| Header font color | Specify a font color for the header text. |
| Header background color | Specify a background color for the header text area. |
| Header height | Specify the height, in pixels, for the header. |
| Header alignment | Specify left, right, or centered alignment for the header text. |
| Add image (button) | Click Add an image to specify the location of an image file to use in header. For example, a company logo. |
Row font
| Option | Description |
| Row font name | Specify the font for rows. |
| Row font size | Specify the font size. |
| Row font color | Specify the font color. |
| Row background color | Specify a background color for the rows. |
Fields tab
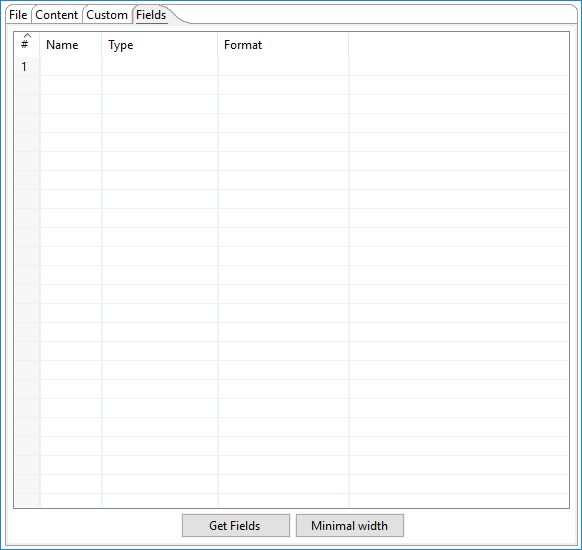
The Field tab defines properties for the exported fields. Click Get Fields to automatically retrieve a list of fields from the input stream and populate the list. The Minimal width button removes any padding from the output.
| Option | Description |
| Name | Specify the name of the field. |
| Type | Specify the field's data type (string, date, or number). |
| Format | Specify the format mask (number type). |
| Get Fields (button) | Click Get Fields to retrieve a list of fields from the input stream and populate the list. |
| Minimal width (button) | Click Minimal width to remove any excess padding from the output. |
Metadata injection support
All fields of this step support metadata injection. You can use this step with ETL metadata injection to pass metadata to your transformation at runtime.