Data Source Model Editor

The Data Source Model Editor guides you through editing relational and multidimensional models created using the Data Source Wizard. The Data Source Model Editor gives you the ability to move fields by dragging them to the appropriate location, mix and match fields from different tables, add fields to more than one category, or remove a field altogether.
The following tasks are things you can do to refine your relational and multidimensional data models with the Data Source Model Editor. Also included are some things that you can do specifically to refine your multidimensional data models, including:
- Assign Geographic Properties
- Assign Time Dimension Properties
- Use Ordinal Columns
- Properties of Time Dimension Levels
Get started with the Data Source Model Editor
Procedure
Open the Data Source Model Editor by clicking Manage Data Sources, selecting a data source, and clicking the Edit icon.
The Data Source Model Editor appears.Select the Reporting tab to edit a reporting relational model, or the Analysis tab to edit the analysis multidimensional model.
You can now edit the model or clear the model and start building a model from scratch. For instance, you can choose a field and drag it to the appropriate folder on the Analysis/Reporting model pane.
This causes that field to be displayed and used when designing reports.Click OK when you are done editing your model.
Results
The model builds and appears in the Data Source list.
Tour the Data Source Model Editor
When you first open the model editor, the center pane of the dialog box displays the active model. This model is organized into categories and fields that represent the tables and columns in your data.
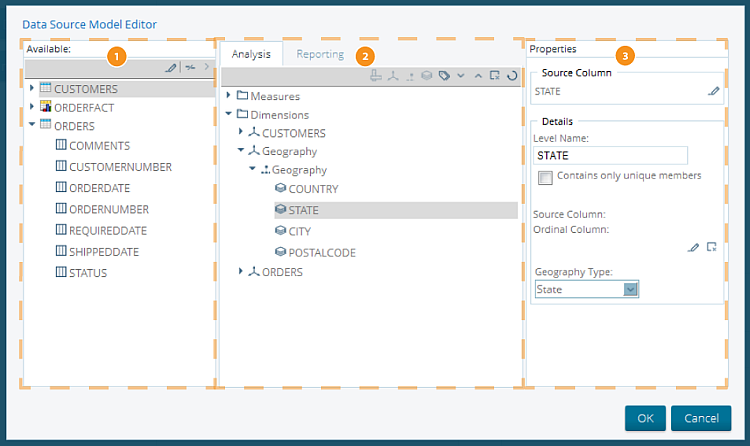
| Item | Name | Function |
| 1 | Available pane | Displays a list of the available tables and columns of the data source. |
| 2 | Analysis / Reporting model pane | Displays the active data source model. |
| 3 | Properties pane | Displays the properties associated with a selected category or field. |

| Icon Name | Function | Definition |
| Add Measure | Add a measure to the model. | A measure is a property on which calculations can be made, such as a sum, count, or average. |
| Add Dimension | Add a dimension to the model. | A dimension is used to provide filtering, grouping, or labeling capabilities. A dimension is related to fact data, and is typically something like a product model, color, size, geographic location, salespeople's names, or a unit of time. |
| Add Hierarchy | Add hierarchies to a dimension. | Hierarchies organize data by strict ranks. |
| Add Level | Add levels to a hierarchy. | A level is a set of objects within a hierarchy that have the same rank or importance. |
| Add Member Property | Add custom member properties to a level. | Member properties are the attributes of a level. |
| Move Up / Down | Move levels up and down in a hierarchy. | Moving levels up and down allow you to change their ranks within the hierarchy. |
| Remove field | Removes a field from the model. | n/a |
| Clear Model | Clears the entire model. | n/a |

| Icon Name | Function | Definition |
| Add Category | Add a category to the model. | A category is a structure that contains objects that are linked. |
| Add Field | Add a field to a category. | A field is the place where data is stored within a category. |
| Move Up / Down | Move levels up and down in a hierarchy. | Moving levels up and down allow you to change their ranks within the hierarchy. |
| Remove field | Remove a field. | n/a |
| Add Member Property | Add custom member properties to a level. | Member properties are the attributes of a level. |
| Clear Model | Clears the entire model. | n/a |
Add member properties to a level
Procedure
Click the Analysis tab.
Select a field from the Available pane to the Analysis pane.
With the field selected, click the Add Member Property icon.
The New Member Property dialog box appears.Enter a name for the new member property. Click OK
Set the source column for the new member property. Expand the level with new member property and choose the member property.
A yellow caution icon appears next to the parent dimension, hierarchy, and level of the new child member property. The icon indicates you need to specify the source column for the new member properties before proceeding. Enter a name for the new member property.Specify the source column for the new member property. Click Fix Missing Column.
The Select Source Column dialog appears.Chose a column from the available list. Click OK.
Edit multidimensional data source models
For multidimensional models, the Data Source Model Editor helps you add custom properties to a level, such as geographic or time dimensions.
Delete a data source
Procedure
Open the Data Sources window by clicking Manage Data Sources on the console Home page, selecting a data source, and clicking the Edit icon.
Click a data source in the list to highlight it.
Click on the Remove icon in the Data Sources tool bar.
The Remove Data Source window appears.Click Remove to delete the data source.
If you choose not to delete the data source, you can click Cancel to exit the window.
Results
Data Source Model Editor tips
The following tips are helpful when working with specific data sources:
- Creating a data source from a CSV file treats all columns as if they are in a single table, with no limitations on where measures come from or which fields can be grouped in a hierarchy.
- Creating a data source from a database table for reporting and analysis requires you to specify a fact table. Only numeric columns from the fact table can be used as measures. Also, all levels in a single hierarchy must come from the same dimension table.
- If you add or edit annotations on the data model in Analyzer, these annotations will not be visible when viewing the model in the Data Source Wizard. For example, if you add a calculated measure to the model in Analyzer, it will not display in the list of measures when viewing the model in the wizard. Saving the model in the wizard will overwrite any annotations which were added to the model in Analyzer.