Build a business view

The last step in creating a business domain is building your business view. A business view is a collection of business categories that represents the view of your model typically consumed by your end users. Each model can have one and only one business view. Business views are made up of logically (logically relevant to your organization or end-users) organized business categories and business columns.
A business category is like a bucket where you group and re-group your business columns. Business categories can mimic your business table names or be named after your favorite rock stars. Categories do not have metadata associated with them, have no tie back to any business table (although the editor graph gives you the impression this relationship exists; don't be fooled), and have the simple purpose of allowing you to bucket the business columns in your model as intuitively as possibly for your data consumers.
Building a business view consists of creating your categories, then moving your business columns from the business tables into the categories. You can move columns from different business tables into the same category, and even duplicate the same business column into two different categories.
Create a new category
To create a new category using the navigation pane, first make sure that the model you want to add this category to is selected, and the Business View node is visible.
Procedure
In the navigation pane, right-click Business View.
Select New Category.
The Business Category Properties dialog box appears.Type a name for the category in the ID field.
Click OK.
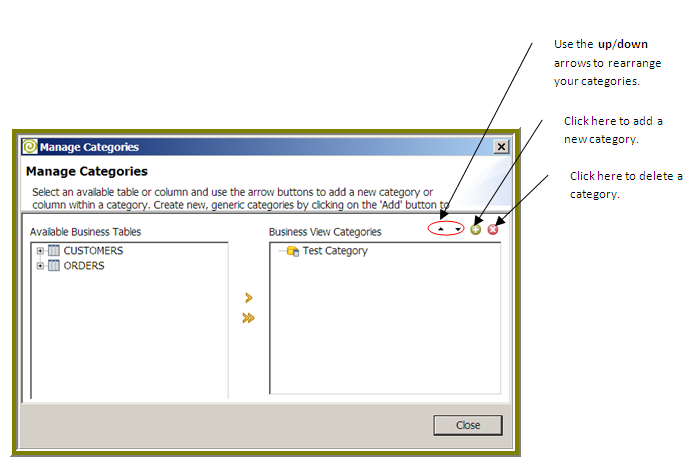
Build a business view using Manage Categories
Procedure
Double-click on Business View in the navigation pane. Alternatively, go to .
The Manage Categories dialog box appears.Create categories directly from your business tables by moving columns into categories, add new categories, and remove categories and columns.
Click Close when you are done.
Create a new category from a business table
Procedure
Select the table in the navigation tree on the left.
Click the Right Arrow to add categories.
Notice that your category has the same name as your business table, and all of your business columns were added to the new category by default.Click Close when finished.
Move columns into categories
Procedure
Select the table from the list of available business tables.
To view the columns under a business table, click the Plus Sign to the left of each table name.Select the destination category from the list on the right.
Click the Right Arrow to move columns.
Click Close if you are done.
Add a new category
Procedure
Click the Plus Sign in the upper-right corner of the Business View Categories list.
The Business Category Properties dialog box appears.Enter an ID (name) for your category, and click OK.
The new category name appears in the Manage Categories dialog box.Click Close if you are done.
Remove categories and columns
Procedure
Select the items you want to remove in the Business View Categories list on the right.
Click the X icon to delete the selected categories or columns.
Click Close when you are done.