Managing data objects

Data objects are virtual resources created by users by defining a set of join conditions between resources. You can profile, tag, search, and browse the data object virtual resource like any other resource in Lumada Data Catalog.
Use this article to learn how to manage data objects if you are a non-administrative user with permissions to manage properties for datasets and data objects in Data Catalog.
For example, you may have access to multiple resources for tabulating the employee contact information, skills, and assignments for a particular project. Now you need to gather contact information and skill sets for all employees assigned to a project. You can build a virtual resource by defining join conditions between these resources.
You can set join conditions in two ways:
- As suggested by Data Catalog from the tag associations
- With user-defined joins (single or composite)
When opening a data object, you can view the selected data object via the graph view or the profile view as well as the join conditions table. From both views, you can edit and save the data object with suggested join options. In the graph view, use the graph controls to resize, refocus, and magnify the graph view. In the Join Conditions table, you can refresh your sources for the latest view and search join suggestions by keyword. You can also customize the spacing in your table by clicking the More actions icon.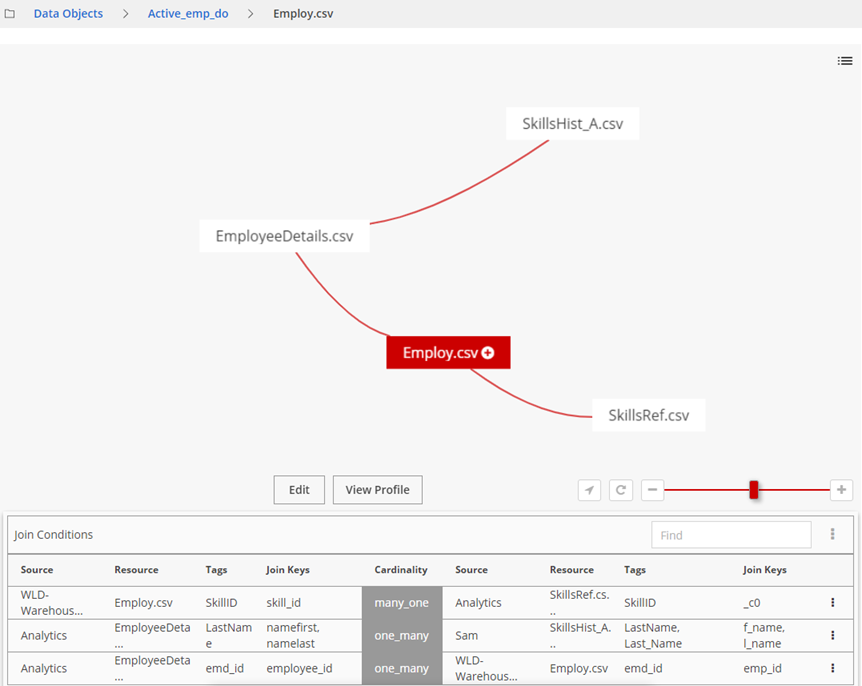
In the Graph view, you can see graphs of the relationships between all the resources in the data object, and view, add, refresh, and edit joins. You can browse the possible join paths and profile the data object to assess its correctness and relevance. In the Profile view, you can examine details such as origin, sensitivity, fields, and lineage. You can also do the following tasks:
- Add a tag
- Export to CSV
- Generate a Hive view
- Profile the data object
- Tag the data object
Create a data object
Perform the following steps to create a data object.
Procedure
Navigate to .
Select the resource you want for the initial building block for your data object.
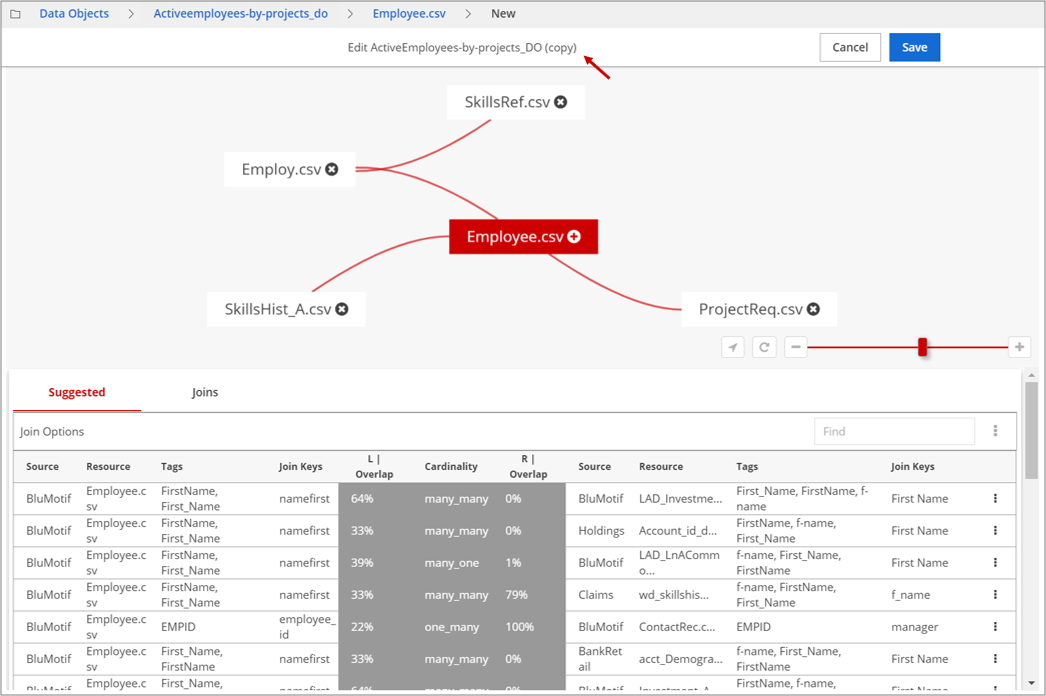
Click Data Objects and then New Data Object as shown below.
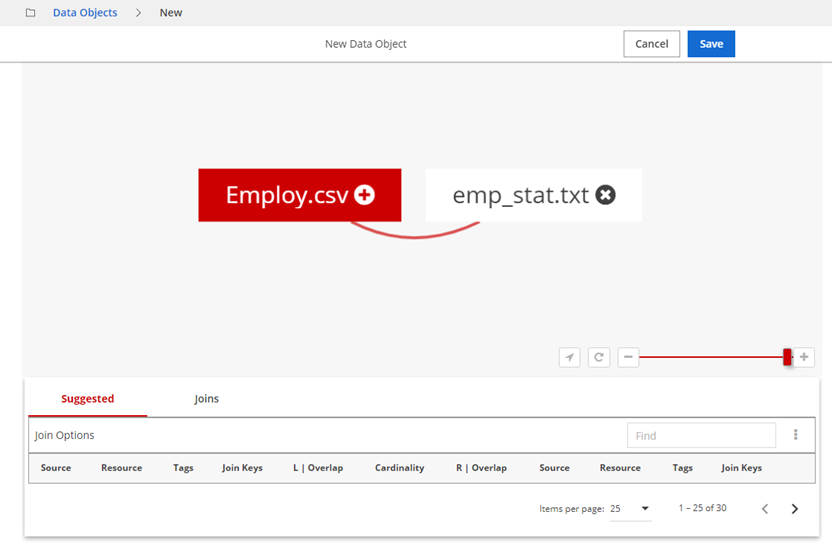
 The selected data resource appears in the graph view.
View the suggested joins.
The Suggested tab displays the suggested joins as Join Options with the Tags identified for the resources with their join Cardinality relationship, such as one_many, many_one, one_one, or many_many. The Join Keys are field names for the resources considered for potential joins.Click the row of a suggested join to further inspect the join statistics.
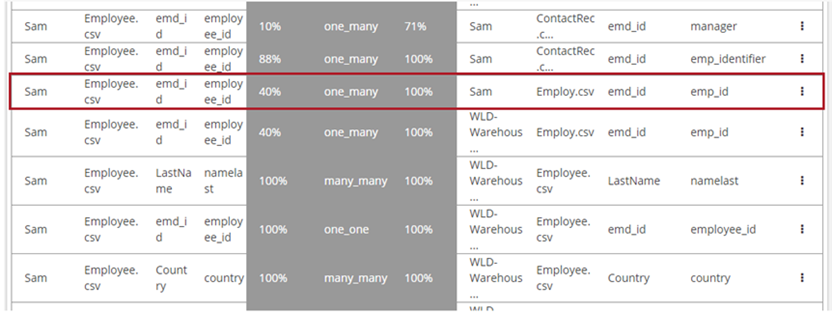
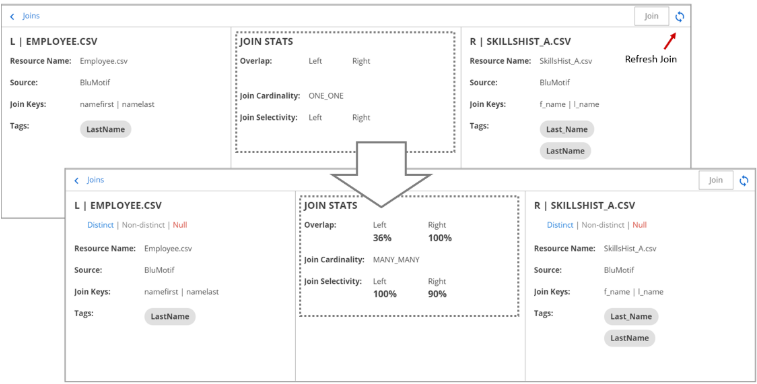
The JOIN STATS display the Overlap stats identifying the overlap between both resources. In the above example, 40% values in Employee.csv overlap with 100% values in Employ.csv in a one_many relationship, which is a good join candidate.
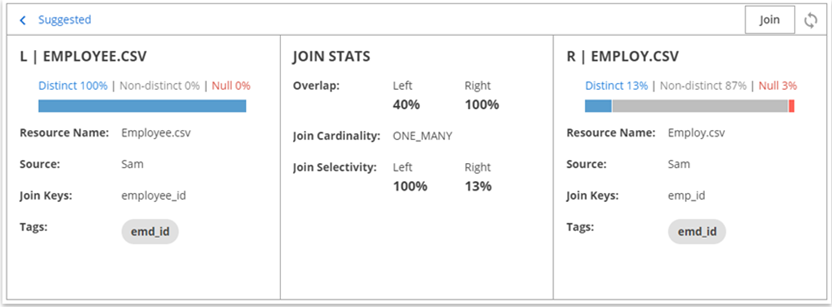
(Optional) If the join statistics look favorable, click Join to establish the relationship between the two resources.
If you would like to establish a manual join, please see Establish a manual join.Click Save. In the dialog box that opens, provide a name and description for your new data object. Optionally, click Cancel to discard your work.
When naming your data object, the name must begin with an alphabet character and can include numeric characters, hyphens '-', and underscores '_'. It cannot contain dots '.' because Data Catalog uses the dot separator to identify lineage and parentage between nested folders. Also, make sure that the name strings do not match any Data Catalog reserved names.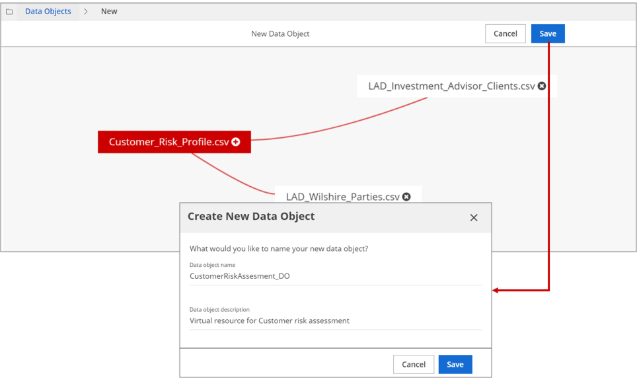
Click Save. Optionally, click Cancel to discard your work.
Your data object is now created and saved.
Establish a manual join
For example, if you know there is a first name - last name combination that creates a unique relation between resources, you can define it in the data object creation process.
In the Graph view, a manual join is indicated by a red cross inside a white circle after the name of the data resource. For example, in the following image, the manual join icon is appended to the Employ.csv file name.
Perform the following steps to establish a manual join:
Procedure
In the Graph view, click the Manual Join icon on the file name for the manual join to be added, in this example, Employ.csv.
The Join pane appears below.Enter the fields in Key 1 for the base resource. In the example, Key 1 is Employ.csv.
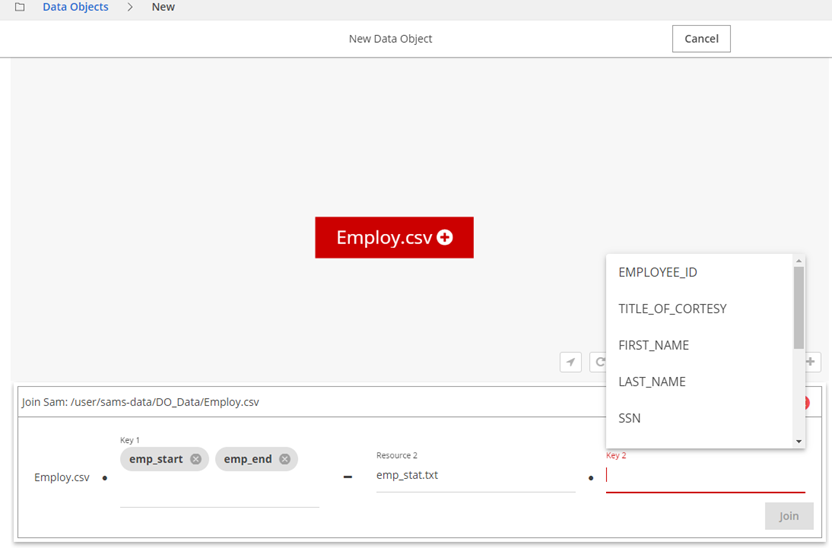
Enter the intended resource in Resource 2 that is expected to contain values in Key 1. Start typing the resource name in the field and select the best match from the menu that displays.
Select field names for Key 2.
Click Join to establish a composite manual join.
The data object appears in the Graph view.Click Save. In the dialog box that opens, provide a name and description for your new data object. Optionally, click Cancel to discard your work.
When naming your data object, the name must begin with an alphabet character and can include numeric characters, hyphens '-', and underscores '_'. It cannot contain dots '.' because Data Catalog uses the dot separator to identify lineage and parentage between nested folders. Also, make sure that the name strings do not match any Data Catalog reserved names.Click Save. Optionally, click Cancel to discard your work.
Your data object is now created and saved.
Edit a data object
Perform the following steps to edit a data object:
Procedure
Navigate to and select the data object to edit.
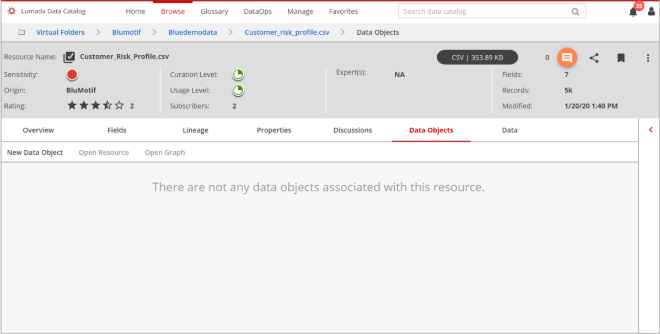
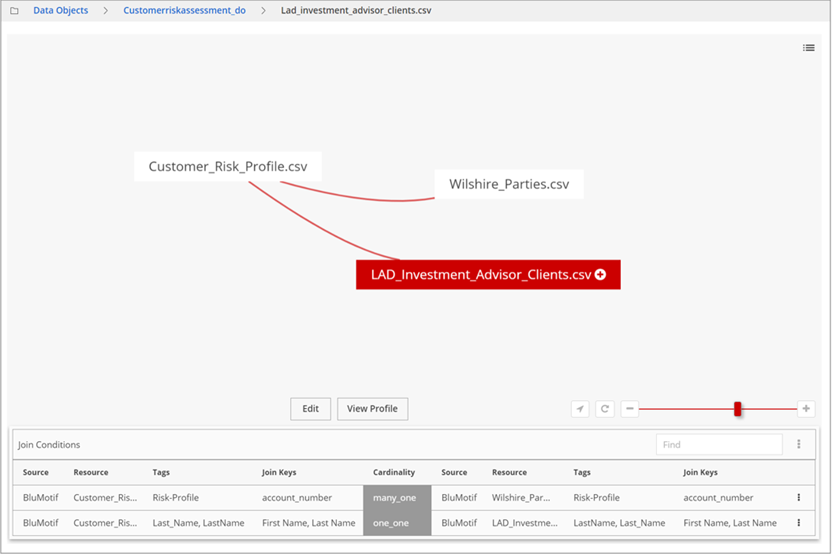 When you save a data object, you can continue building the data object by making the member resource the focus block in the Graph view. In this example, LAD_Investment_Advisor_Clients.csv is the selected object.
Click Customer_Risk_Profile.csv to make it the focus for the next join conditions, and click Edit.
Select the suggested join or establish another manual join to complete the data object.
Save the data object with the same name. The data object appears as in the image below:
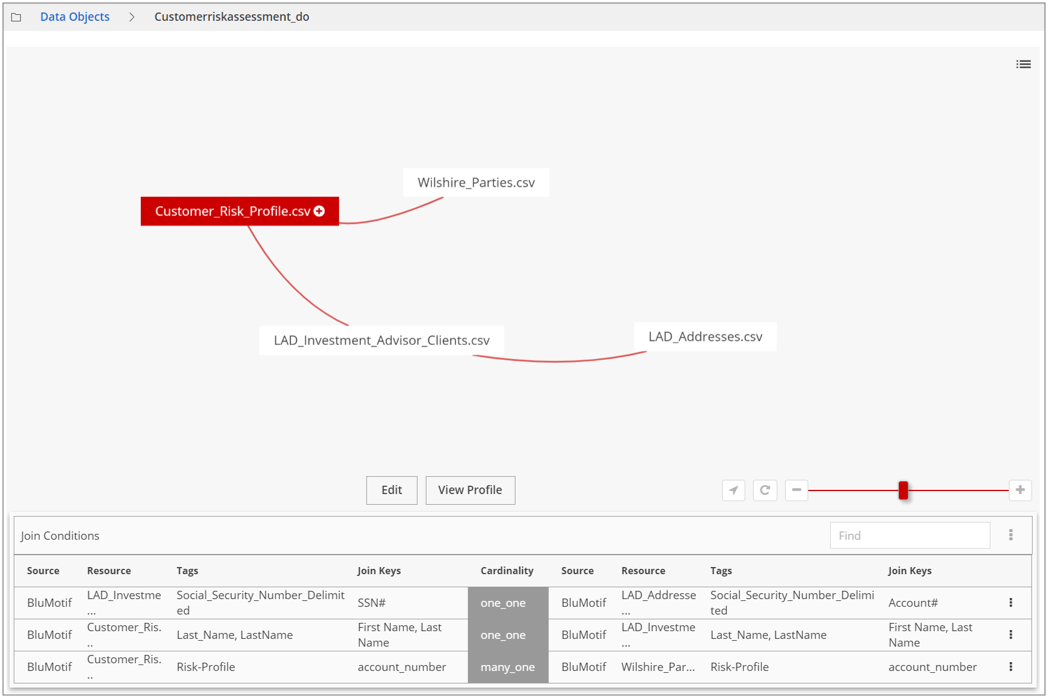 NoteIf a data object is updated, such as with new or deleted joins, you need to re-profile the data object to reflect the changes.
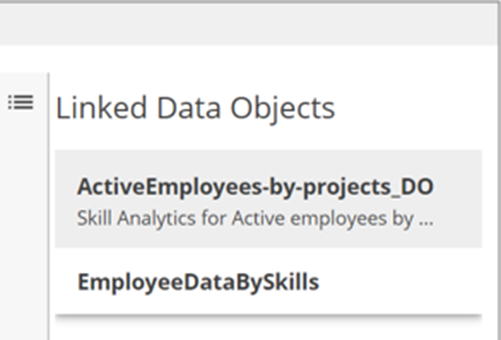
Click the List icon in the upper-right corner of the Graph view to display a list of data objects to which the focus resource belongs.
 If you select the data object from the list, the Graph view
updates with the view of the selected data object.
If you select the data object from the list, the Graph view
updates with the view of the selected data object.
Using a data object as a template
In Lumada Data Catalog, you can use an existing data object as a template to build another data object. From the Data Objects page, navigate to . Data Catalog creates a copy of the template data object and opens it in Edit mode. You can make edits or updates and save the copy with a new name.
Profiling a data object
After you create a data object, you can profile and tag it to retrieve the metadata of the virtual resource as defined by the join conditions.
The profile and tag operations apply only to data objects.
Refreshing joins
In Lumada Data Catalog, the ability to refresh joins only applies to data objects. However, you can refresh a data object join to verify the join statistics. The ability to refresh joins is particularly useful in cases of manual joins. Although suggested joins display these statistics to aid in your join selection, manual joins do not display join statistics at join time.
You can refresh a join from the data object Edit mode by clicking in the Joins tab for the selected join.
You can also refresh a join by opening the join and clicking the Refresh icon.
You can also remove a join by selecting .
A Refresh provides an estimate of the join statistics over 1000 rows, and a Profile examines and fetches join statistics from the entire data profile and will be more accurate.
Profile a data object
Perform the following steps to profile a data object:
Procedure
Navigate to and select the data object to profile.
Click View Profile.
Click the More actions icon in the upper-right corner and select Profile data object from the drop-down menu that displays.
The Profiling mode dialog box opens.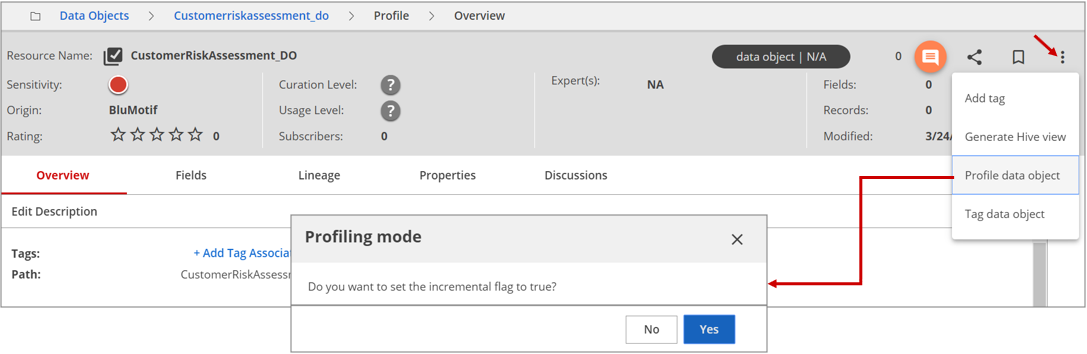
Specify if you want to profile the data object incrementally (processing only the changes since last profile) or non-incrementally (profiling the entire data object). Depending on your requirement, choose one of the following options.
- Yes for incremental profiling.
- No for non-incremental profiling.
Results
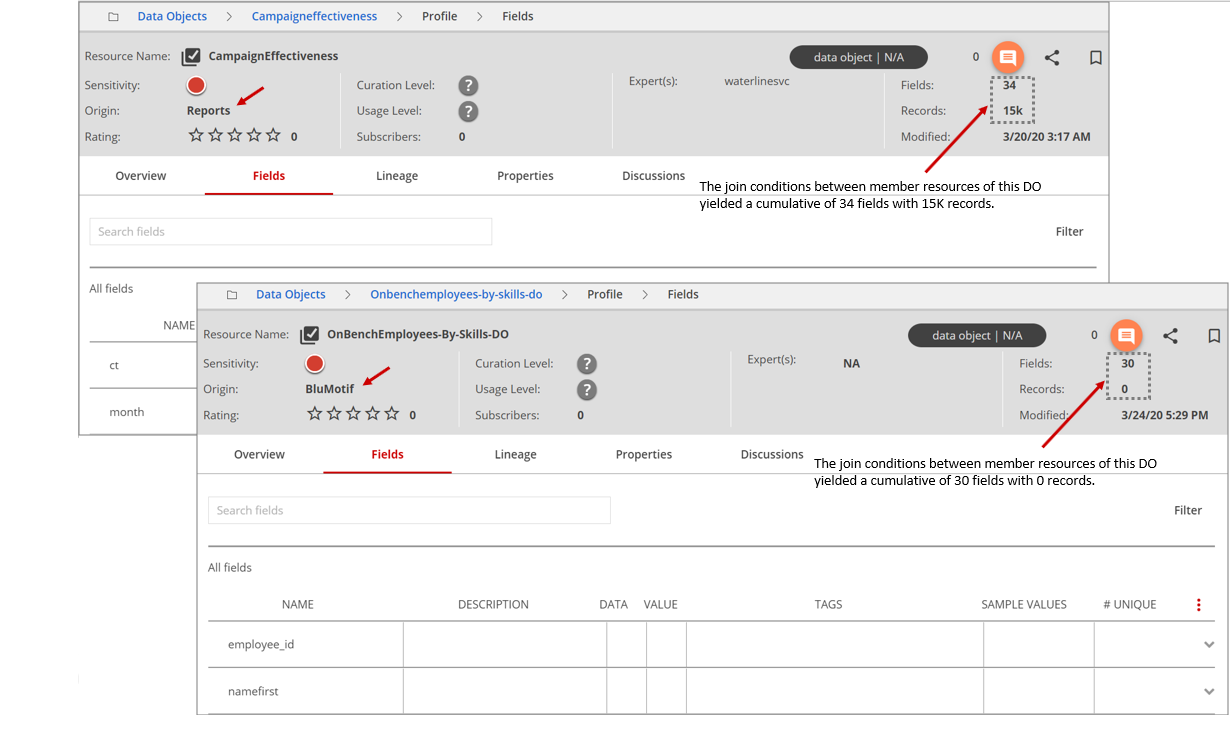
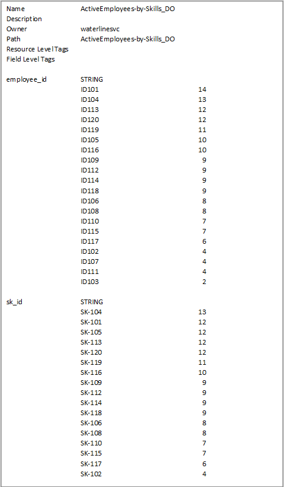
In the first example screen below, the join conditions between member resources of the data object yielded a cumulative of 34 fields with 15,000 records. In the second screen, the join conditions between member resources of the data object yielded a cumulative of 30 fields with 0 records.
The data object sensitivity is determined by the highest sensitivity of the member resources. You can view the color indicator in the upper-left menu bar. In this example, the red circle indicates' high sensitivity'.
The data object assumes the origin of the starter member resource on which the data object is built. In the examples, the origins of the data objects are Reports and BluMotif.
Next steps

Delete a data object
Perform the following steps to delete a data object:
Procedure
Navigate to .
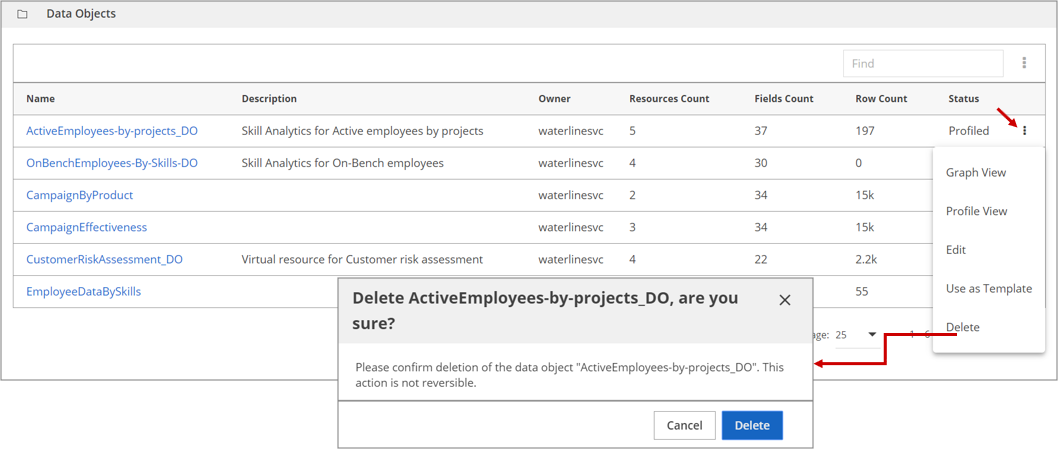
Locate the data object you want to delete and click More actions at the end of its row.
From the menu that displays, click Delete.
A confirmation dialog box prompts you to confirm the delete action while warning that the action is not reversible.Click Delete to confirm the deletion of the data object.
Results
Export to a CSV file
Perform the following steps to export to a CSV file:
Procedure
Navigate to the Profile view of the data object.
Click More actions in the upper-right menu bar and select Export To CSV from the drop-down menu that displays.
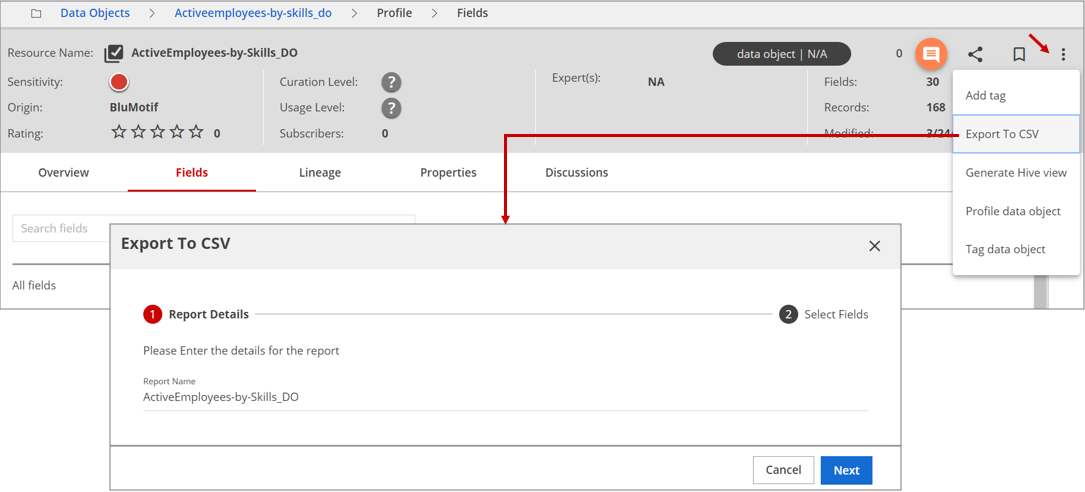
Enter the report name and click Next.
Select the fields to be exported into the CSV file.
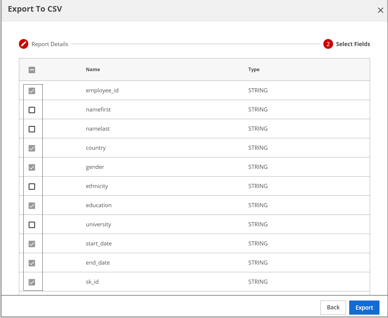
Click Export to start the CSV download process.
The CSV file is downloaded into the download folder configured in the browser (usually the Downloads folder).
Results
Generating a Hive view
Because data objects are treated like any other resource in Lumada Data Catalog, you can generate a Hive view of the data object. The data object Hive view generation has certain preconditions and restrictions:
- The Hive server must be configured with Data Catalog JARs. Refer to Configure HiveServer2 for LDC for details on this process.
- You must be authorized for at least one Hive database available through Data Catalog.
- Data Catalog should have at least the schema information for the resource.
- The data object must be profiled before you generate the Hive view.
Hive view generation is only supported for data objects with members belonging to different virtual folders (HDFS and Hive only). If any two data object members belong to the same virtual folder, Data Catalog is unable to create a corresponding Hive view, so you receive an error message both in the user interface and in the logs.
When you create a Hive view, it appears in Data Catalog immediately. Detailed metadata and data is available only after the Hive view is profiled.
Generate a Hive view
The purpose of generating a Hive view of a data object is to be able to profile the data object so it can participate in tag propagation.
Perform the following steps to generate a Hive view:
Procedure
Navigate to .
Locate the data object for which you want to generate a Hive view and click More actions at the end of its row.
From the menu that displays, click Profile View. The data object displays in Profile view.
Click More actions in the upper-right corner and select Generate Hive view from the drop-down menu that displays.
The Generate Hive View dialog box opens for the selected data object.Select a Hive virtual folder and a Hive database, then click Next.
On the Field Names page, enter field names for Hive generation or accept the default values. By default, the toggle for Use names of associated tags is set to on. Click Next.
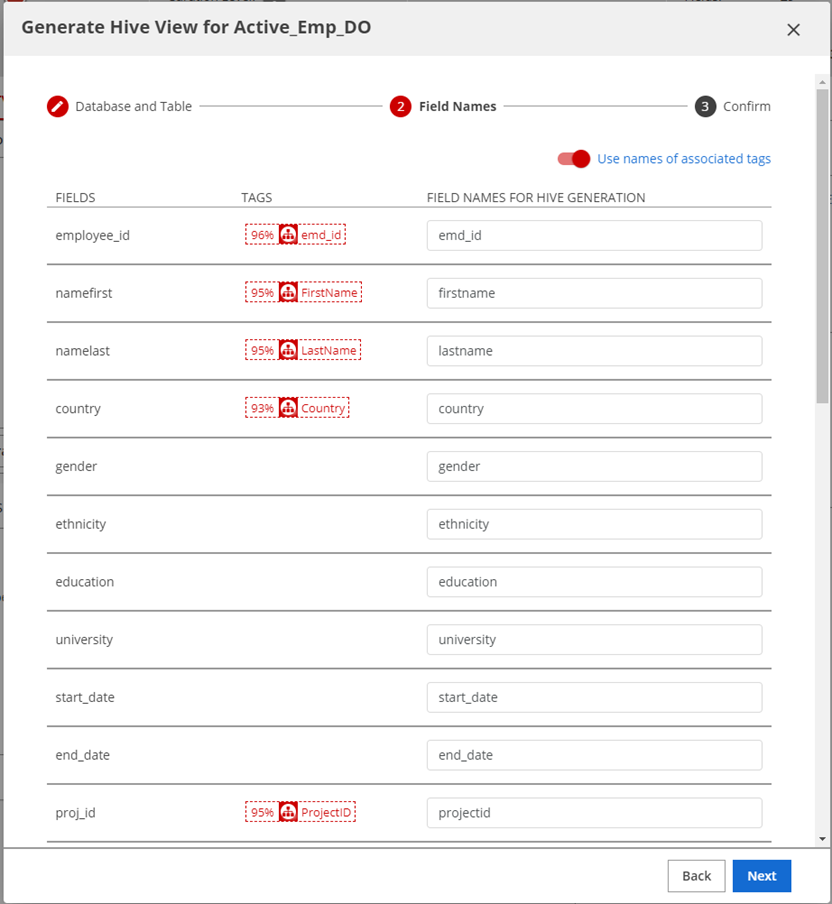
On the Confirm page, review the field mappings and verify the new view you want to create. If you want to make a change, click the Back button. If you are ready to confirm, click Generate Hive View.
Results
Data objects access logic
Data object accessibility in Lumada Data Catalog is governed by access logic that prevents access to unintended audiences while maintaining enough metadata visibility to allow your user role to request data access.
Depending on your user role, access to data objects follows these rules:
Your resource Read Access level is NATIVE
- You cannot see any join options unless you have access to both resources involved in the join.
- You cannot enter joins that involve resources to which you have no data access.
- You can profile and view any data object you construct under the above restrictions because you have access to all the resources belonging to the data object.
Your resource Read Access level is METADATA
- You can see all join options and can enter joins, although you may not be able to see stats on join conditions.
- For single column joins, you cannot run or see join-related stats, join cardinality, or overlaps unless you have access to both resources in question.
- For composite joins, you cannot run or see join and join keys stats, join cardinality, overlaps, selectivity, or null related stats, unless you have access to both resources in question.
- You cannot run or view data object profiles unless you have access to all resources involved in the data object.