Utility jobs

You can use the Data Catalog utility tools to update dashboards, and troubleshoot discovery and metadata details. Extended profiling generates resource metadata used for discoveries that reside in the discovery cache. Use the following tools to troubleshoot specific data in the discovery cache for qualifying discovery operations, updating dashboards, and resolving metadata inconsistencies.
To open Tools from any page, select the Tools icon in the left toolbar of the navigation pane. The Tools page opens.
Tools include:
Maintaining the discovery cache (DiscoveryCacheCompactor)
Removes unused MapFile directories and merges small MapFile directories. It is a distributed replacement for
RepoCacheMaintenance.
Run a Data Rationalization job
Reports details about duplicated and overlapping data. Use this utility to populate the Data Rationalization dashboard.
Use this tool to encrypt your plain text values for use in a Data Catalog configuration.
Utils
You can perform the following actions on CSV files:
- Export all the lineages (ExportLineage)
- Import all lineages (ImportLineage)
The output size from some of these utilities may be large. As a best practice, you should redirect the console output to a temporary file.
Maintaining the discovery cache
As a best practice, you should maintain the discovery cache by removing unused MapFile directories and merging small MapFile directories. The Data Catalog discovery cache is a repository containing large properties of entities generated during profiling and term propagation. Large properties are used in term propagation, lineage discovery, and in some instances regular expression evaluation.
The location and content of the discovery cache are controlled by configuration settings made in the Configurations user interface page. To change a configuration setting, go to Management and click View Configuration on the Configuration card. Then enter a keyword in the search box to search for a specific configuration setting.
URI for discovery cache metadata storeDefines the URI of the discovery cache metadata files. Its default value is
s3a://ldc-discovery-cache. You should configure large properties only on the default agent.Relative location for a large properties metadata storeDefines the location relative to the large properties URI for a large properties metadata store. Its default value is "/".
You should change the URI and location to fit your environment, and both should be accessible by the users running jobs.
The large properties of data resources and term propagation information in the discovery cache are stored in the resource_lp and tag_lp directories.
To view the metadata for term and large properties, enter the following command:
$ hdfs dfs -ls /user/ldcuser/.ldc_hdfs_metadata/
The output is similar to the following example:
$ hdfs dfs -ls /user/ldcuser/.ldc_hdfs_metadata/
Found 3 items
drwxr-xr-x  - ldcuser ldcuser    0 2021-09-28 05:25 /user/ldcuser/.ldc_hdfs_metadata/Built-in_Terms
drwxr-xr-x  - ldcuser ldcuser    0 2021-09-28 05:45 /user/ldcuser/.ldc_hdfs_metadata/resource_lp
drwxr-xr-x  - ldcuser ldcuser    0 2021-09-28 05:45 /user/ldcuser/.ldc_hdfs_metadata/tag_lp
$
Each directory contains the map files with generated unique names.
$ hdfs dfs -rm -R /user/ldcuser/.ldc_hdfs_metadata
The following configuration setting controls compression:
Minimum number of objects in discovery cache MapFile
If below this number, the object from MapFile will be relocated during discovery cache compression. The default is 50.
Compress the discovery cache
Procedure
Navigate to the default agent and enter the following command to see the command parameters:
./ldc compact -helpThe syntax is: ldc compact -numPartitions [number of partitions] -remove [false/true] -compact [false/true]
where:
-numPartitions(Optional) Number of partitions. The default value is 10.
-remove(Optional) If set to true, unreferenced discovery cache files are removed. If set to false, unreferenced discovery cache files are reported, but not removed. The default value is true.
-compact(Optional) If set to true, small or partially referenced discovery cache map file directories are merged according to the configuration settings for the percentage of discovery cache unreferenced objects in one MapFile and the minimum number of objects in a discovery cache MapFile. If set to false, the directories are reported, but not merged. The default value is true.
Enter a command with the parameters you want to specify.
Results
Run a Data Rationalization job
Before you run a Data Rationalization job, you must first run the applicable Data Profiling, Format Discovery, and Schema Discovery jobs on your data. Also, allocate at least 6 GB of memory for the executors and driver for this job.
Perform the following steps to run a Data Rationalization job:
Procedure
Open the Data Canvas page.
Select the data sources that you want to investigate.
Click the Action menu and select Process.
Click Data Rationalization.
Add any of the following parameters and values to the Command line text box according to your requirements.
NoteAll parameters are optional. If a value is not specified, the default value is used.Parameter Description -firstDataSource Specifies the first data source to use for overlap analysis. If not defined, all data sources are analyzed. -secondDataSource Specifies the second data source to use for overlap analysis. If the second data source is not defined, all data sources are analyzed. -incremental Specifies whether to perform incremental analysis. Set to true to perform overlap analysis for data sources only if the analysis has not been done before or requires an update. Set to false to redo the overlap analysis. The default is true.
-reprocess Specifies whether to reprocess data resources. Set to true to perform overlap analysis for data resources that have been processed. Set to false to perform overlap analysis only for resources that were re-profiled after the last analysis. The -incremental parameter must be set to false for this parameter to be active. The default is false.
-fth_copy Specifies the amount of overlap ratio when assessing a field as a copy. The formula is (1.0 - cardinality ratio < -fth_copy value). The default is 0.1.
-fth_overlap Specifies the precision to cut off accidental field overlaps. The file is considered an overlap if both the source and target overlap ratios are greater than this value. The default is 0.2..
-rth_copy Specifies the amount of precision required to detect if resources are copies. Resources are assessed as copies if the ratio of the matching fields in the compared resources is less than this value. The default is 0.1.
-rth_overlap Specifies the precision in overlap relationships needed to cut off accidental resource overlaps. Overlap relationships are denoted between resource1 and resource2 only if max([resource1 overlapped fields count]/[resource1 fields count], [resource2 overlapped fields count]/[resource2 fields count]) > [this value].The default is 0.32.
-same_semantics Specifies whether to perform semantic analysis. Set to true to perform overlap analysis for a pair of source and target fields that have the same internally discovered semantics attributes, such as temporal,free text,numeric, orstrings. To extend the scope of fields compared for overlap analysis, set this value to false. Setting this value to false may increase the accuracy of your overlap analysis, but also may cause a decrease in performance.The default is true.
-exclude_field_list Specifies a list of field names to exclude from overlap analysis. Click Save.
Results
Next steps
Encrypt text
You can use the Encrypt tool to encrypt plain text values in a Lumada Data Catalog configuration. Some use cases for encryption might be for API keys, Kubernetes secrets, or discovery cache attributes. Perform the following steps to encrypt text:
Procedure
In the left-hand navigation pane, click the Tools icon.
Under Encryption Tool, enter the text you want to encrypt in the Plain Text field and click Encrypt. The encrypted results display in the Encrypted result field. Plain text and encrypted texts enclosed with enc(…) are interchangeable.
The encrypted results display in the Encrypted result field. Plain text and encrypted texts enclosed withenc(…)are interchangeable.(Optional) You can copy the encrypted text by clicking the Copy Result icon.
You can use the result in place of any plain texts. For example, use for large properties with AWS secret keys. You do not have to paste the encrypted text in the data source passwords. Passwords are automatically encrypted when they are created or updated.(Optional) You can clear the plain text value by clicking Reset.
Lineage export and import
You can export lineages discovered by Data Catalog and import user-defined lineages with the Lineage – Import/Export tool. You can also use this tool to delete lineages that were exported as a CSV file.
The lineage relationships, both resource level and field level, are exported in the CSV format in a pre-defined structure. Lineage import also requires the user-defined lineages to be submitted only in this pre-defined format. Lineage export and imports are based on lineage targets, not sources.
When limiting lineage export to a specific virtual folder or path, all lineages are exported to defined targets in the virtual folder or path.
Export-import CSV structure
Data Catalog exports lineages in a pre-defined fixed format. The following table describes the columns of this fixed format:
| Col# | Col Name | Default Value | Description |
| A | external_id | system generated | (Required) Unique ID of the entity represented by CSV line, operation, or operation execution |
| B | external_source_name | "LDC" | Name of the external source. Use LDC for lineages created manually in Data Catalog. |
| C | target_data_source_name | "" | Name of the target data source |
| D | target_resource_path | "" | Target data resource path |
| E | lineage_type | "" | Lineage type (options: INFERRED, INFERRED_ALTERNATIVE, FACTUAL, IMPORTED, HDFS2HIVE, OTHER) |
| F | lineage_kind | "" | Lineage kind (options: COPY, PARTIAL_COPY, JOIN, UNION, UNION_PART, MASK, ENCRYPT, STANDARDIZE, CALCULATION, SUBSET, SUPERSET, HIVE_EXTERNAL, OTHER) |
| G | lineage_exec_type | "" | Lineage operation level (options:
lineage_exec_type_resource,
lineage_exec_type_field) |
| H | target_resource_field | "" | Target field |
| I | resource_lineage_reference | "" | GUID for the Operation execution entity GUID |
| J | principal | "" | Principal or lineage creator as group:user |
| K | source_data_source_name | "" | Source data source name |
| L | source_resource_path | "" | Source data resource path |
| M | source_resource_field | "" | Source field |
| N | lineage_state | "" | Lineage state (options: ACCEPTED, REJECTED, SUGGESTED, IMPORTED) |
| O | description | "" | Lineage description |
| P | code | "" | Transformation code |
| Q | operation_reference | "" | GUID for the Operation entity |
| R | operation_type | "operation_execution" | Lineage entity type (options: operation, operation_execution). The default value is operation_execution. |
For every lineage you export, the details for the lineage operation include the operation execution details.
The following sample is a portion of the CSV file exported:

The following details apply to the selected sample of the CSV export:
- Row 75: Identifies the lineage and shows it was REJECTED.
- Row 76: Lists all the information in the DETAILS panel for the lineage. It identifies lineage type, kind, status, description, and code.
- Rows 77 – 94: Lists the field level lineage details for the selected lineage operation. The Code column (Col P) identifies the source field to target field mapping found in the View Mapping or Code section under the DETAILS tab.
The operation_reference values (Column Q in this example) for
all rows following the lineage identifier row (Row 75 per this example) are the same and
represent the external_id of the lineage operation.
The following lineage types can occur:
Inferred
Primary lineage discovered by Data Catalog. The AI engine identifies one primary lineage based on proprietary algorithms.
Inferred alternative
Lineage discovered by Data Catalog. If more than one source is a candidate for primary lineage, the AI engine marks these inferred lineages as
Inferred_alternative.Factual
Any lineage added manually.
Imported
Any lineage imported from third-party applications such as Apache Atlas.
HDFS2HIVE
HDFS to HIVE lineage identified as part of schema discovery.
Export a lineage
Procedure
On the Home page from the left-side menu bar, click Tools.
The Tools page opens.Click the Lineage – Import/Export tab.
The Lineage – Import/Export Tool opens.Click Export.
The export-specific fields appear.Select the limit of the export target for the Virtual Folder Selection.
The default value is All of the virtual folders.Specify the following parameter in the Enter Parameters text box if you want to apply it to the export:
-path(Optional) Limit the lineage export to this path.
Click Submit.
Results
-path parameter specified: ./ldc
exportLineageToCSV -virtualFolder vf -path pathtoDataEntitySave exported lineage to your local machine
The ExportLineage command exports to the CSV file in the exports directory under the local agent. If you want to save the exported lineage to your local machine, perform the following steps:
Procedure
On the Home page from the left-side menu bar, click Management.
The Manage Your Environment page opens.Select Job Activity under Job Management.
The Job Activity window opens.Expand the exportLineageToCSV activity by clicking the down arrow on the activity row, then click the right arrow.
The Instance Steps dialog box appears.Click Download Supported Files.
Results
Import a lineage
Procedure
On the Home page from the left-side menu bar, click Tools.
The Tools page opens.Click the Lineage – Import/Export tab.
The Lineage – Import/Export Tool opens.Click Import.
The import-specific fields appear.Specify the location of the CSV file in Upload File.
(Optional) Select Undo to delete all defined lineages from the virtual folder associated with the Upload File. Otherwise, deselect Undo to retain all defined lineages and insert the imported lineage.
The Undo option is deselected by default.NoteThe use of parameters in the Enter Parameters field is not currently supported.Click Submit.
Results
Next steps
Lineage best practices
You should adhere to the following best practices when updating existing lineages in Data Catalog.
- You can update existing lineages by exporting them to a CSV file, curating the lineages in the CSV file, then importing the transformed lineages back into Data Catalog.
- When updating lineages, do not manipulate the
external_id,lineage_exec_type,resource_lineage_referenceoroperation_referencefields. Errors occur when any of these fields are modified.- The
external_ids are generated by Data Catalog and are unique to the system. - The
lineage_exec_typefield identifies resource lineage versus field lineage. - The
resource_lineage_referenceandoperation_referencefields depend on theexternal_idfield.
- The
- The
principal,description, andcodefields are descriptive. No validations are performed on the content of these fields while importing lineages. - The
lineage_typeandlineage_kindfields are also considered descriptive when importing lineages. No validations are performed on the user updates to these fields. - Validations are performed on any changes to the
target_data_source_namefield, thesource_data_source_namefield, the target path, the target field, the resource path, the resource field, and thelineage_state. Changes to resource names as part of path name changes are not supported. - Data Catalog does not offer field curation.
Removing lineages
You can also use the Lineage – Import/Export tool to remove lineages from Data Catalog. When you select Undo for Import, the import process removes all lineages specified in the import CSV file.
Model - Import/Export tool
You can use the Model - Import/Export tool, a migration utility that functions like a data model mapper, to export and import entities according to the applicable environment:
- In environments with different data mappings, you can export or import the basic definitions of Data Catalog assets or the data model.
- In environments with matched data mappings, you can export or import most of the asset metadata.
The following metadata can be exported and imported:
- Data sources
- User roles
- Glossaries
- Business terms
- Term associations
- Virtual folders
- Custom properties
Exporting metadata
You can export metadata from Data Catalog and save the metadata in a CSV format.
The entities are exported to a file in CSV format with the following file name convention:
exported_<entity>.csv
For example:
exported_termassociations.csv
exported_customproperties.csv
exported_glossaries.csv
exported_folders.csv
exported_userroles.csv
exported_sources.csv
exported_businessterms.csv
Export metadata
Follow the steps below to export metadata in a CSV format:
Procedure
On the Home page from the left-side menu bar, click Tools.
The Tools page opens.Select the Model – Import / Export tab.
The Model – Import / Export Tool page opens.Click Export.
The export-specific fields appear.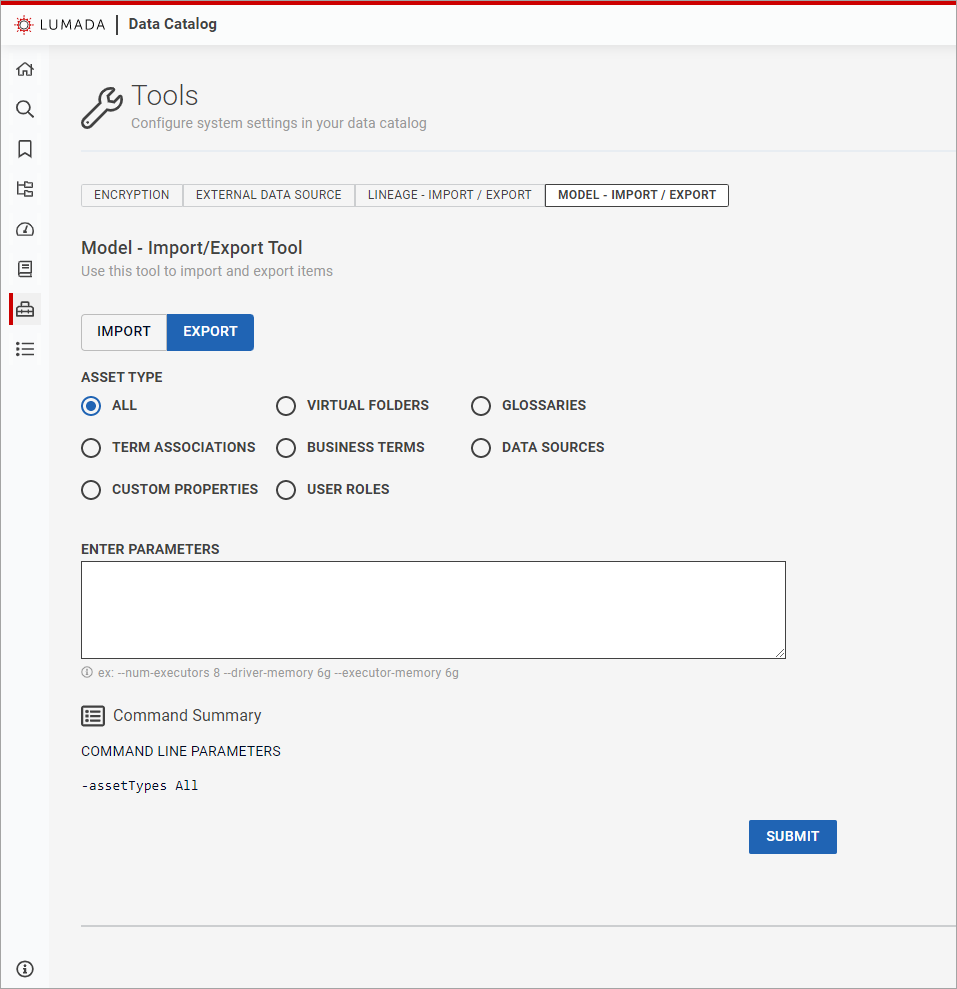
Select the asset type of the exported metadata.
The default value is All of the types.In the Enter Parameters text box, enter any optional command line parameters, such as [
The specified parameters appear in the Command Summary section.--num-executor], [--driver-memory] or [--executor-memory], that you want to apply to the export.Click Submit.
Results
Importing metadata
You can import metadata that has been saved in the pre-defined Data Catalog CSV file format.
To import user roles, data sources, and term associations, you must maintain the following import-export compatibility:
- Use only the CSV metadata files that were exported earlier from Data Catalog.
- Use the same version of the Model - Import/Export Tool that was used for exporting the metadata files.
Metadata file structures
The data is formatted inside the CSV file. When you are importing metadata into Data Catalog, a specific import sequence is required due to internal dependencies. For example, if you are importing business terms, make sure the required glossary is available in Data Catalog. If not, import the glossary first and then import the business terms. These dependencies are described for each of the metadata types, below.
Data sources
When you are importing data sources, make sure to create and connect agents, and profile the data before importing any term associations.
The data source import file should have the following columns in this order:
- DATASOURCE_NAME
- DATASOURCE_DESC
- DATASOURCE_TYPE
- DATASOURCE_PATH
- DATASOURCE_URL
- DATASOURCE_USER
- DATASOURCE_PASSWORD
- DATASOURCE_JDBC_DRIVER
User roles
The user roles import file should have the following columns in this order:
- USER_ROLE_NAME
- USER_ROLE_DESC
- USER_POLICY_NAMES
- VIRTUAL_FOLDER_NAMES
- GLOSSARY_NAMES
- METADATA_ACCESS
- DATA_ACCESS
- IS_DEFAULT_ROLE
- IS_ALLOW_JOB_EXECUTION
Glossaries
The glossaries import file should have the following columns in this order:
- GLOSSARY_NAME
- GLOSSARY_DESC
- GLOSSARY_COLOR
Business terms
Before importing any business terms, make sure you have created or imported the corresponding glossary.
The business terms import file should have the following columns in this order:
- GLOSSARY_NAME
- PARENT_LOGICAL_PATH
- TERM_NAME
- TERM_DESCRIPTION
- TERM_METHOD
- TERM_REGEX
- TERM_MINSCORE
- TERM_MINLEN
- TERM_MAXLEN
- TERM_ENABLED
- TERM_LEARNING_ENABLED
- EXTERNAL_ID
- EXTERNAL_SOURCE_NAME
- TERM_SYNONYMS
- ENTITY
- ANCHOR
- CREATE_RESOURCE_TERM_ASSOCIATION
- DEFAULT_OR_CUSTOM
- EXPRESSION
You can use the term name to show hierarchy in business terms by using dot notation for naming the business term, as shown in the following example:
1. "Sales","Orders.Jan.Week1","Tag for Orders",VALUE,,0.0,0,0,true,true,,,""
The example above identifies a business term Week1 with the parent
business term Jan and grandparent business term Orders
under the Sales glossary.
Term associations
Before importing any term associations, make sure you have profiled the virtual folder and have imported the corresponding business terms and glossary.
The term associations import file should have the following columns in this order:
- GLOSSARY_NAME
- TERM_NAME
- DATASOURCE_NAME
- RESOURCE_NAME
- FIELD_NAME
- TERM_PROPAGATION
- TERM_ASSOCIATION_STATE
Virtual folders
Before importing csv files into virtual folders, you must create or import the respective parent data source.
The virtual folders import file should have the following columns in this order:
- VIRTUAL_FOLDER_NAME
- VIRTUAL_FOLDER_DESC
- VIRTUAL_FOLDER_PARENT_NAME
- VIRTUAL_FOLDER_DATASOURCE
- VIRTUAL_FOLDER_PATH
- VIRTUAL_FOLDER_INCLUDE
- VIRTUAL_FOLDER_EXCLUDE
- IS_VIRTUAL_FOLDER_ROOT
Custom properties
The custom properties import file should have the following columns in this order:
- CUSTOM_PROPERTY_NAME
- CUSTOM_PROPERTY_DISPLAY_NAME
- CUSTOM_PROPERTY_DATATYPE
- CUSTOM_PROPERTY_DESC
- CUSTOM_PROPERTY_GROUP_NAME
- CUSTOM_PROPERTY_GROUP_DESC
- IS_CUSTOM_PROPERTY
- IS_CASE_SENSITIVE
- IS_SEARCHABLE
- IS_FACE_TABLE
- CUSTOM_PROPERTY_READ_ROLE
- CUSTOM_PROPERTY_WRITE_ROLE
Import metadata
Follow the steps below to import metadata:
Procedure
On the Home page from the left-side menu bar, click Tools.
The Tools page opens.Select the Model – Import / Export tab.
The Model – Import / Export Tool opens.Click Import.
The import-specific fields appear.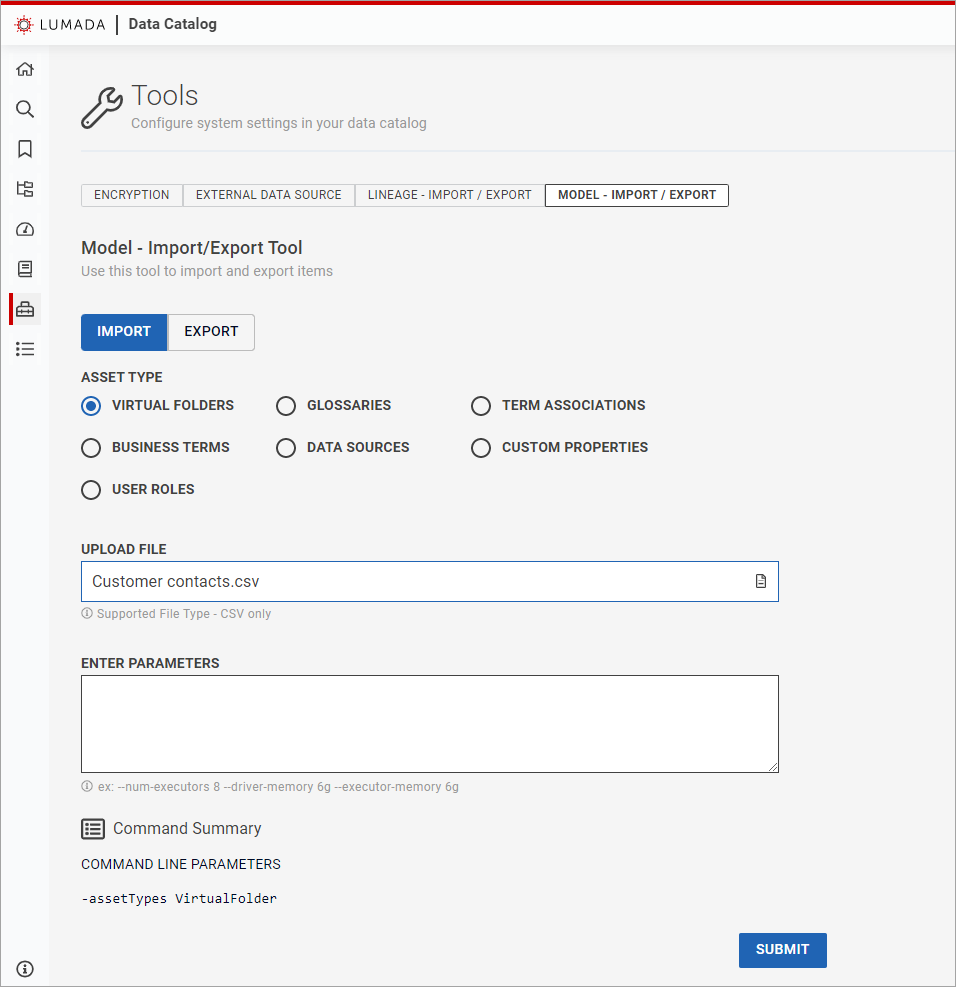
Select the asset type for the imported metadata.
Specify the location of the metadata file in Upload File.
In the Enter Parameters text box, enter any optional command line parameters, such as [
The specified parameters appear in the Command Summary section.--num-executor], [--driver-memory] or [--executor-memory], that you want to apply to the import.Click Submit.
Results