Installing Lumada Data Catalog on CDH, HDP, or CDP

These instructions assume that you are a systems administrator installing Lumada Data Catalog on a CDH, HDP, or CDP platform distribution. Ensure you have completed the Component validations before proceeding with installation. The following sections describe how to download and run the installers.
Requirements
Data Catalog requires the following external components:
- Solr
- Postgres
Solr and PostgresSQL (Postgres) must be installed before installing Data Catalog. See instructions on installing and configuring these components and gather the following information before installing Data Catalog. Note that the actual values should be specific to your environment.
| Solr Connection Details | |
| Solr URL | http://hostname:8983/solr |
| ZooKeeper Znode | hostname:2181/solr |
| Collection Name | wdcollection |
| For installation details, see Downloading and installing Solr. | |
| Postgres Connection Details | |
| URL | jdbc:postgresql://hostname:5432/postgres |
| Username | ldcuser |
| Password | ldcuser |
Download the Data Catalog packages
Download the Data Catalog distribution from the location provided by Data Catalog. If your organization has subscribed to support, you can find the location through the Hitachi Vantara Lumada and Pentaho Support Portal.
You should obtain access to three installers, where X is the specific version of the package you want to install:
- ldc-app-server-X.run
- ldc-metadata-server-X.run
- ldc-agent-X.run
The installation of the Data Catalog packages must occur in the following order:
- Lumada Data Catalog Application Server
- Lumada Data Catalog Metadata Server
- Lumada Data Catalog Agents
Installing Data Catalog packages
The following installation is a generic installation on a non-Kerberized environment. For environment-specific installations, see these articles in Installing Lumada Data Catalog:
- If installing on a Kerberized environment, see Installation with special cases.
- Some environment specific configuration changes are reviewed in Post-install system configurations.
If you cannot find installation instructions for your specific environment, contact Hitachi Vantara Lumada and Pentaho Support Portal.
Install the Lumada Data Catalog Application Server
The Lumada Data Catalog (LDC) Application
Server is installed in two parts: a command line part and a browser-based part. Before you
begin the Data Catalog
installation, you must have a user who has root access permissions or sudo
permissions. You must also provision a directory for a storage location, typically in HDFS,
where the Data Catalog
service user can store and access Data Catalog’s computed fingerprints.
An HDFS privileged user, typically hdfs, can use the following commands to create a storage location:
hdfs dfs -mkdir /user/ldcuser
hdfs dfs -chown -R ldcuser:ldcuser /user/ldcuser
Use the following steps to install Data Catalog.
Part 1: Perform command line installation
Procedure
Stop all Data Catalog processes that are running.
Begin the installation using the one of the two following commands:
If you are NOT using Kerberos authentication, use this command. # sudo bash ./ldc-app-server-6.0.0.runIf you are using Kerberos authentication, use this command. ImportantTo accommodate Kerberos, a manual step is required between the command line and the browser-based parts of the installation. This command prevents the web server from starting. Before resuming Data Catalog installation, you must perform the steps in Set up Kerberos. When you have finished, proceed to Part 2: Perform installation in the browser.# sudo bash ./ldc-app-server-*.run -- --no-execAs a user with root access, from the command line interface, run the executable file you downloaded from the Lumada and Pentaho Support Portal according to your command choice, above.
Enter 1 to use Express Install.
The installer file is uncompressed and verified.At the prompts, complete your entries and selections for the following items:
- The name of the Lumada Data Catalog service user.
- The installation location.
- The log location.
- The installed Solr server version.
- Verification if Kerberos is enabled or not.
- Request to link hdfs-site.xml, hive-site.xml, core-site.xml to Lumada Data Catalog installation.
- The full path to core-site.xml file.
- The full path to hdfs-site.xml file.
- The full path to hive-site.xml file.
Review the summary of your selections, then enter
The directories are created, the LDC Application Server is installed, and services are started.Y(es) when ready to proceed.
Results
Next steps
Part 2: Perform installation in the browser
Perform the following steps to continue the installation:
Procedure
Browse to the
The browser opens the Welcome to Lumada Data Catalog page.setuplink at http://<LDC node>:8082/setup.Click Let's get started.
The browser opens the Lumada Data Catalog End User License Agreement page.Read the license terms and conditions, then select the check box to accept the license agreement and click I agree.
A license is granted and the Connect with Solr page appears.Enter the following fields and settings on the Connect with Solr page to set up the Data Catalog Solr collection repository:
In Solr Client Mode, select the client mode that corresponds to your Solr installation.
These are the same values that you configured in Install Solr and Create the collection.In the Solr Server Url field, enter the URL of Solr server.
In the Solr Zookeeper Ensemble field, enter the ZooKeeper ensemble.
In the Lumada Data Catalog Collection Name field, enter the Solr collection name for your collection.
In Solr Authentication Mode, select an authentication mode.
Depending on the Solr Authentication mode for your Solr implementation, you may have to enter the Solr credentials or ensure there is a valid Kerberos ticket, which is active at the time of this installation.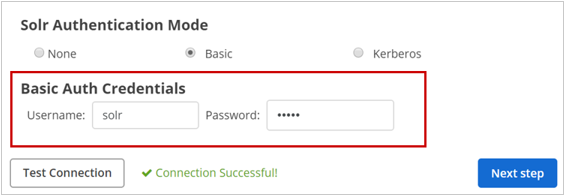
Click Test Connection.
The Connection Successful message appears.NoteIf the test does not succeed, verify that Solr is running, and that the Data Catalog service user has access to the collection.Click Next step.
Enter the following fields and settings to set up the Postgres database which is used for Data Catalog audit logs and Discussions.
In the Postgres Driver Class field, enter the class used to communicate with the Postgres database.
In the Url field, enter the location of the Postgres database installation.
In the Postgres User field, enter the username used to access Postgres.
In the Postgres Password field, enter the password for the above username used to access Postgres.
Click Test Connection.
The Postgres Connection Successful message appears.NoteIf the test does not succeed, verify that Solr is running, and that the Data Catalog service user has access to the collection.Click Next step.
The Large properties storage page appears.
Enter the following details about the storage location on your cluster (typically HDFS) which is used to store the metadata information required for running Data Catalog jobs and identifying tags.
In the Large Metadata Storage Uri field, the URI is automatically detected by the installer.
If the detected URI is incorrect, enter the URI of the HDFS name node. If High Availability (HA) is enabled, this URI will be the HA URI of the HDFS service.In the Parent Path field, enter the path of the parent where you want to store the metadata. This path is typically the home directory of the Data Catalog user.
This path must be write-accessible by the Data Catalog service user. When running jobs, a .ldc_hdfs_metadata directory is created under this path.Click Test Connection.
The Connection Successful message appears.NoteIf you have not already configured the Hadoop proxy settings of the Data Catalog service user, the Test Connection might fail. Verify that the client configuration has been propagated to the entire cluster and that the cluster has been restarted. In addition, check the following true-distributed setups for accessibility:- For jobs involved in reading or writing to a large properties storage in an HDFS cluster, the namenodes and datanodes of that cluster need to be network-accessible from the cluster where the jobs are executed.
- If the clusters involved are configured with different Kerberos realms with no mutual trust, the jobs will fail. For such scenarios, it is best to configure the large properties storage to be a neutral accessible system, such as an S3 bucket.
Click Next step.
Ensure the following repository and roles bootstrap processes successfully complete:
- The Solr schema is created.
- The Postgres schema is created.
- The Roles, Job sequences, and Built-in tags are bootstrapped.
When the process finishes, click Next step.
The Authentication method page appears.
Next steps
Use LDAP for authentication
Perform the following steps to configure Data Catalog to use LDAP to validate users who log in to the web application:
Procedure
In Authentication Type, select LDAP.
For LDAP Auth Mode, select the authentication mode.
See LDAP search modes for details.For LDAP Url, enter the URL for the authentication type.
For Auth Identity Pattern, enter the identity pattern for the authentication.
The pattern must contain the username literal that will replace the actual user ID.For Lumada Data Catalog Administrator, enter a user as the administrator who manages the Data Catalog.
As a best practice, enter ldcuser. However, you can enter a different name here now or later. This user is granted with a Data Catalog Administrator role, which is configured to have access to all data sources and tag domains. Use this login to add additional users and to continue configuration tasks. See Role-based access control (RBAC) for information.For Test Authentication, enter the user credentials of the administrator in the Username and Password fields.
Click Test Login.
The Login successful message appears.Click Next step.
The LDC Metadata Server details page appears.
Next steps
Use SSH for authentication
Perform the following steps to configure Data Catalog to use SSH to validate users who log in to the web application:
Procedure
In Authentication Type, select SSH.
For SSH Host, enter the host to connect to for SSH authentication.
For SSH Port, enter the standard SSH port 22 or another port if configured separately.
For Host Fingerprint, enter the SHA256 sum of the RSA host key used to verify the host.
This field is automatically filled if Detect is used.For Lumada Data Catalog Administrator, enter a user as the administrator who manages the Data Catalog.
As a best practice, enter ldcuser. However, you can enter a different name here now or later. This user is granted with a Data Catalog Administrator role, which is configured to have access to all data sources and tag domains. Use this login to add additional users and to continue configuration tasks. See Role-based access control (RBAC) for information.For Test Authentication, enter the user credentials of the administrator in the Username and Password fields.
Click Test Login.
The Login successful message appears.Click Next step.
The LDC Metadata Server details page appears.
Next steps
Use Kerberos for authentication
Perform the following steps to configure Data Catalog to use Kerberos to validate users who log in to the web application:
Procedure
For Authentication Type, select KERBEROS.
For Lumada Data Catalog Administrator, enter a user as the administrator who manages the Data Catalog.
As a best practice, enter ldcuser. However, you can enter a different name here now or later. This user is granted with a Data Catalog Administrator role, which is configured to have access to all data sources and tag domains. Use this login to add additional users and to continue configuration tasks. See Role-based access control (RBAC) for information.For Test Authentication, enter the user credentials of the administrator in the Username and Password fields.
Click Test Login.
The Login successful message appears.Click Next step.
The LDC Metadata Server details page appears.
Next steps
Get the Lumada Data Catalog Metadata Server command token
Perform the following steps to initialize and register the LDC Metadata Server:
Procedure
Click the copy icon to copy the LDC Metadata Server command token from the LDC Metadata Server details page, and then save the contents locally for later use.
You need this information when installing the LDC Metadata Server.Click Next step.
The Restart page appears.Click Restart to apply the changes.
After the changes are applied, Data Catalog is ready.
The Welcome page appears.You may have to restart the Data Catalog services using a command line to make sure the changes are applied successfully:
$ bin/app-server restart. If Page not found is returned, check the setup.log file in the /var/log/ldc directory for insights into the failure.Log in with your Data Catalog administrator credentials.
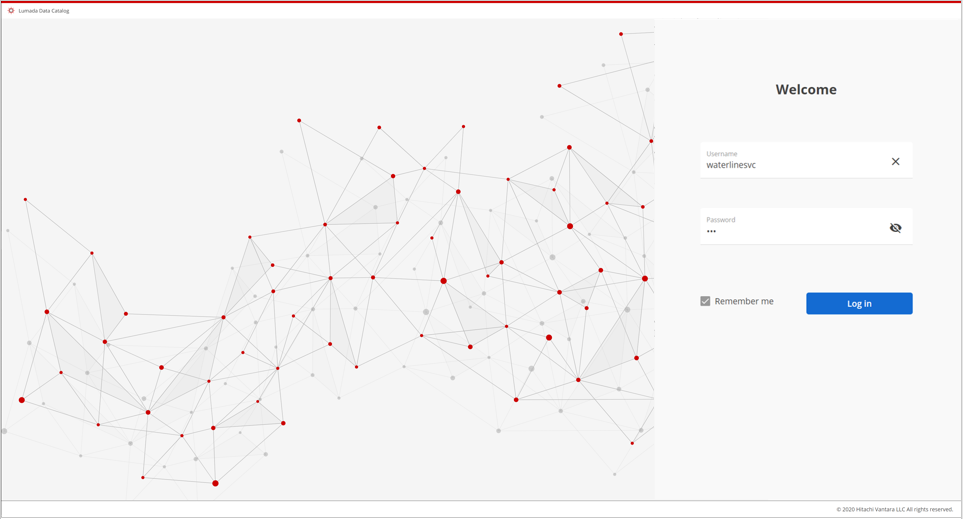
If you select the Remember me check box, Data Catalog remembers only the username of the current user. If your organization policy does not permit username retention, you can disable this feature by setting the value of the
ldc.web.login.AutoCompleteAllowed
property in <LDC App-Server>/conf/configuration.json to false.Some browsers, however, may permit the auto-fill form feature, which is outside the control of Data Catalog.
ImportantWhenever you restart the Postgres server, you must also restart the LDC Application Server, and if they are installed, the LDC Metadata Server and the LDC Agent.
Next steps
Install the Lumada Data Catalog Metadata Server
Before you begin
Follow the steps below to install the LDC Metadata Server:
Procedure
If you have the previously generated LDC Metadata Server command token, go to step 3. Otherwise, proceed to the next step.
(Optional) Retrieve the command token:
Navigate to Manage and then click Network.
Click Metadata Server and then select metadata-rest-server.
Click 1 selected, and then select Install Metadata Rest Server from the drop-down menu.
The Install Metadata Server pane appears.Click the copy icon and save the token to a location.
Click Close to close the pane.
Log off Data Catalog.
From a command line interface, run the executable file you downloaded from the Lumada and Pentaho Support Portal along with the LDC Metadata Server command token on the node where you want to install the LDC Metadata Server.
[root@docker b1318]# sudo bash ./ldc-metadata-server-6.0.1.run -- --init \
                                    --endpoint http://docker.ldc.com:8082 \
                                    --client-id metadata-rest-server \
                                    --token 270831cf-1141-4a7f-adc9-7e452b33d4d8 \
                                    --public-host docker.ldc.com \
                                    --port 4242
                                    --public-port 4242
Refer to the following list for a description of each argument:
--init
Initialize: synchronize the repository configuration from the LDC Application Server.
--endpoint
The URL of the LDC Application Server you want to connect to
--token
Authentication token
--public-host
Public host of the LDC Metadata Server to be reported to LDC Agents when they subsequently register. "Public" does not necessarily mean the internet facing public hostname/IP. It only means the hostname/IP that is routable from all the LDC Agents. If all the LDC Agents are part of a private subnet, this should be the private hostname/IP of the LDC Metadata Server host.
--port
Port on which to run
--public-port
Public port on which you may want to specify, especially in the Kubernetes environment, in addition to the (local/internal) port that the LDC Metadata Server uses to communicate with the LDC Application Server.
--cert-fingerprint
The SHA-256 fingerprint of the certificate where the endpoint argument is pointing to the LDC Application Server's SSL port, and the LDC Application Server is serving the default self-signed certificate.
--no-tls
(Optional) Instructs the LDC Metadata Server to listen on a plain HTTP socket and not on an TLS socket
Enter 1 to use Express Install.
At the prompts, complete your entries and selections:
- The name of the Lumada Data Catalog service user
- The installation location
- The log location
- Is Kerberos enabled
- The installed Solr server version
ldc.metadata.server.hostldc.metadata.server.portldc.metadata.server.isSecureldc.metadata.server.fingerprint- The relevant parameters on the LDC Metadata Server are saved in the application.yml under the conf directory.
Results
If you have errors, or if you need to change parameters after installation, you can run the following LDC Metadata Server script from a command line, instead of the full installation:
/opt/ldc/metadata-server/bin/metadata-server init \
                                               --endpoint http://docker.ldc.com:8082 \
                                               --client-id metadata-rest-server \
                                               --token 270831cf-1141-4a7f-adc9-7e452b33d4d8 \
                                               --public-host docker.ldc.com \
                                               --port 4242 \
                                               --public-port 4242 \
                                               --cert-fingerprint bb4648da8f32d63959a89e1bb0bcba5d2146b0557fb52123cb3eb73fbc8ef265
Next steps
Install Lumada Data Catalog Agents
Follow the steps below to install LDC Agents:
Procedure
Browse to Data Catalog's Welcome page at
The Welcome to Lumada Data Catalog page opens.http://<LDC node>:8082and log in with your Data Catalog administrator credentials.Navigate to Manage and then click Agents.
Click Create Agent.
The Create Agent dialog box opens.In the Name field, enter a name for the Agent, and then in the Description field, enter a description for the Agent.
Click Add.
The Register Agent dialog box appears.Click the copy icon.
From a command line interface, run the executable file you downloaded from Support portal along with the Agents command token on the cluster where you want to install LDC Agents:
[root@docker b1318]# sudo bash./ldc-agent-6.0.0.run -- --register \
                         --endpoint http://docker.ldc.com:8082 \
                         --agent-id ra1f0dfb95a22446ff \
                         --agent-token 995a72e9-0930-4514-9306-e2aade5db1fa
Refer to the following list for a description of each argument:
endpoint
"Public" URL of the LDC Application Server that is exposed to the LDC Agent. If the LDC Application Server and the LDC Agent are in the same network, this can be the private host name/IP and port of the LDC Application Server.
agent-id and agent-token
Authentication parameters for the LDC Agent to connect to the central catalog.
cert-fingerprint
SHA-256 fingerprint of the certificate served by the LDC Application Server endpoint. Note that this fingerprint can be different from the generated fingerprint if you are connecting via a reverse proxy, and you will need to substitute the correct fingerprint.
The step does the following:
- Installs the agent binaries and configuration at the specified location.
- Connects to the LDC Application Server at the specified endpoint, authenticates using the token, and registers itself.
- Fetches the LDC Metadata Server connection parameters like the host, port, TLS/SSL flag and fingerprint and connects to the LDC Metadata Server to test the connectivity.
- Opens a websocket connection to the LDC Application Server and stays connected waiting for further commands.
Enter 1 to use Express Install.
At the prompts, complete your entries and selections:
- The name of the Lumada Data Catalog service user
- The installation location
- The log location
- The Hive version
- Is Kerberos enabled
Review the summary of your selections, then enter
The installation completes. LDC Agents opens a web socket connection to the LDC Application Server, as shown by the green Registered and Connected indicators.Ywhen ready to proceed.
Install LDC Agents on each of your additional data source clusters.
The LDC Agent's connection configuration to the LDC Application Server is stored in the conf/application.yml. The Agent's connection configuration to the LDC Metadata Server is stored in the conf/meta-client-configuration.json, and is used by jobs to publish metadata to the LDC Metadata Server.
Results
/opt/ldc/agent/bin/agent register --endpoint http://b5:8082 \
                                            --agent-id ra3145b5dc2941434e \
                                            --agent-token 5e15a8dd-b995-4a4f-b3b7-2e7f9205110e
Next steps
Installation with special cases
In some cases, you may need to pause installation of the LDC Application Server to make changes before Data Catalog installation can continue. These special cases are explained in the following articles.
Use custom ports
Perform the following steps to resolve detected port conflicts during installation:
Procedure
If you have an existing version of Data Catalog running, exit the installer by pressing CtrlC.
Stop any Data Catalog services.
From a command line, execute the following code to restart the installer:
./ldc-app-server-*.run -- --no-execComplete the command-line portion of the installation, as described in Part 1: Perform command line installation.
Switch to the service user and modify the port numbers in the conf/install.properties file as shown below:
<app-server> $ vi conf/install.properties

    #============================================
    # Jetty Related configs
    #============================================

    JETTY_MEMORY_ARGS="-Xss2m -Xms512m -Xmx6144m"

    LDC_JETTY_HTTP_PORT=8082
    LDC_JETTY_HTTPS_PORT=4039
    LDC_WEB_DAEMON_PORT=4082
    LDC_SERVICE_USER=ldcuser
    LDC_LOG_DIR=/var/log/ldc
Restart services to complete the installation:
$ bin/app-server start
						--setup
Change temporary directory if not writable
Data Catalog's installer expands the archive in a temporary directory specified by the $TMPDIR environment variable. The default directory is /tmp. The installer needs write permission to the temporary directory. If the directory is not writable, change the $TMPDIR variable to a different writable directory as shown in the following example:
mkdir test
export TMPDIR=$PWD/test
./ldc-app-server-*.run
Set up Kerberos
- your cluster is NOT configured with Kerberos.
- you answered 'Y'(es) to the Is Kerberos enabled? field during the installation process and supplied the Keytab file name with full path and principle details during installation.
If your cluster is configured with Kerberos and you need to set up Kerberos for Data Catalog, perform the following steps:
Procedure
Create a conf/keytab.properties file with the following contents:
keyTabPath=/home/ldc/ldcuser.keytab
principal=ldcuser@CORP.ACME.COM
See the following list for a description of each argument:
keyTabPath
Specifies the full file system path to the keytab, for example, /home/ldc/ldcuser.keytab. This path must be readable by the Data Catalog service user.
principalSpecifies the full service principal of the service user, for example, ldcuser@CORP.ACME.COM.
Get a ticket using kinit.
Link core-site.xml, hds-site.xml, and hive-site.xml into the LDC Application Server's conf/ directory.
You can typically find these files under the /etc/ path. If you cannot find the files here, then locate them using the following commands and use the discovered path:.
$ ln -s /etc/hadoop/conf/core-site.xml /opt/ldc/app-server/conf/
$ ln -s /etc/hadoop/conf/hdfs-site.xml /opt/ldc/app-server/conf/
$ ln -s /etc/hive/conf/hive-site.xml /opt/ldc/app-server/conf/
Use the following command to restart the LDC Application Server in setup mode:
/opt/ldc/app-server/bin/app-server restart
						--setup
.
Next steps
For LDC Agents installation, confirm the following:
- LDC Agents has a valid ticket when adding data sources and running jobs.
- The keytab.properties in the
agent/conf directory has the contents similar to
those shown below:
keyTabPath=/home/ldc/ldcuser.keytab
principal=ldcuser@CORP.ACME.COM
If this file does not exist, then create it. Make sure this keytab file is readable for the LDC Agents service user.