Installing Lumada Data Catalog on Amazon EMR

You can use Amazon EMR as the computation platform for Lumada Data Catalog. As with any other platform, the catalog can contain resources from S3 buckets, HDFS file systems, Hive databases, and other relational databases.
System requirements
Data Catalog supports the following configuration on Amazon EMR:
| Distribution | Components | Versions | Notes |
| AWS | EMR | 5.30.1 | |
| Apache SparkTM | 2.4.5 | ||
| Solr | 8.4.1 | Installed separately | |
| HDFS | 2.8.5 | ||
| HIVE | 2.3.6 | ||
| Postgres | 11.9 | Installed separately | |
| Atlas | NA |
Sizing estimates
If you plan to install Data Catalog and Solr on the same node, the node should have at least 64 GB RAM. This corresponds to an EC2 m5.2xlarge instance. Alternatively, configure Data Catalog and Solr on separate nodes in the same cluster.
Launching the Amazon EMR instance
Depending on the volume of data you intend to process, you can include as few as one master node and one compute node in your cluster. If you choose to use spot pricing, be sure to give yourself room for surge pricing so you don't lose your instances unexpectedly. Also, make sure to instantiate the cluster in the same region as your S3 bucket data.
Preparation
Before installing the Data Catalog packages, make sure you have read and followed the pre-installation validations for your environment, specifically:
- Validate access to Hadoop components through the browser for storage of Data Catalog's computed "fingerprints."
- Configure the Data Catalog service user
- Provide the user running the installer root access through sudo.
Downloading and installing Solr
Refer to Installing standalone Solr document for instructions on installing Solr in SolrCloud mode for EMR.
Downloading and installing Postgres
Data Catalog highly recommends installing the complementary Postgres package provided by Data Catalog.
Download the Postgres package and follow the on-screen installation instructions.
Downloading the Data Catalog packages
If you have not already done so, download the Data Catalog distribution from the location provided by Data Catalog and upload it to the AWS node you are using to run Data Catalog (master node). If your organization has subscribed to support, you can find the location through the Hitachi Vantara Lumada and Pentaho Support Portal.
Obtain access to the following three installers. Note that X is the specific version that you want to install.
- ldc-app-server-X.run
- ldc-metadata-server-X.run
- ldc-agent-X.run
To optimize your setup, install the components in the following order:
- LDC Application Server
- LDC Metadata Server
- LDC Agent
Before installing the Data Catalog packages, make sure you have configured the service user by following the steps in Configure the Data Catalog service user. Then, as the Data Catalog service user, extract the installer from the tar package.
The following installation is a generic installation on a non-Kerberized environment. For environment-specific installations, refer to those sections in the Installation articles.
If you are installing in a Kerberized environment, see the Installation with Special Cases.
Install the LDC Application Server
Procedure
Execute the following command::
./ldc-app-server-*.runThe following text displays in the Terminal window:Verifying archive integrity... 100% MD5 checksums are OK. All good. Uncompressing Lumada Data Catalog App Server Installer 100% This program installs Data Catalog Application Server. Press ^C at any time to quit. #~~~~~~~~~~~~~~~~~~~~~~~~~~~~~~~~~~~~~~~~~~~~~~~~~~~~~~~~~~~~ LUMADA DATA CATALOG APPLICATION SERVER INSTALLER #~~~~~~~~~~~~~~~~~~~~~~~~~~~~~~~~~~~~~~~~~~~~~~~~~~~~~~~~~~~~ Enter the name of the Data Catalog service user [ldcuser]: wlddev Enter install location [/opt/ldc] : Enter log location [/var/log/ldc] : #~~~~~~~~~~~~~~~~~~~~~~~ SELECTION SUMMARY #~~~~~~~~~~~~~~~~~~~~~~~ Data Catalog service user : wlddev Install location : /opt/ldc (will be created) Log location : /var/log/ldc (will be created) Proceed? [Y/n]: [sudo] password for wlddev: Created directory /opt/ldc Created directory /opt/ldc/app-server Created directory /var/log/ldc Copying files ... done. Installed app-server to /opt/ldc/app-server Starting services ............ done.Open a browser window, then navigate to the
The browser opens the Welcome to Lumada Data Catalog page.setuplink at http://<ldc node>:8082/setup.Click Let's Get Started. The setup wizard opens.
The End User License Agreement page appears.Read the license terms and conditions and select the check box to accept the license agreement. Click I agree.
The Connect with Solr page appears.On the Connect with Solr page, enter the following fields and settings to set up the Data Catalog Solr collection repository:
In Solr Client Mode, choose the client mode corresponding to your Solr installation.
For EMR, a best practice is to use Cloud mode.
Use the same values that you configured in Installing Solr and create a collection.
In the Solr Server Url field, enter the URL of Solr server.
Review the Solr connection URL to ensure it matches the location of the Solr server. The default is the same node where Data Catalog is installed.In the Solr Zookeeper Ensemble field, enter the ZooKeeper ensemble.
In the Lumada Data Catalog Collection Name field, enter the Solr collection name as defined in the previous Solr steps.
In Solr Authentication Mode, select an authentication mode: None, Basic, or Kerberos.
Click Test Connection.
The Connection Successful message appears.If the test fails, make sure that Solr is running and that the Data Catalog service user has access to the collection.
Click Next step.
Enter the following fields and settings to set up the Postgres database, which is used for audit logs and discussions:
In the Postgres Driver Class field, enter the class used to communicate with the Postgres database.
In the Url field, enter the location of the Postgres database installation.
In the Postgres User field, enter the username used to access Postgres.
In the Postgres Password field, enter the password for the above username used to access Postgres.
Click Test Connection.
The Postgres Connection Successful! message appears.If the test fails, make sure that Solr is running and that the Data Catalog service user has access to the collection.
Click Next step.
Enter the following fields for the location in your cluster, which are typically HDFS. These fields are used to store metadata information required for running jobs and identifying tags.
In the Large Metadata Storage Uri field, enter the fully-qualified URI location to store intermediate metadata for Lumada Data Catalog processing jobs.
This URI will be automatically detected by the installer. However, if incorrect, enter the URI of the HDFS name node. If HA is enabled, this value is the HA URI of the HDFS service.Set the storage location URI if different than the local HDFS. For example, this location could be an S3 bucket.
In the Parent Path field, enter the path of the parent where you want to store the metadata, which is typically the home directory of the Data Catalog service user.
This path must be write-accessible by the Data Catalog service user. Subsequently, when running jobs, a directory named .ldc_hdfs_metadata is created under this path.Click Test Connection.
The Connection Successful message appears.If you have not already configured the Hadoop proxy settings of the Data Catalog service user, the Test Connection might fail. Follow these steps and make sure the client configuration is applied to the entire cluster and that the cluster has been restarted.
Click Next step.
Data Catalog begins the repository and roles bootstrap process. Make sure that the Solr schema has been created, the Postgres schema has been created and roles, job sequences and built-in tags are bootstrapped successfully. You should only have to create the Solr collection creation once.
When all processes are complete and display a checkmark, click Next step to continue.
The Authentication method page appears.Select and configure your user authentication scheme.
Select the authentication method that allows Data Catalog to validate users who log in to the web application.For EMR instances, a best practice is an LDAP server. The following steps are for using LDAP authentication to validate the users logging into Data Catalog.
In Authentication type, select the authentication type. For LDAP enter the following fields.
In LDAP Auth Mode, select an authentication mode: bind-only, bind-search, or search-bind.
See LDAP search modes for more information.In the LDAP Url field, enter the URL for the authentication type.
The default entry is a free, third-party LDAP provider. The URL begins with ldap://. If you are using a secure connection to the server, the URL begins with ldaps://. The standard LDAP server port is 389 and 636 for SSL.In the Auth Identity Pattern field, enter the identity pattern for the authentication.
The pattern must contain the username that will replace the actual user ID.
This string must include the phrase "
uid={USERNAME}" and can include other LDAP configuration parameters such as to specify users and groups. You can add a search root to the URL to restrict user identity searches to only a part of the LDAP directory.For example, "
uid={USERNAME},dc=subsidiary,dc=com"In the Lumada Data Catalog Administrator field, enter a user as the administrator who will manage the Data Catalog.
It is recommended to enterldcuser. However, you can enter a different name here. This user is granted the Data Catalog administrator role, which is configured for access to all data sources and tag domains.Use this login to add additional users and continue configuration tasks.
In Test Authentication, enter the user credentials of the administrator in the Username and Password fields.
Click Test Login.
The Login Successful message appears.Click Next step.
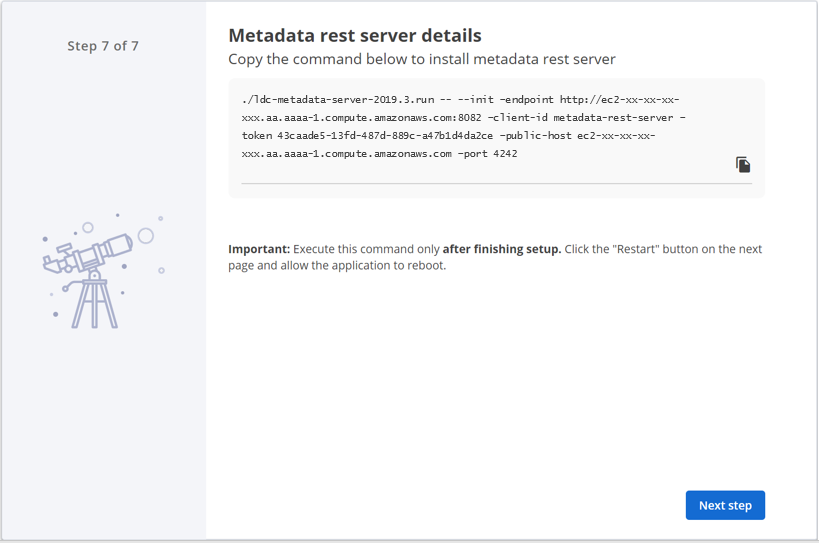
On the last step of the setup wizard, copy the Metadata Server installation command from the Metadata REST server details page, but do not execute it yet. Then click Next step.
You need this information when installing the LDC Metadata Server. The LDC Application Server installation automatically creates the token for the LDC Metadata Server, which is used for initializing and registering the Metadata Server with the Application Server.
 NoteThe same Metadata Server token is available in the user interface after restarting the Application Server. Select Install Metadata Rest Server, under and select Install Metadata Rest Server.The Restart page appears.
Click Restart to apply the changes.
You may have to restart the Data Catalog services through the command line to make sure the changes are applied successfully. After the changes are applied, Data Catalog is ready.The Welcome page appears.
Next steps
Install the LDC Metadata Server
Perform the following steps to install the Metadata Server:
Procedure
Restart the Application Server.
Execute the following command on the node where you want to install the Metadata Server.
./ldc-metadata-server-*.run -- --init --endpoint proton:8082 \
--client-id metadata-rest-server \
--token 4236cea0-93ad-416d-9b38-919392ac6059 \
--public-host proton \
--port 4242
Refer to the following list for a description of each argument:
--init
Initialize: synchronize the repository configuration from the LDC Application Server.
--endpoint
The URL of the LDC Application Server you want to connect to.
--token
Authentication token.
--public-host
Public host of the LDC Metadata Server to be reported to the LDC Agent when it subsequently registers. "Public" does not necessarily mean the internet facing public hostname/IP. It only means the hostname/IP that is routable from all the LDC Agent. If all the LDC Agents are part of a private subnet, then enter the private hostname/IP of the LDC Metadata Server host.
--port
Port on which to run.
The following text displays in the Terminal window:
Verifying archive integrity...  100%   All good.
Uncompressing Lumada Data Catalog Metadata Server Installer  100%


This program installs Lumada Data Catalog Metadata Server.

Press ^C at any time to quit.

~~~~~~~~~~~~~~~~~~~~~~~~~~~~~~~~~~~~~~~~~~~~~~~~~~~~~~~~~~~~
               LUMADA DATA CATALOG METADATA SERVER INSTALLER
~~~~~~~~~~~~~~~~~~~~~~~~~~~~~~~~~~~~~~~~~~~~~~~~~~~~~~~~~~~~
    1. Express Install          (Requires superuser access)
    2. Upgrade
    3. Exit

Enter your choice [1-3]: 1
Enter the name of the Lumada Data Catalog service user [ldcuser]:
Enter install location [/opt/ldc] :
Enter log location [/var/log/ldc] :
Enter the Solr server version [8.4.1]:
Is Kerberos enabled? [y/N]: y
Full path to Lumada Data Catalog service user keytab : /home/ldcuser/ldcuser.keytab
Lumada Data Catalog service user's fully qualified principal : ldcuser@HITACHIVANTARA.COM
~~~~~~~~~~~~~~~~~~~~~~~
   SELECTION SUMMARY
~~~~~~~~~~~~~~~~~~~~~~~
Lumada Data Catalog service user : ldcuser
                Install location : /opt/ldc
                    Log location : /var/log/ldc
                Kerberos enabled : true
            Kerberos keytab path : /home/ldcuser/ldcuser.keytab
              Kerberos principal : ldcuser@HITACHIVANTARA.COM
             Solr server version : 7.5.0
Proceed? [Y/n]: y
Removed existing directory /opt/ldc/metadata-server
Directory /opt/ldc exists.
Created directory /opt/ldc/metadata-server
Directory /var/log/ldc exists.
Copying files ... done.

Installed metadata-server to /opt/ldc/metadata-server
Generating certificate ...
SLF4J: Class path contains multiple SLF4J providers.
SLF4J: Found provider [org.slf4j.simple.SimpleServiceProvider@38af3868]
SLF4J: Found provider [org.apache.logging.slf4j.SLF4JServiceProvider@77459877]
SLF4J: See http://www.slf4j.org/codes.html#multiple_bindings for an explanation.
SLF4J: Actual provider is of type [org.slf4j.simple.SimpleServiceProvider@38af3868]
[main] INFO com.hitachivantara.cli.WldSSLCertificateGenerator - Absolute path for keystore is : /opt/ldc/metadata-server/conf/keystore
[main] INFO com.hitachivantara.utils.WldSSLUtility - SSL certificate successfully generated. Storing certificate in keystore
[main] INFO com.hitachivantara.utils.WldSSLUtility - SSL certificate successfully stored in keystore
        Certificate fingerprint (SHA-256): 28baed0ff68461d6079e8faccb7132d835abb1f66589b2c6d11dcbd313c69f12
Executing command: "/opt/ldc/metadata-server/bin/metadata-server" init --endpoint http://ec2-xx-xxx-xx-xx.aa-aaaa-1.compute.amazonaws.com:8082 --client-id metadata-rest-server --token d60766a6-7c5c-49e5-b86e-dd759fd640eb --public-host ec2-xx-xxx-xx-xx.aa-aaaa-1.compute.amazonaws.com --port 4242 --no-exec false
Initializing application
done.
removed ‘/tmp/tmp.UqOj0eBmhY’
Next steps
Install LDC Agent
Procedure
In Lumada Data Catalog, navigate to .
The Agents page opens.Click Create Agent.
The Create Agent dialog box opens.Enter a name and description for the Agent in the Name and Description fields, then click Add.
The Register Agent dialog box opens.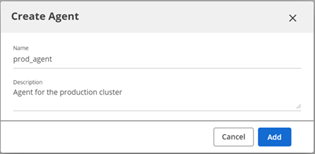
Copy the command generated in the Register Agent dialog box.
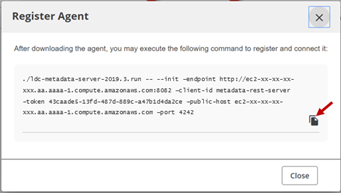
Run the copied command to install the LDC Agent as follows:
./ldc-agent-*.run -- --register --endpoint http://ec2-xx-xxx-xx-xx.aa-aaaa-1.compute.amazonaws.com:8082 --agent-id ra8be27f45bd764a58 --agent-token d9417b45-2cd9-401b-927c-4d5c4912c614The following text displays in the Terminal window:
Verifying archive integrity...  100%   All good.
Uncompressing Lumada Data Catalog Agent Installer  100%


This program installs Lumada Data Catalog Agent.

Press ^C at any time to quit.

~~~~~~~~~~~~~~~~~~~~~~~~~~~~~~~~~~~~~~~~~~~~~~~~~~~~~~~~~~~~
               LUMADA DATA CATALOG AGENT INSTALLER
~~~~~~~~~~~~~~~~~~~~~~~~~~~~~~~~~~~~~~~~~~~~~~~~~~~~~~~~~~~~
    1. Express Install          (Requires superuser access)
    2. Upgrade
    3. Exit

Enter your choice [1-3]: 1
Enter the name of the Lumada Data Catalog service user [ldcuser]:
Enter install location [/opt/ldc] :
Enter log location [/var/log/ldc] :
Enter HIVE version [3.1.2]: 2.1.1
Is Kerberos enabled? [y/N]: n
~~~~~~~~~~~~~~~~~~~~~~~
   SELECTION SUMMARY
~~~~~~~~~~~~~~~~~~~~~~~
Lumada Data Catalog service user : ldcuser
                Install location : /opt/ldc
                    Log location : /var/log/ldc
                Kerberos enabled : false
Proceed? [Y/n]:
Directory /opt/ldc exists.
Created directory /opt/ldc/agent
Directory /var/log/ldc exists.
Copying files ... done.

Installed agent to /opt/ldc/agent
Executing command: "/opt/ldc/agent/bin/agent" register --endpoint http://ec2-xx-xxx-xx-xx.aa-aaaa-1.compute.amazonaws.com:8082 --agent-token d9417b45-2cd9-401b-927c-4d5c4912c614 --agent-id ra8be27f45bd764a58 --no-exec false
Registering agent
done.
The installation then continues in the browser at the public IP address for the node where Data Catalog was installed:
http://<public_ip_address>:8082/setupNoteDo not log on to a fresh installation without running the Lumada Data Catalog installer setup process first.
Next steps
Final EMR setup
After installation and before defining any S3 data sources, add the required JARs to the classpath and restart the LDC Application Server.
If you are running on the EMR node itself, create links to the existing JARs in the Application Server's ext/ directory using the following commands:
$ ln -s /usr/share/aws/aws-java-sdk/aws-java-sdk-core-1.11.xxx.jar /opt/ldc/app-server/ext/
$ ln -s /usr/share/aws/aws-java-sdk/aws-java-sdk-s3-1.11.xxx.jar /opt/ldc/app-server/ext/
(Optional) If running on a non-EMR EC2 instance, or plain non-hadoop VM, download the JARs from Maven using the following commands:
$ wget https://repo1.maven.org/maven2/com/amazonaws/aws-java-sdk-core/1.11.221/aws-java-sdk-core-1.11.221.jar -P /opt/ldc/app-server/ext/
$ wget https://repo1.maven.org/maven2/com/amazonaws/aws-java-sdk-s3/1.11.221/aws-java-sdk-s3-1.11.221.jar -P /opt/ldc/app-server/ext/
If running on a non-EMR EC2 instance, in addition to the above files, you must remove the following JARs from the specified locations using the following commands:
<Agent Dir> $ rm lib/dependencies/httpclient-4.5.10.jar
<Agent Dir> $ rm lib/dependencies/httpcore-4.4.12.jar
<Agent Dir> $ rm lib/dependencies/joda-time-2.2.jar
<Agent Dir> $ rm lib/ldc ldc-execution-bigquery-2019.3.jar
Download the hadoop-aws JAR file needed for the S3A file scheme into the Application Servers ext/ directory using the following command:
The S3A file scheme requires this command to work.$ wget https://repo1.maven.org/maven2/org/apache/hadoop/hadoop-aws/2.9.2/hadoop-aws-2.9.2.jar -P /opt/ldc/app-server/extRestart the Application Server using the following command:
$ <LDC-HOME>/app-server/bin/app-server restartCheck the version of the installed JARs using the following command:
$ ls /usr/share/aws/emr/emrfs/lib/Use the version number variable from the output of the previous command and link the JARs that the LDC Agent needs to access for HDFS and Spark using the following commands:
$ ln -s /usr/share/aws/emr/emrfs/lib/emrfs-hadoop-assembly-<version>.jar
      <LDC-HOME>/agent/ext/
$ ln -s /usr/lib/hadoop-lzo/lib/hadoop-lzo.jar <LDC-HOME>/agent/ext/In the ldc script in the
<Agent Dir>/bindirectory, make the following changes:Update the
SPARK_HIVE_SITE_PATHvalue to point to /etc/spark/conf/hive-site.xmlIn the following block, change
$DEFAULT_HIVE_SITE_PATHto$DEFAULT_SPARK_SITE_PATHin the following code:
$PROFILE)
        shift
    buildJarList
     reorder "$@"
      FILES="${FILES},$DEFAULT_HIVE_SITE_PATH"
Restart Agent using the following command:
$ <LDC-HOME>/agent/bin/agent restartIf your EMR version is less than version 5.6, move the following Hive Server 2 JDBC driver into the Data Catalog installation using the following commands:
$ ln -s /usr/lib/hive/lib/hive-exec.jar <LDC-HOME>/agent/ext/
$ ln -s /usr/lib/hive/lib/hive-service.jar <LDC-HOME>/agent/ext/
$ ln -s /usr/lib/hive/lib/hive-jdbc.jar <LDC-HOME>/agent/ext/
Restart the HiveServer2.
Build your Lumada Data Catalog
Now that Data Catalog is installed and running, connect to the data you want to include in the catalog. For information on creating a data source, see Manage data sources.
- Make sure that the HDFS connection URL reflects s3://
- Note the difference between the HDFS URL (s3a://) and Agent Local URL (s3://)