Connecting to Virtual File Systems

You can connect to most of your Virtual File Systems (VFS) through VFS connections in PDI. A VFS connection is a stored set of VFS properties that you can use to connect to a specific file system. In PDI, you can add a VFS connection and then reference that connection whenever you want to access files or folders on your Virtual File System. For example, you can use the VFS connection for Hitachi Content Platform (HCP) in any of the HCP transformation steps without the need to repeatedly enter your credentialing information for data access.
With a VFS connection, you can set your VFS properties with a single instance that can be used multiple times. The VFS connection supports the following file system types:
Google Cloud Storage
The Google Cloud Storage file system. See Google Cloud Storage for more information on this protocol.
Snowflake Staging
A staging area used by Snowflake to load files. See Snowflake staging area for more information on this protocol.
Amazon S3 / MinIO
- Simple Storage Service (S3) accesses the resources on Amazon Web Services. See Working with AWS Credentials for Amazon S3 setup instructions.
- MinIO accesses data objects on an Amazon compatible storage server. See the MinIO Quickstart Guide for MinIO setup instructions.
HCP
The Hitachi Content Platform. You must configure HCP and PDI before accessing the platform. See Access to HCP for more information.
Catalog
The Lumada Data Catalog. You must configure PDI before accessing Data Catalog or its resources. See Access to Lumada Data Catalog for more information.
After you create a VFS connection, you can use it with PDI steps and entries that support the use of VFS connections. The VFS connection is saved in the repository. If you are not connected to a repository, the connection is saved locally on the machine where it was created.
If a VFS connection in PDI is not available for your Virtual File System, you may be able to access it with the VFS browser. See VFS browser for further details.
Before you begin
You must first perform a few setup tasks if you need to access the Google Cloud, the Hitachi Content Platform (HCP), or the Lumada Data Catalog.
Access to Google Cloud
Perform the following steps to set up your system to use Google Cloud storage:
Procedure
Download the service account credentials file that you have created using the Google API Console to your local machine.
Create a new system environmental variable on your operating system named GOOGLE_APPLICATION_CREDENTIALS.
Set the path to the downloaded JSON service account credentials file as the value of the GOOGLE_APPLICATION_CREDENTIALS variable.
Results
Access to HCP
Within HCP, access control lists (ACLs) grant privileges to the user to perform a variety of file operations. Namespaces, owned and managed by tenants, are used for logical groupings, access and permissions, and object metadata such as versioning, retention and shred settings. For more information about HCP, see the Introduction to Hitachi Content Platform.
Perform the following steps to setup access to HCP:
Procedure
Log on to the HCP Tenant Management Console.
Click Namespaces and then select the Name you want to configure.
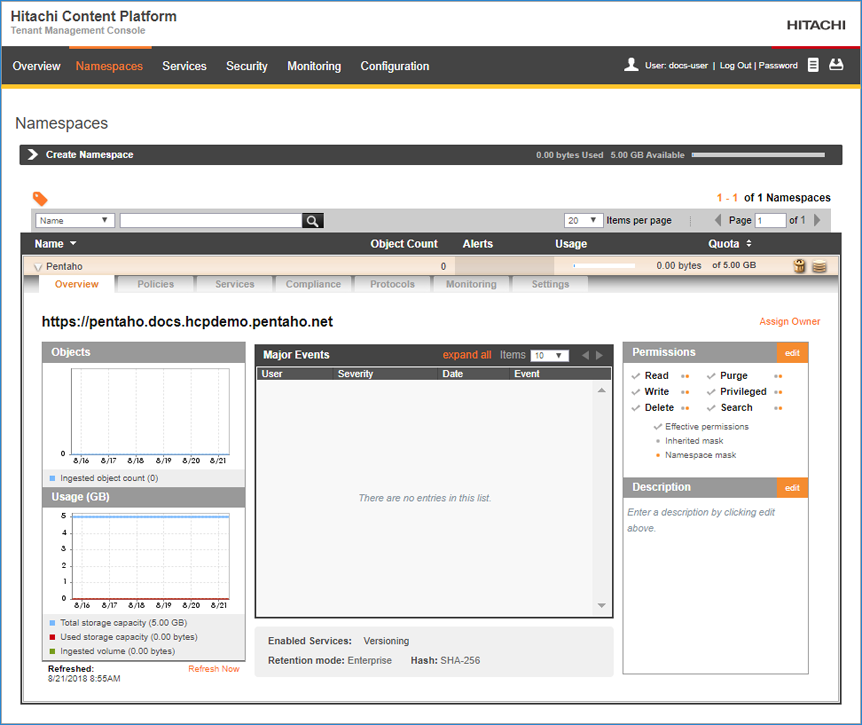
In the Protocols tab, click HTTP(S), and verify Enable HTTPS and Enable REST API with Authenticated access only are selected.
In the Settings tab, select ACLs.
Select the Enable ACLs check box and, when prompted, click Enable ACLs to confirm.
Results
Access to Lumada Data Catalog
Lumada Data Catalog has the capability of accessing and registering data stored either on Amazon, MinIO, or HDFS. Multiple connections in PDI are required to access Data Catalog and the resources that it manages:
- To access Data Catalog, you will need to know the authentication type used, instance URL, and your account credentials.
- To access S3 resources from Data Catalog, see Create a VFS connection.
- To access HDFS resources from Data Catalog, see Connecting to a Hadoop cluster with the PDI client.
Create a VFS connection
Procedure
Start the PDI client (Spoon) and create a new transformation or job.
In the View tab of the Explorer pane, right-click on the VFS Connections folder, and then click New.
The New VFS connection dialog box opens.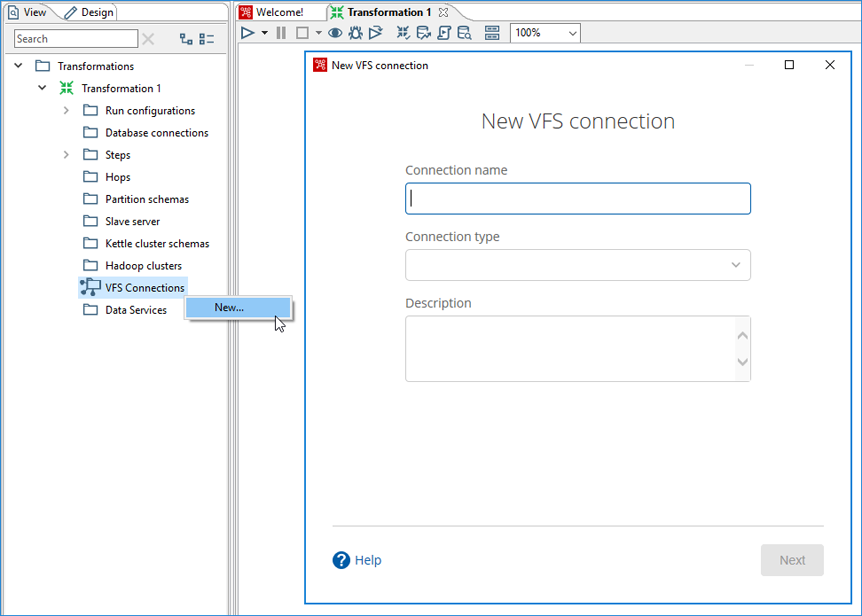
In the Connection name field, enter a name that uniquely describes this connection.
The name can contain spaces, but it cannot include special characters, such as#,$, and%.In the Connection type field, select from one of the following types:
Google Cloud Storage:
The Google Cloud Storage file system. See Google Cloud Storage for more information on this protocol.
Snowflake Staging:
A staging area used by Snowflake to load files. See Snowflake staging area for more information on this protocol.
Amazon S3 / MinIO:
- Simple Storage Service (S3) accesses the resources on Amazon Web Services. See Working with AWS Credentials for Amazon S3 setup instructions.
- MinIO accesses data objects on an Amazon compatible storage server. See the MinIO Quickstart Guide for MinIO setup instructions.
HCP:
The Hitachi Content Platform. You must configure HCP and PDI before accessing the platform. You must also configure object versioning in HCP Namespaces. See Access to HCP for more information.
Catalog:
The Lumada Data Catalog. You must configure your Data Catalog connection before accessing the platform. Enter the authentication type, connection URL and account credentials. To access data resources from Data Catalog, an S3 or HDFS connection is also required. See Access to Lumada Data Catalog for details.
(Optional) Enter a description for your connection in the Description field.
Click Next.
On the Connection Details page, enter the information according to your selected Connection type. Select one of the following options if you selected Amazon S3 / MinIO on the previous page:
- For Amazon: Select the Default S3 connection check box to enable use of Amazon S3.
- For MinIO: Select the Default S3 connection check box to enable use of MinIO. Also, select the PathStyle Access check box to enable path-style access. Otherwise, S3 bucket-style access is used.
(Optional) Click Test to verify your connection.
Click Next to view the connection summary, then Finish to complete the setup.
Results
Edit a VFS connection
Procedure
Right-click the VFS Connections folder and select Edit.
When the Edit VFS Connection dialog box opens, select the Pencil icon next to the section you want to edit.
Delete a VFS connection
Procedure
Right-click the VFS Connections folder.
Select Delete, then Yes, Delete.
Results
Access files with a VFS connection
Follow these instructions to access files with the VFS Open or Save dialog box in the PDI client.
Procedure
In the PDI client, select to open a file or to save a file.
The VFS Open or Save dialog box opens, as shown in the following example: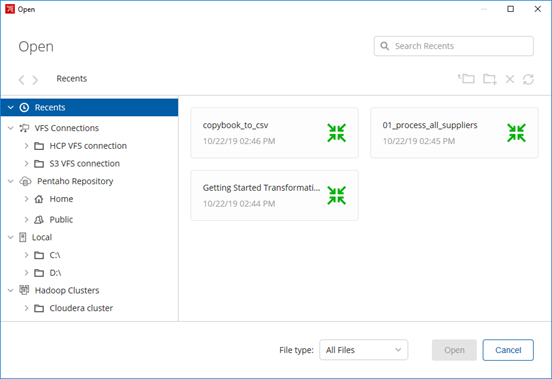
Recently accessed files appear in the right panel.
Navigate to your folders and files through the VFS connection category in the left panel.
When you select a folder or file, the Recents drop-down list updates to show the navigation path to your file location.(Optional) Click on the navigation path to show and copy the Pentaho file path, even if it is a Virtual File System (VFS) path. See Pentaho address to a VFS connection for details on the Pentaho file path for the Virtual File System.
Perform one of the following actions:
- Double-click on the file.
- Select it and press the Enter key.
- Select it and click Open or Save depending of whether you are opening or saving a file.
Results
Pentaho address to a VFS connection
The Pentaho address is the Pentaho virtual file system
(pvfs) location within your VFS connection. When you are locating a
file under the VFS connection category in the file access dialog box, the directory path in
your Virtual File System appears in the address text box.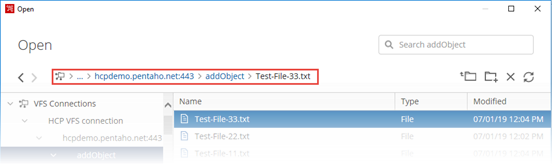
When you click in the address bar, the Pentaho address to the file appears in the text box.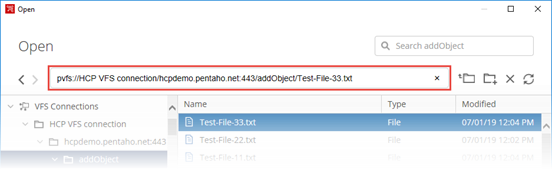
You can copy and paste a Pentaho address into file path options of PDI steps and entries that support VFS connections.
Steps and entries supporting VFS connections
You may have a transformation or a job containing a step or entry that accesses a file on a Virtual File System.
The following steps and entries support VFS connections:
- Avro Input
- Avro Output
- Bulk load from MySQL into file
- Bulk load into MSSQL
- Bulk load into MySQL
- Catalog Input
- Catalog Output
- Copybook Input
- CSV File Input
- De-serialize from file
- Fixed file input
- Get data from XML
- Get File Names
- Get Files Rows Count
- Get SubFolder names
- Google Analytics
- GZIP CSV Input
- Job (job entry)
- JSON Input
- JSON output
- ORC Input
- ORC Output
- Parquet Input
- Parquet Output
- Query HCP
- Read Metadata
- Read metadata from Copybook
- Read metadata from HCP
- Text File Output
- Transformation (job entry)
- Write Metadata
- Write metadata to HCP
VFS browser
In some transformation steps and job entries, a Virtual File System (VFS) browser is used in place of VFS connections and the Open dialog box. When you use the VFS browser, specify a VFS URL instead of the VFS connection. The files are accessed using HTTP and the URLs contain schema data that identify a protocol to use. Your files can be local or remote, and can reside in compressed formats such as TAR and ZIP. For more information, see the Apache Commons VFS documentation.
Before you begin
If you need to access a Google Drive or the Hitachi Content Platform (HCP), you must perform a few setup tasks.
Access to a Google Drive
Procedure
Follow the "Step 1" procedure in the article "Build your first Drive app (Java)" in the Google Drive APIs documentation.
This procedure turns on the Google Drive API and creates a credentials.json file.Rename the credentials.json file to client_secret.json. Copy and paste the renamed file into the data-integration/plugins/pentaho-googledrive-vfs/credentials directory.
Restart PDI.
The Google Drive option does not appear when creating a VFS connection until you copy and paste the client_secret.json file into the credentials directory and restart PDI.Log in to your Google account.
Enter you Google account credentials and log in. The Google Drive permission window displays.
Click Allow to access your Google Drive Resources.
Results
Set up HCP credentials
Perform the following steps to set up your HCP credentials.
Procedure
Depending on the operating system, create the following subdirectory in the user’s home directory:
- Linux: ~/.hcp/
- Windows: C:\Users\username\.hcp\
Create a file named credentials and save it to the \.hcp directory.
Open the credentials file then add the parameters and values shown in the following code:
[default]
hcp_username=[username]
hcp_password=[password]
accept_self_signed_certificates=false
Insert the HCP namespace username and password, and change accept_self_signed_certificates to true if you want to enable a security bypass.
NoteYou can also use obfuscated or encrypted usernames and passwords.Save and close the file.
For the Pentaho Server setup, stop and start the server.
Results
Access files with the VFS browser
Procedure
Select in the PDI client to open the VFS browser.
The Open File dialog box opens.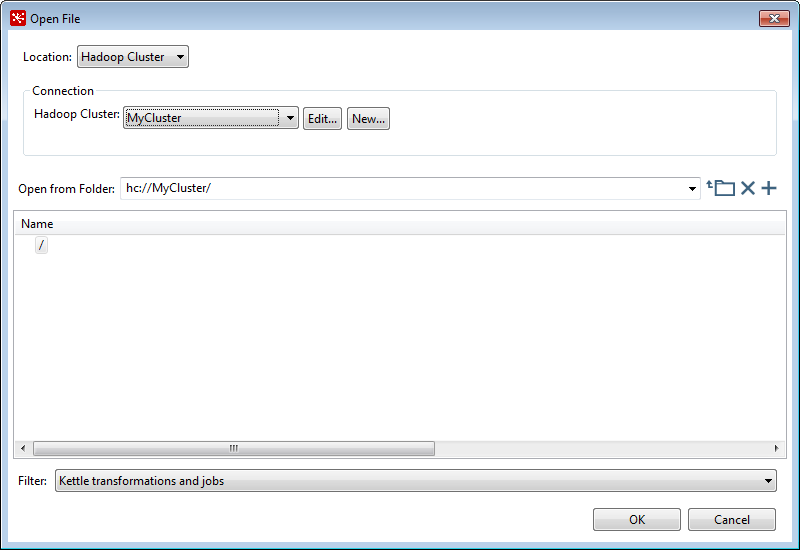
In the Location field, select the type of file system. The following file systems are supported:
- Local: Opens files on your local machine. Use the folders in the Name panel of the Open File dialog box to select a resource.
- Hadoop Cluster: Opens files on any Hadoop cluster except S3. Click the Hadoop Cluster drop-down box to select your cluster, then the resource you want to access.
- HDFS: Opens files on Hadoop distributed file systems. Select the cluster you want for the Hadoop Cluster option, then select the resource you want to access.
- Google Drive: Opens files on the Google file system. You must configure PDI to access the Google file system. See Access to a Google Drive for more information.
In the Open from Folder field, enter the VFS URL.
The following addresses are VFS URL examples for the Open from Folder field:
- Local:
ftp://userID:password@ftp.myhost.com/path_to/file.txt - HDFS:
hdfs://myusername:mypassword@mynamenode:port/path
- Local:
(Optional) Select another value in the Filter menu to filter on file types other than transformations and jobs, which is the default value.

(Optional) Select a file or folder and click the X icon in the upper-right corner of the browser to delete it.
(Optional) click the + icon in the upper-right corner of the browser to create a new folder.
Next steps
Supported steps and entries
The following steps and entries support the VFS browser:
- Amazon EMR Job Executor (introduced in v.9.0)
- Amazon Hive Job Executor (introduced in v.9.0)
- AMQP Consumer (introduced in v.9.0)
- Avro Input (introduced in v.8.3)
- Avro Output (introduced in v.8.3)
- ETL metadata injection
- File Exists (Job Entry)
- Hadoop Copy Files
- Hadoop File Input
- Hadoop File Output
- JMS Consumer (introduced in v.9.0)
- Job Executor (introduced in v.9.0)
- Kafka Consumer (introduced in v.9.0)
- Kinesis Consumer (introduced in v.9.0)
- Mapping (sub-transformation)
- MQTT Consumer (introduced in v.9.0)
- ORC Input (introduced in v.8.3)
- ORC Output (introduced in v.8.3)
- Parquet Input (introduced in v.8.3)
- Parquet Output (introduced in v.8.3)
- Oozie Job Executor (introduced in v.9.0)
- Simple Mapping (introduced in v.9.0)
- Single Threader (introduced in v.9.0)
- Sqoop Export (introduced in v.9.0)
- Sqoop Import (introduced in v.9.0)
- Transformation Executor (introduced in v.9.0)
- Weka Scoring (introduced in v.9.0)
The VFS dialog boxes are configured through specific transformation parameters. See Configure SFTP VFS for more information on configuring options for SFTP.
Configure VFS options
The VFS browser can be configured to set variables as parameters for use at runtime. A VFS Configuration Sample.ktr sample transformation containing some examples of the parameters you can set is located in the data-integration/samples/transformations directory. For more information on setting variables, see Specifying VFS properties as parameters. For an example of configuring an SFTP VFS connection, see Configure SFTP VFS.